Hi
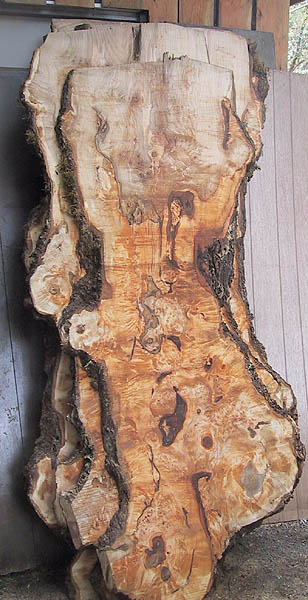
The stock is gorgeous, it looks like highly figured wood but perhaps that’s the heat effect you mention.
I can relate to this so well, my dad and I built a “deer rifle” out of an 8mm Polish mauser back when I was 16. That was back when guns were still “ok ”, the inner city types largely responsible for our rate of gun crime didn’t shoot each other just for fun or sport yet
Back then kids learned about guns from rifle club at school or from someone who cared about safety and responsibility, not from Hollywood like now. Heck, I had a bb gun and then air rifle much of my childhood and I’ve never been tempted to hijack a plane or rob anyone. I asume you and your dad would have been just as dangerous as me if you still had the barrel etc.
I’m sure your (I assume liberals ) in government will tell you that you are safer now (that is your no longer a threat).
I would assume the criminals are still just as able to get guns from the black market though.
Has this been going on long enough for them to tell if it had the intended result?
I am hoping that same intrusive “save me from what I might someday do” faction doesn’t go much further here in gunland (USA).
Anyway, my late Dad had a finishing trick too, I’ll pass on.
He found that many kinds of wood finish could be brought to a high gloss relatively easily by using simonize paste car wax. You put it on, let it dry to a powder and buff (which got warm) to gloss.
I have tried it on a couple guitars and it works great.
Best,
Tom
Awesome! Binary, I hope you can keep this thread going. I'd love to see more pics and details of the process. Maybe some pics of burl at different stages of the process? Do you guys think this method will work for typical 1/4" plywood (birch, maple, or oak), which I could get from Home Depot? I'd like to do a test run. Thanks, again, for the thread.
We now have conservatives in power and they promised to end the gun registry since all it does is waste millions/?billions? of dollars and achieve nothing.
Hopefully someone has some veneer @ home that they can run a trial on (maybe not even a burl but just a plain oak/cherry). Would that result in some type of deep piano finish?
imho it would be beautiful to have a bordeaux cherry with a deeeeep gloss to it.
Hopefully someone has some veneer @ home that they can run a trial on (maybe not even a burl but just a plain oak/cherry). Would that result in some type of deep piano finish?
imho it would be beautiful to have a bordeaux cherry with a deeeeep gloss to it.
poobah said:Right on with the drugs and alcohol...
I skipped the alcool....
dave
Gourgeous... i can only imagine what it looks like 1st hand...
Here is some burl my buddy cut...
and i imagine once this one is sliced up it could produce something interesting
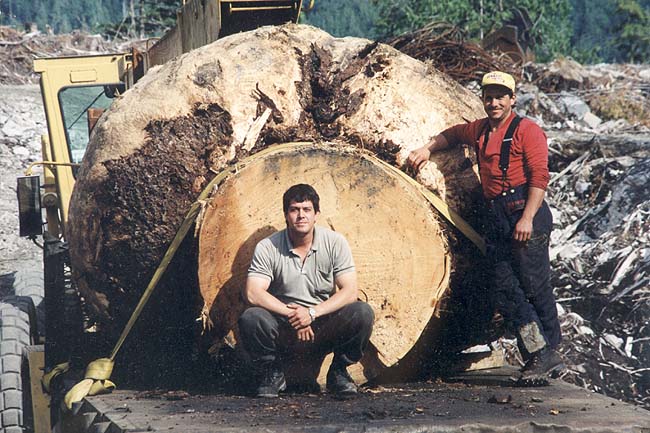
more here: http://www.urbanmilling.com/
dave
Here is some burl my buddy cut...
and i imagine once this one is sliced up it could produce something interesting
more here: http://www.urbanmilling.com/
dave
OK Guys,
This is one method for doing burl veneer work. This method ONLY applies to raw, unbacked burl. Perhaps this method could be adapted to paper backed burls as well... you're on your own there.
Tools:
Disposable brushes
Old towel
Leather gloves
Sharp knives
Common household iron... prefereably with smooth metal face
Spray bottle of water
Small bowl
Scissors maybe
Materials:
Sawn sheets of veneer (more required for newbie... you WILL destroy some)
PVA woodworkers glue (regular white (yellow) glue).
1. Raw burl is hardly flat, as the veneer is sawn from the burl it tends to relax, and literally can be as rippled as an egg crate. Lay one sheet of veneer over a hard flat surface. Spray the veneer generously with water and allow to soak in. At this time you may prefer to rough your veneer to the size of your workpiece... allow at least an inch on all sides (after practice, you can be more frugal) Put the iron on medium high and begin by gently pressing the veneer flat. Don't try to this in one stroke. It will require mutilple passes and lots more water... it is the steam that is doing the work. As you flatten the piece, try not to stretch the material as you would clothing... you are trying to compress the material if anything. In other words you don't really want your flattened piece larger than it was before you started... you want to compress all the mountains and valleys "into" themselves. Continue this process until you have a reasonably flat, not perfect, piece of material.
2. Prepare your substrate. Your substrate should be wood and sanded precisely to your desired shape. Concentrate on shape, and flatness, but not smoothness. Leave some roughness for the glue to grab... don't use finer than 60 or 80 grit paper.
3. Pour some glue in the bowl and mix with a small amount of water. You only want to slightly thin the glue. It should be just thin enough to spread very slowly with the brush.
4. With a damp towel, wet your substrate. You want to make the surface moist... not wet. Repeat with your veneer... remmber to wet the correct (back) side.
5. Using the brush, immediately coat your substrate and veneer with the glue. Apply a smooth, medium coating. Practice will teach you what "medium" means. Try to avoid pushing the glue through holes in the veneer. If you veneer has alot of holes, you can cover the "good" side with CHEAP masking tape before applying the glue... avoid powerful sticky tape... it can tear the burl apart when you try to remove it. Applying the glue will go slowly (unless you used too much water). Work in a "wave" across the material as the glue will begin to dry as you work. With the gluing complete, allow the workpieces to dry for at least 4 hours... maybe more. When dry, the glue should be clear, somewhat shiny, and not sticky to the touch.
6. Dawn your leather gloves. Place the veneer over your workpiece and balance your excess around the edges. With the iron on medium high, starting in the center, iron the veneer in position. Work slowly from the center out. Try to get the piece anchored in position, but only work one face at a time. Don't try wrapping around any curves at this point.
7. Now starting at one edge of the workpiece, use the edge of the iron and considerable pressure to set the veneer in place. Use a very, very, slow rocking motion, in an arc shape with the edge of the iron. The iron should be held nearly flat but not totally. You want to concentrate heat and pressure in a narrow stripe (arc). You want to rock, see-saw, this area of heat and pressure slowly across the workface. If you are doing a "wrap" you should start away from wrap and work towards it. The raised side of the iron should be pointing in the direction you are working. You can use your spray bottle during this process to help steam down lumps or to coerce the veneer around compounds curves etc... avoid using too much water as it sets your glue back to step 5 and you will need considerable heat and time to reset the glue. Do not proceed to a new area until all steaming stops
8. At this point you should have your veneer more or less flat and bonded to the substrate... if you have wraps... go ahead and turn the corner. You may need to rotate your workpiece, if this is the case, you may wish to trim some excess away from the edges so you accidentally break it off and leave a jagged edge. For the wraps, go slow, use water to make steam, and considerable pressure. Do not proceed onto the next flat until the wrapped area is perfect... heat, steam, and pressure and don't proceed until all the steam is gone.
9. Now check for loose spots. You can try different gloves or rags, but if you wipe or tap the surface you can clearly hear loose spots in the veneer. Using the tip of the iron fix any loose spots... apply pressure until the heat is gone... a leathered thumb or smooth hammer face will work.
10. Resist the urge to start sanding the veneer... DON'T! Trim your edges, carefully sand flush, and proceed with the veneering.
11. When you have the whole thing done, let it sit for a few days... a week would be better. Then rub and tap again checking for loose spots... fix 'em as needed. Use can use a syringe with glue at this point if you have some stubborn ones... go easy on the glue and don't pull away the heat unitl the steam is gone and the glue set hard.
12. At this point it should look fairly discouraging. You should have heat stains, a zillion arc shapes dents across the veneer etc... DON'T sand!
13. Now, putty up all your holes. Use a narrow knife, clean, and try to put putty only where you need it. Use a porous stainable wood putty.
14. SANDING... next installment
In the meantime, THIS AIN'T EASY, or cheap. Don't even think of starting on a real piece of work... practice on scraps first... more than once. Also, much of this pertains to unbacked burl only. Burl is the hardest by far... so you could try flat grained wood and find considerable ease. The advantage of burl is that it can wrapped around compound curves because it is so elastic (you compressed it in the first stage... 'member?)
Good Luck!
Oh... and if you wonder how Mercedes and Lexus do this? They have steam presses and can preform the burl under enormous heat and pressure before doing a plywood style style lay-up. They also throw alot of pieces away... which sucks when you have "books" or "butterfly" matched sets of veneer. They too use putty.
")
This is one method for doing burl veneer work. This method ONLY applies to raw, unbacked burl. Perhaps this method could be adapted to paper backed burls as well... you're on your own there.
Tools:
Disposable brushes
Old towel
Leather gloves
Sharp knives
Common household iron... prefereably with smooth metal face
Spray bottle of water
Small bowl
Scissors maybe
Materials:
Sawn sheets of veneer (more required for newbie... you WILL destroy some)
PVA woodworkers glue (regular white (yellow) glue).
1. Raw burl is hardly flat, as the veneer is sawn from the burl it tends to relax, and literally can be as rippled as an egg crate. Lay one sheet of veneer over a hard flat surface. Spray the veneer generously with water and allow to soak in. At this time you may prefer to rough your veneer to the size of your workpiece... allow at least an inch on all sides (after practice, you can be more frugal) Put the iron on medium high and begin by gently pressing the veneer flat. Don't try to this in one stroke. It will require mutilple passes and lots more water... it is the steam that is doing the work. As you flatten the piece, try not to stretch the material as you would clothing... you are trying to compress the material if anything. In other words you don't really want your flattened piece larger than it was before you started... you want to compress all the mountains and valleys "into" themselves. Continue this process until you have a reasonably flat, not perfect, piece of material.
2. Prepare your substrate. Your substrate should be wood and sanded precisely to your desired shape. Concentrate on shape, and flatness, but not smoothness. Leave some roughness for the glue to grab... don't use finer than 60 or 80 grit paper.
3. Pour some glue in the bowl and mix with a small amount of water. You only want to slightly thin the glue. It should be just thin enough to spread very slowly with the brush.
4. With a damp towel, wet your substrate. You want to make the surface moist... not wet. Repeat with your veneer... remmber to wet the correct (back) side.
5. Using the brush, immediately coat your substrate and veneer with the glue. Apply a smooth, medium coating. Practice will teach you what "medium" means. Try to avoid pushing the glue through holes in the veneer. If you veneer has alot of holes, you can cover the "good" side with CHEAP masking tape before applying the glue... avoid powerful sticky tape... it can tear the burl apart when you try to remove it. Applying the glue will go slowly (unless you used too much water). Work in a "wave" across the material as the glue will begin to dry as you work. With the gluing complete, allow the workpieces to dry for at least 4 hours... maybe more. When dry, the glue should be clear, somewhat shiny, and not sticky to the touch.
6. Dawn your leather gloves. Place the veneer over your workpiece and balance your excess around the edges. With the iron on medium high, starting in the center, iron the veneer in position. Work slowly from the center out. Try to get the piece anchored in position, but only work one face at a time. Don't try wrapping around any curves at this point.
7. Now starting at one edge of the workpiece, use the edge of the iron and considerable pressure to set the veneer in place. Use a very, very, slow rocking motion, in an arc shape with the edge of the iron. The iron should be held nearly flat but not totally. You want to concentrate heat and pressure in a narrow stripe (arc). You want to rock, see-saw, this area of heat and pressure slowly across the workface. If you are doing a "wrap" you should start away from wrap and work towards it. The raised side of the iron should be pointing in the direction you are working. You can use your spray bottle during this process to help steam down lumps or to coerce the veneer around compounds curves etc... avoid using too much water as it sets your glue back to step 5 and you will need considerable heat and time to reset the glue. Do not proceed to a new area until all steaming stops
8. At this point you should have your veneer more or less flat and bonded to the substrate... if you have wraps... go ahead and turn the corner. You may need to rotate your workpiece, if this is the case, you may wish to trim some excess away from the edges so you accidentally break it off and leave a jagged edge. For the wraps, go slow, use water to make steam, and considerable pressure. Do not proceed onto the next flat until the wrapped area is perfect... heat, steam, and pressure and don't proceed until all the steam is gone.
9. Now check for loose spots. You can try different gloves or rags, but if you wipe or tap the surface you can clearly hear loose spots in the veneer. Using the tip of the iron fix any loose spots... apply pressure until the heat is gone... a leathered thumb or smooth hammer face will work.
10. Resist the urge to start sanding the veneer... DON'T! Trim your edges, carefully sand flush, and proceed with the veneering.
11. When you have the whole thing done, let it sit for a few days... a week would be better. Then rub and tap again checking for loose spots... fix 'em as needed. Use can use a syringe with glue at this point if you have some stubborn ones... go easy on the glue and don't pull away the heat unitl the steam is gone and the glue set hard.
12. At this point it should look fairly discouraging. You should have heat stains, a zillion arc shapes dents across the veneer etc... DON'T sand!
13. Now, putty up all your holes. Use a narrow knife, clean, and try to put putty only where you need it. Use a porous stainable wood putty.
14. SANDING... next installment
In the meantime, THIS AIN'T EASY, or cheap. Don't even think of starting on a real piece of work... practice on scraps first... more than once. Also, much of this pertains to unbacked burl only. Burl is the hardest by far... so you could try flat grained wood and find considerable ease. The advantage of burl is that it can wrapped around compound curves because it is so elastic (you compressed it in the first stage... 'member?)
Good Luck!
Oh... and if you wonder how Mercedes and Lexus do this? They have steam presses and can preform the burl under enormous heat and pressure before doing a plywood style style lay-up. They also throw alot of pieces away... which sucks when you have "books" or "butterfly" matched sets of veneer. They too use putty.
planet10 said:Gourgeous... i can only imagine what it looks like 1st hand...
Here is some burl my buddy cut...
dave
Dave, that burl that you showed pix of, I have had a vision for some time that requires exactly that. How long are those pieces? What I invision is an open baffle speaker that uses raw cuts of burled planks like those.
Take the flat cut surface and drum sand to a nice finish but leave the bark on the edges. Use the linseed/tiger torch finish on the face and mount the drivers. A truly minimalist approach but with the right pieces of wood, the right finish and the right drivers it would be a visually stunning speaker. Those look like the right pieces of wood.
If I lived closer I'd be on your door step right now begging.
That monster burl is both awe inspiring and kind've bizzare. If you had a big enough lathe you could make a couple of monster horns out of it. It'd be pretty tough to beat that for bragging rights
poobah said:OK Guys,
This is one method for doing burl veneer work. This method ONLY applies to raw, unbacked burl. Perhaps this method could be adapted to paper backed burls as well... you're on your own there.
Great post Poobah,
Monday I am going to look around and see what local resources are available to buy veneers. This thread may be kind of stop and go as we gather the materials to try some of this but lets keep it alive. This is hard knowledge to come by and I certainly appreciate the time it took you to write that post, thanks
NickZ.... I think you are both right and wrong.....
boileed linseed oil is- just boiled linseed oil.
On the other hand, - some products sold today might have additives- e.g turpentine, pure tar etc. depending on specific use.
Pure boiles linseed oil is still quite commmmon overhere.
Boiled linseed oil was commonly used for boats, and house paint in my area. Even today, linseed oil is commonly used on woodeen boats............
Contrary to boiled, raw linseed oil hadly dries and stays rather soft and flexible.
Dave- how much does it cost to ship somme of them burl boards over to Norway??
ezkcdude said:Awesome! Binary, I hope you can keep this thread going. I'd love to see more pics and details of the process. Maybe some pics of burl at different stages of the process? Do you guys think this method will work for typical 1/4" plywood (birch, maple, or oak), which I could get from Home Depot? I'd like to do a test run. Thanks, again, for the thread.
Thanks, we all need to contribute to keep something like this going.
I have no idea if it will work on plywood. I have some oak plywood but I need to come up with a way to heat the linseed. Starting Monday I am going to start playing with all of these ideas.
Poobah is a great resource, lets milk him dry
AuroraB said:NickZ.... I think you are both right and wrong.....
boileed linseed oil is- just boiled linseed oil.
Boiled linseed oil was commonly used for boats, and house paint in my area. Even today, linseed oil is commonly used on woodeen boats............
Contrary to boiled, raw linseed oil hadly dries and stays rather soft and flexible.
Dave- how much does it cost to ship somme of them burl boards over to Norway??
That is where/why my family probably first incountered linseed oil Aurora. My family history is carpenters and fisherman from Nova Scotia. A Nova Scotian fisherman was a carpenter to some degree as most all were boat builders or at the very least, a boat repairman.
My memory is that it was 100% pure boiled linseed oil. Hopefully it is available around here. Find out tomorrow.
P.S. Leave Dave alone, he barely has enough boards to share with me.
In North America you've got
Raw linseed oil. This stuff is food safe. It's just like you mentioned.
Boiled linseed has driers [chemicals] added.
http://www.dolmetsch.com/recorderoil.htm
That's got a bit of info on using linseed oil. Not really in depth but I found the bit about adding colour to boiled oil with metal interesting.
This boiled oil uses Cobalt and maganese
http://www.eezimmermanco.com/products_files/LinsedOilBoiled.html
The page also mentions not heating the stuff.
poobah said:I am still waiting for a chemist to come along and tell us why the flame thing works out so cool... I have never "done it" but I can just imagine. I think it is about "natural" polymerization..
Here's a good general article: http://www.recorderhomepage.net/wood.html The "flame thing" is a way of speeding up the process. You'd probably get most of the way there with just time, but the heat may also tip the chemistry scales so that somewhat different effects are caused by heat than just by oxygen driven polymerization. Somewhat analagous to the process of carmelization of sugar.
Sheldon
edit: BTW, boiled linseed oil used to be just that. It may be that iron and other trace metals in the cooking container also helps start the polymerization process. It looks like most of the "boiled" linseed oil now sold has various metals added to catalize the polymerizations reaction, and the are not actually boiled.
Binary...
the boat oil was most certainly 100% pure boiled oil, but overhere it was sometimes mixed with tar.
Actually- the treatmment is still often recommendeed for wooden boats, but with the addition of alcyd oils and thinned with turpentine or white spirit.... mixed with pigments , it was used as paint. Actually- here up north and along the coast, paint was often made from cod liver oil, as it was quite a lot cheaper. Should be well known in the Nova Scotia area..
Don't think the cod liver oil is suiable for loudspeakers, - unless you want your music to smell.................
Surely- pure, boiled linseed oil must be available- at least from a specialist supplier. It is quite common overhere....
Actually, - if Dave looks in, I would be interested to know the weight of one of them boards, mostly just for kicks..
I am actually quite envious of you guys overthere, with respect to the supply of different woods....
I *can* get a lot of stuff, though, but the prices are just hilarious.
I was phone hunting for some standard mahogany, ...
min. 50$ for 1 meter of 2x4.....wouldn't even think of maple burl....
Wow... everyone came out to play on this one!
Hey I did find some sites... fairly lame... but, apparently you can also use the paper-backed veneer with the PVA - Iron method.
For those of you doing purely flat / no compound curves stuff... I would sure recommend the paper-backed stuff...
Hey I did find some sites... fairly lame... but, apparently you can also use the paper-backed veneer with the PVA - Iron method.
For those of you doing purely flat / no compound curves stuff... I would sure recommend the paper-backed stuff...
AuroraB said:how much does it cost to ship somme of them burl boards over to Norway??
A lot no doubt...
The pieces are about 4' tall maybe a bit more. Some my still be available,
I have some 2" thick cedar slabs i was thinking of for baffles... given a request getting slabs cut is probably not all that difficult. Limit is 4-5" wide by 18' long (given an appropriate tree)
dave
Much like the next guy... I capitalize on ANY reason to do something with a flame... it's more dangerous... and therefore more manly.
But with what you have to give these days for fancy wood, I would do a side by side test. It could be that newer linseed oils with metallic catalysts do the same thing without the flame. Depth and detail is about how smooth the surface of the wood AND the finish is. Maybe it works just as well, or better, with the modern stuff... it could happen. Then you could just tell everyone you did it with a flame!
But with what you have to give these days for fancy wood, I would do a side by side test. It could be that newer linseed oils with metallic catalysts do the same thing without the flame. Depth and detail is about how smooth the surface of the wood AND the finish is. Maybe it works just as well, or better, with the modern stuff... it could happen. Then you could just tell everyone you did it with a flame!
Poobah...you just might be on to something with metal cathalysts...
I have a special interest in old woodworking techniques, so I started searching for norwegian links on this theme...
in a note from one of our universities, I found mentioned that raw linseed oil was being boiled with lead oxide.........to make- -boiled linseed oil..............
I have a special interest in old woodworking techniques, so I started searching for norwegian links on this theme...
in a note from one of our universities, I found mentioned that raw linseed oil was being boiled with lead oxide.........to make- -boiled linseed oil..............
- Status
- This old topic is closed. If you want to reopen this topic, contact a moderator using the "Report Post" button.
- Home
- Loudspeakers
- Multi-Way
- A lost method of finishing