Soon, It has only been 14 months. Keep going I think there is a crest to this mountain coming up and maybe a nice comfortable recliner to enjoy all.
Casey, Do you have an infrared heat gun handy? I wonder how hot that ribbon gets at max output. It is not much different than a small bathroom heater element. Not much voltage but a heck of a lot of current at .5 ohm.
Tad
Casey, Do you have an infrared heat gun handy? I wonder how hot that ribbon gets at max output. It is not much different than a small bathroom heater element. Not much voltage but a heck of a lot of current at .5 ohm.
Tad
Soon, It has only been 14 months.
Thanx for that
 ..this was supposed to be a quick "bunny trail" from my turntable project.
I wonder how hot that ribbon gets at max output. It is not much different than a small bathroom heater element.
After cranking it hard for a while, I checked the temp with the back of my hand..barely above ambient. The limitation is physical, not thermal.
Casey
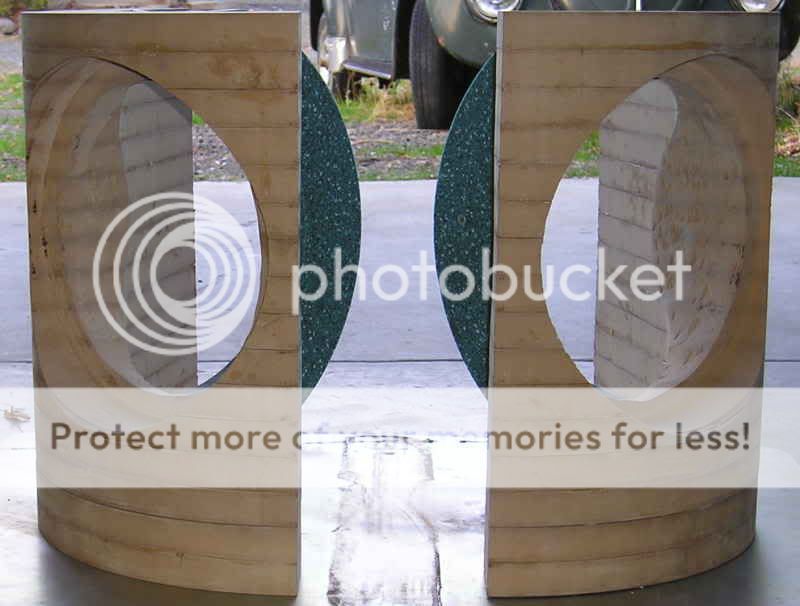
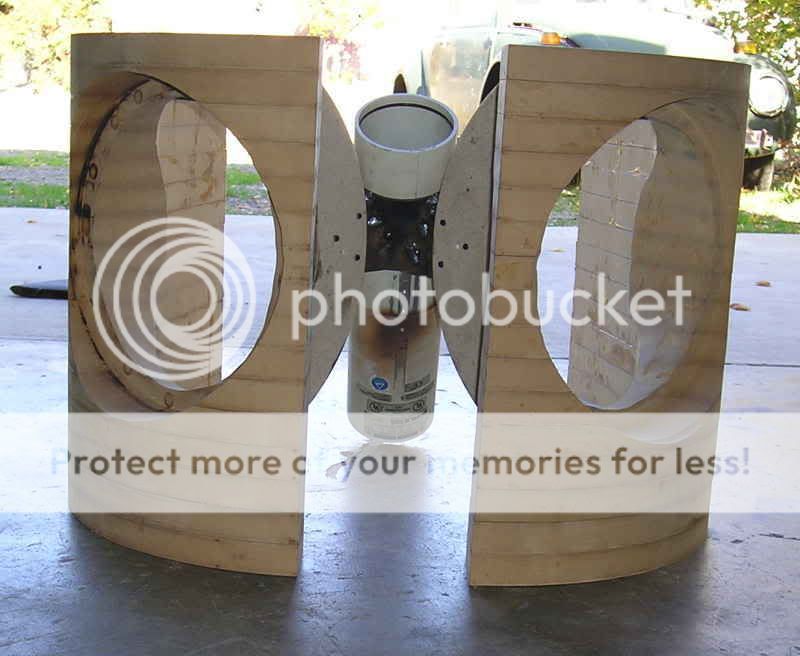
Getting close to completing the bass portion of my baffle.
I finished prepping the components to attach my braces. I drilled and tapped 48 holes in the braces, and drilled and counter sunk 48 holes in the mount plates. I then bolted down the saddle pieces and trimmed the braces on the top to be flush with the top of the baffles...
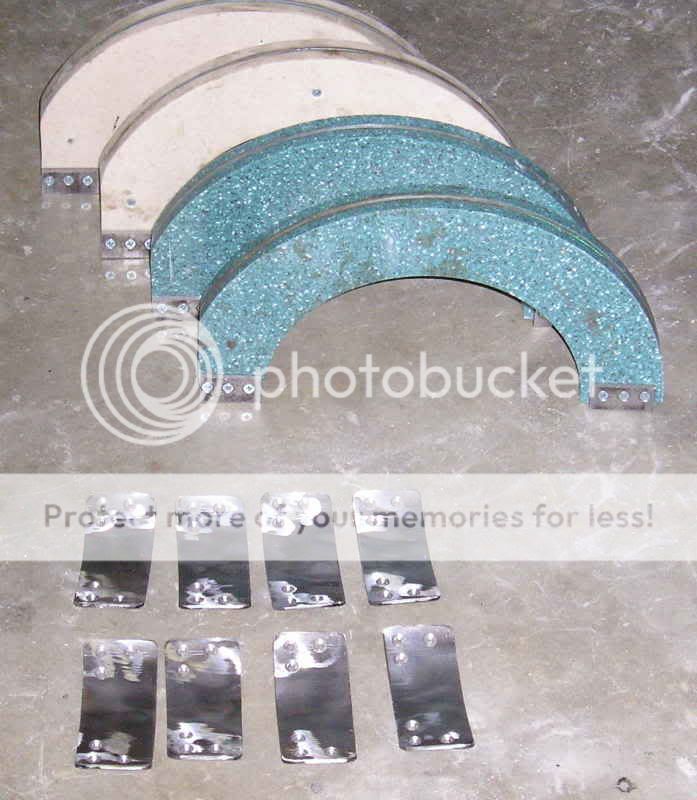
I then welded the mount plates to the attached saddle pieces. This was a bit tricky as Corion can melt easily. I basically "stitched" them on with a series of tack welds. I would rotate thru all 16 saddle pieces, and when I came back around to the first one it was cool enough for another..and so it went until I had a fillet...
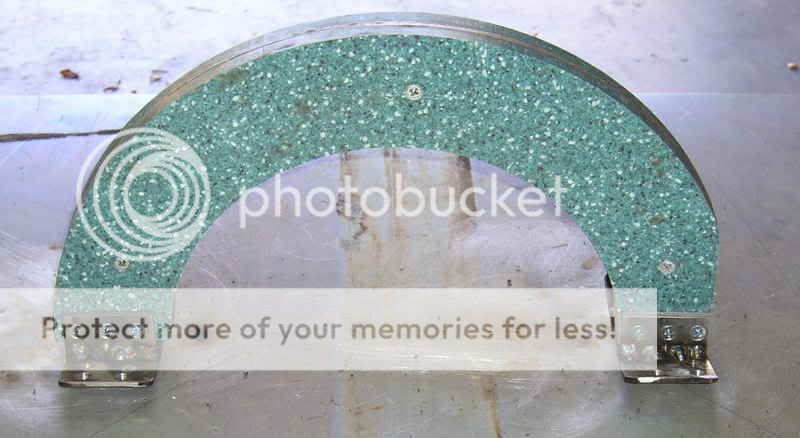
I then screwed them onto my mdf blocks with 6 2" sheet rock screws on each end...
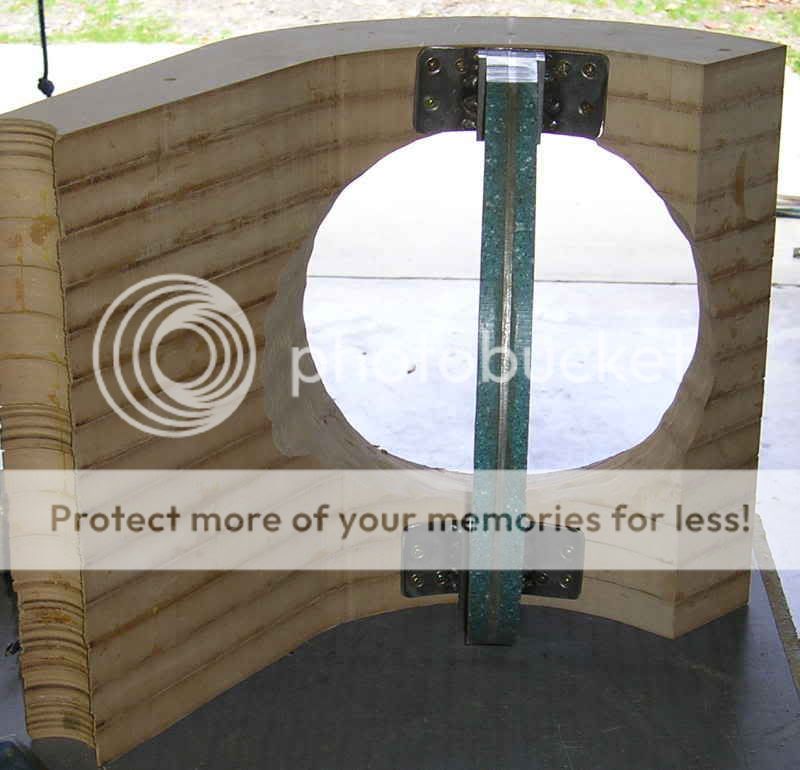
..and from the drivers point of view...
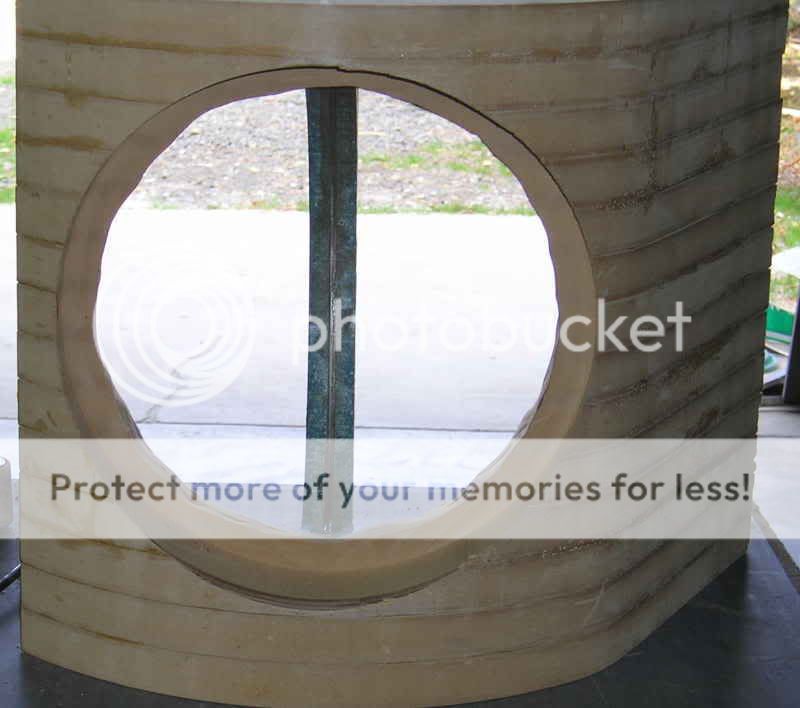
Here is a pair setup on a positioning outline showing the relationship between the 2 halves...
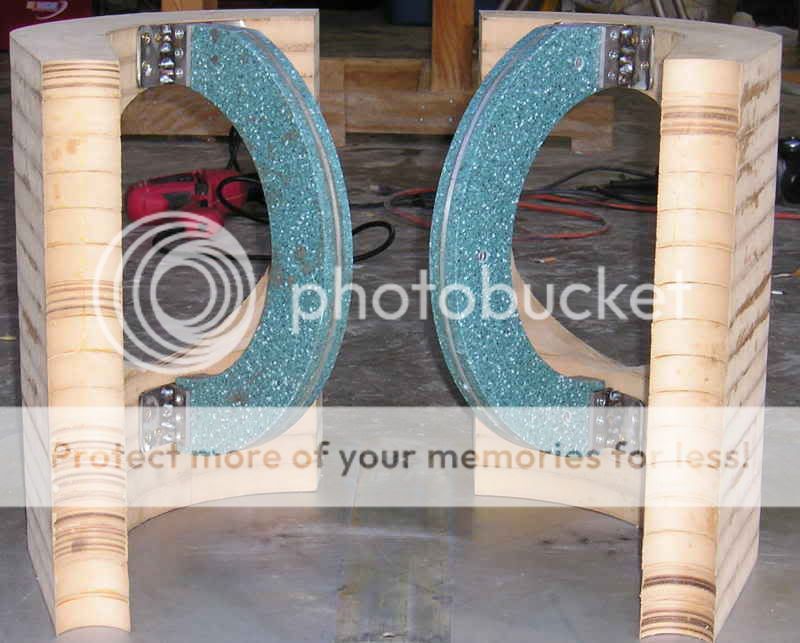
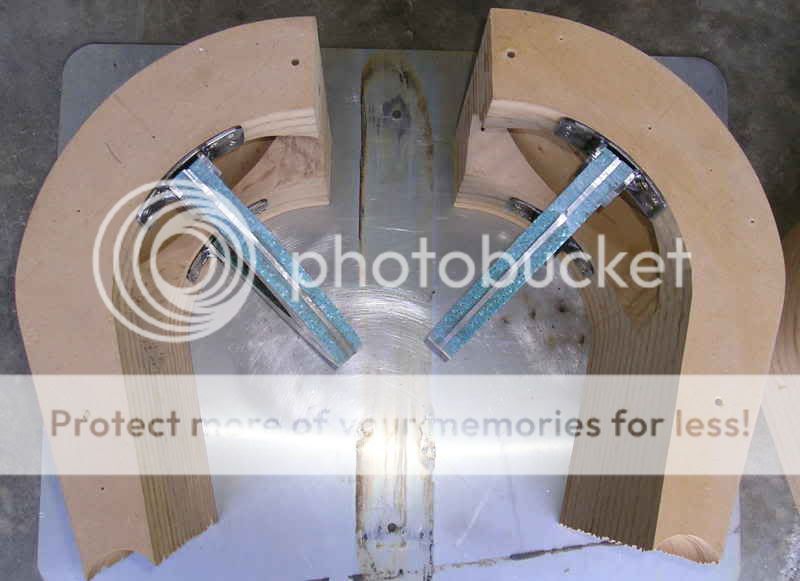
I'll be attaching a piece of sand filled 3" pipe at a 45 deg. angle from the center points of the 2 braces to the floor.
Casey
I finished prepping the components to attach my braces. I drilled and tapped 48 holes in the braces, and drilled and counter sunk 48 holes in the mount plates. I then bolted down the saddle pieces and trimmed the braces on the top to be flush with the top of the baffles...
I then welded the mount plates to the attached saddle pieces. This was a bit tricky as Corion can melt easily. I basically "stitched" them on with a series of tack welds. I would rotate thru all 16 saddle pieces, and when I came back around to the first one it was cool enough for another..and so it went until I had a fillet...
I then screwed them onto my mdf blocks with 6 2" sheet rock screws on each end...
..and from the drivers point of view...
Here is a pair setup on a positioning outline showing the relationship between the 2 halves...
I'll be attaching a piece of sand filled 3" pipe at a 45 deg. angle from the center points of the 2 braces to the floor.
Casey
Beautiful!!
edit - guys, I might have an interesting solution to allow low frequency ribbons
Guitar string. The catch would be weaving them together with something to keep them flat and possibly finding a material to sheath them in to increase efficiency and will not wear away from flex or friction... hmmm.....
Or maybe violin/chelo string might be lighter and just encase it in tin foil/ or copper/aluminum tape
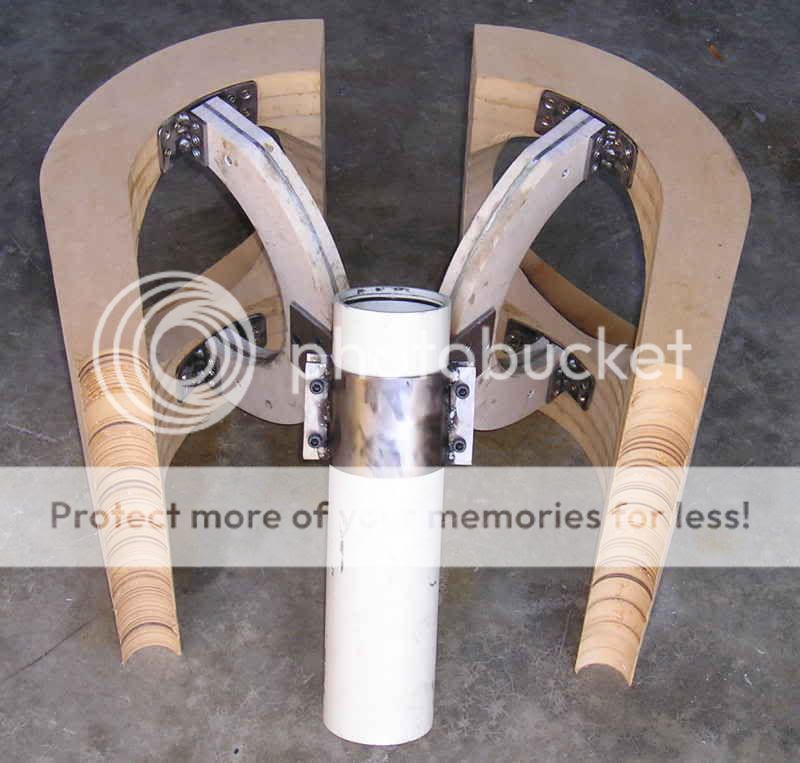
I finally finished the basic structure of my bass modules this weekend...whew. Still have a fair amount of work to do, but the end is in sight.
After cutting, grinding, and pounding the pieces needed for my clamps into submission, I clamped them down and welded them up...

I then drilled and tapped two pairs, and test fitted them to the pipe sections...
Next was fabricating the brackets to attach the clamps to my braces. Here are the pieces for one clamp cut out and spot drilled...
After dilling through with a #7 bit, I aligned and clamped the bracket to the brace to use as a drilling guide...
After drilling 2 holes, I tapped the brace and clearance drilled/countersunk the 2 holes in the bracket. I then bolted it down and drilled through the 3rd hole...
Once I got all the brackets drilled and mounted, I reassembled every thing. With the clamps mounted to the pipe I welded them to the brackets...

The "immovable object" is almost ready for the "unstoppable force" ...
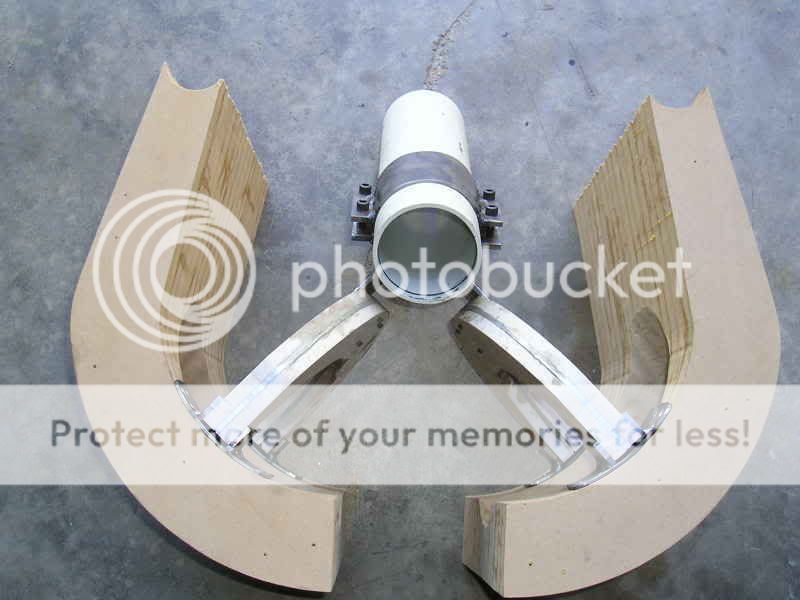
BWU-HA-HA-HA-HA!!!!
Casey
After cutting, grinding, and pounding the pieces needed for my clamps into submission, I clamped them down and welded them up...
I then drilled and tapped two pairs, and test fitted them to the pipe sections...
Next was fabricating the brackets to attach the clamps to my braces. Here are the pieces for one clamp cut out and spot drilled...
After dilling through with a #7 bit, I aligned and clamped the bracket to the brace to use as a drilling guide...
After drilling 2 holes, I tapped the brace and clearance drilled/countersunk the 2 holes in the bracket. I then bolted it down and drilled through the 3rd hole...
Once I got all the brackets drilled and mounted, I reassembled every thing. With the clamps mounted to the pipe I welded them to the brackets...
The "immovable object" is almost ready for the "unstoppable force"
...
BWU-HA-HA-HA-HA!!!!
Casey
NVMDSTEvil and tiki,
I didn't see your post's when I posted my update..sorry.
Ther are a lot of different way to skin the LF cat, I think I have found my prefered way. My ribbons can play LOUD down to 200hz, moderate to 100hz, and low down to 50hz. This allows me to use a gentle slope x-over for the first octave. I will be running the frankenstiens I'm building now for 200hz down.
Casey
Casey,
Yours is an awesome (like 100 billion hotdogs) project. I look forward to your weekly reports. As you're nearing the finish line, I'm sure I'll be both happy and sad to see the end.
If you could, when done, please post an estimate of your time and costs so we can all see just how far out of reach your project is for the average guy and just what a feat it was for you to complete.
My only question is what will you build next that could possibly top this one?
kuroguy-
I'm glad you have been enjoying "stopping in". Part of my motivation has been the fact that I live in the boonies, and this forum gives me an opportunity to "show & tell" and share a virtual beer with the fellow maniacs that lurk here.
I can already give you an approximate break down of the time and materials thus far..
Ribbon proper...around a 1000 hours with an investment of around a grand spread over a year...without the killer deal I made on the magnets it would have cost about twice that.
Frankein-Dipole...about $500 and 100 hours so far .
The "hours" is of actual work..not counting the beer time sitting in my shop and staring at it
Casey
Edit: Where can I collect my hotdogs? Would make one heck of a BBQ to celebrate the completion at some point
Edit again..to answer the whats next Q...it will be to finish my table...
http://www.diyaudio.com/forums/showthread.php?s=&threadid=67089&highlight=
This project was supposed to be a "quick" detour
If I calculate that at machinist's wages ($20/hr) you got over $23500 worth of time and material as well as some real skill required to build them.
Well thats kinda depressing LOL. Truth is if I had a fully realized design (I didn't when I started..I had a vision in my mind as well as some basic cad work and computer modeling). and access to a 4 axis cnc mill and surface grinder I could have probably knocked it out in a month or so. As is I had to work with the most rudimentary of metal working tools, basically a modified drill press, a bandsaw, a small lathe, and hand tools....plus the 2 most critical commodities...desire and time. I have lusted after a truly world class ribbon for the better part of 20 years, and have been single again for close to 2. Since I currently don't have to account for my time, I have been spending it on my projects to the tune of 1-4 hours weeknights and 12-16 Sat, and Sun...and absolutely loving it. Not the ideal for most folks..but it has been suiting me.
Alas, my marathons in the shop may be slowing down..I think I have found my true soul mate. She fully supports my passion though, so we'll see.
There is more to life than building the "ultimate" anything.
Casey
valveitude said:
Alas, my marathons in the shop may be slowing down..I think I have found my true soul mate. She fully supports my passion though, so we'll see.
There is more to life than building the "ultimate" anything.
Casey
I agree.
Your ribbons do look awesome though...
Hi Digi,
Thanx
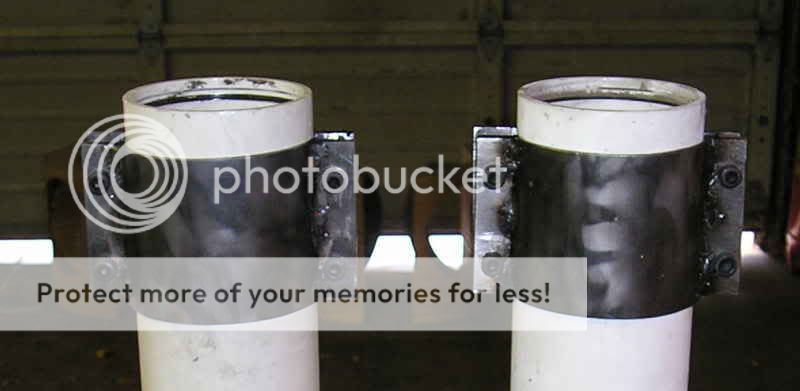
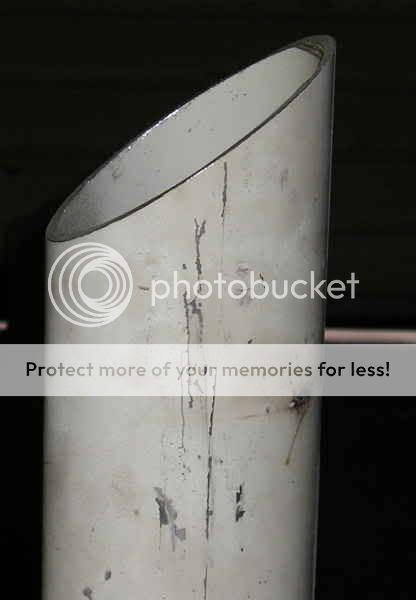
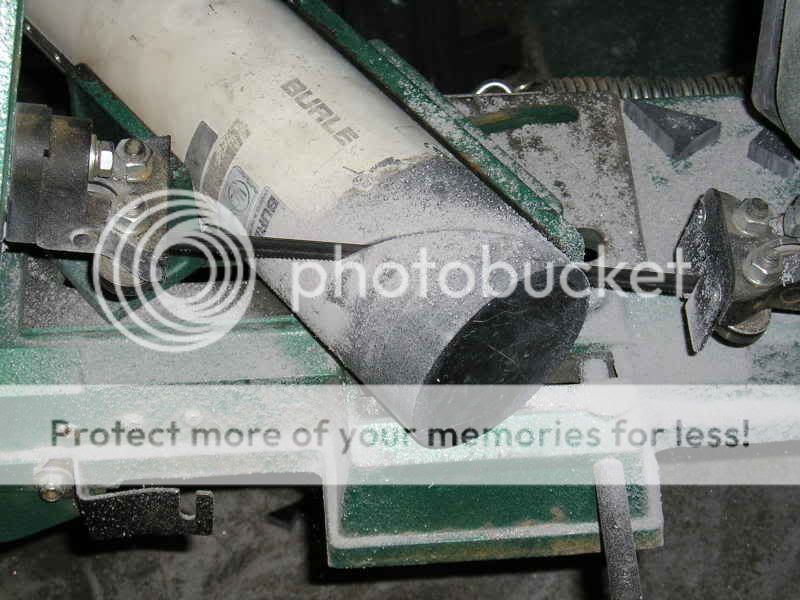
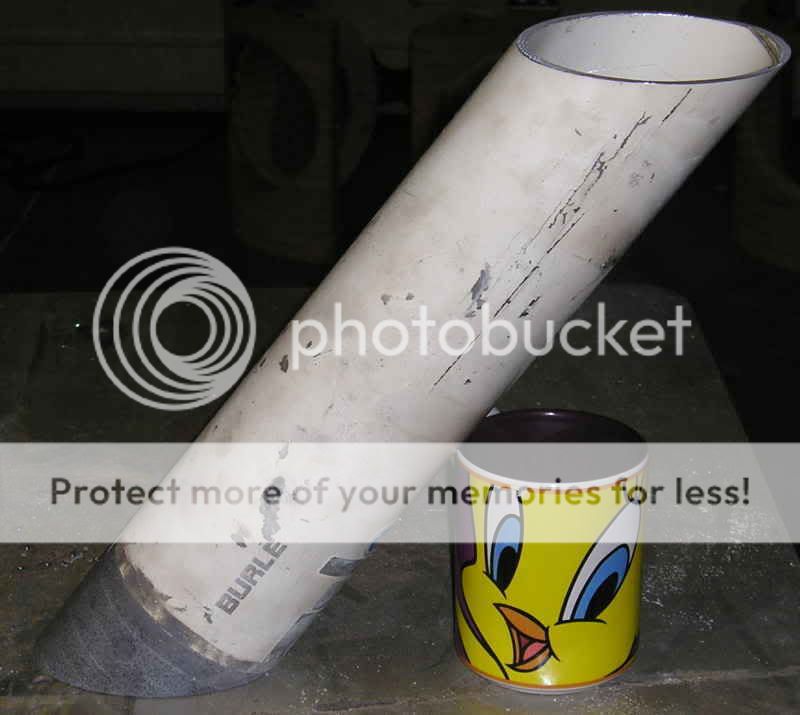
This weekend proved the old saw "the devil is in the details". What seemed like a simple task turned into a project all it's own. I needed to bevel the pipe (actually the "pipes" are old school security camera housings scored dumpster diving) so that the top end wouldn't reflect the ribbon output upwards, plug the bottom to hold the sand, and make provisions to put a spike on the bottom...sounded simple enough
First was the simple matter of beveling the top. I set the band saw angle to match the mounted angle and cut off the top ends...
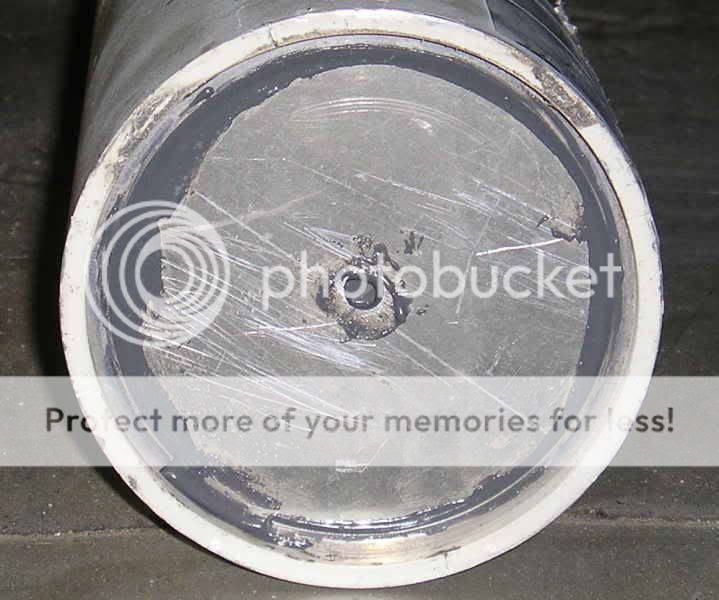
I then cut out some discs and epoxied them against a snap ring at the bottom of the pipe to close up the end to hold my sand...
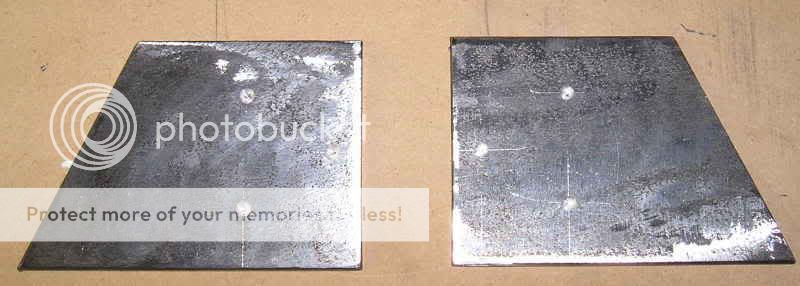
So far things are going swimmingly...then came the setting up for the spike. Having used sand as a ballast before I know that it can find the smallest of holes and leak out. As this is going in my house, i am loathe to provide any opportunity for this so penatrating the bottom barrier isn't an option. In addition, I want the spike to mate with the floor at the standard 90 deg. I decided the best way to do this was to fabicate a piece that attached to the bottom cut at the same angle as the top. Not having any material diminsioned right for this I had to make it. I cut a couple of discs out of Corion 3 1/2" in diameter (the I.D. of my pipe), and then rough cut pieces out of Corion and laminated them together with J-B Weld...
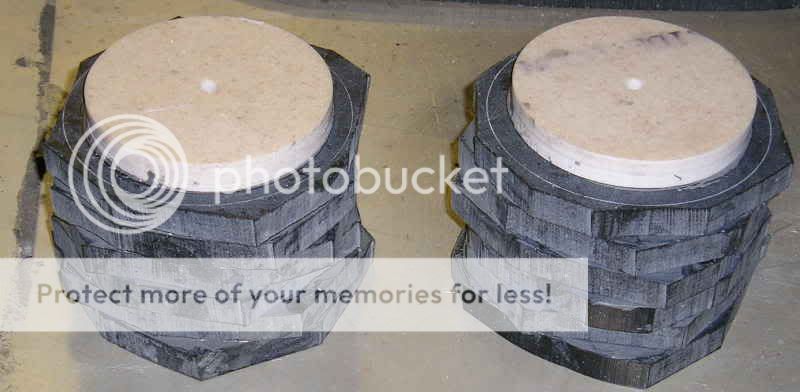
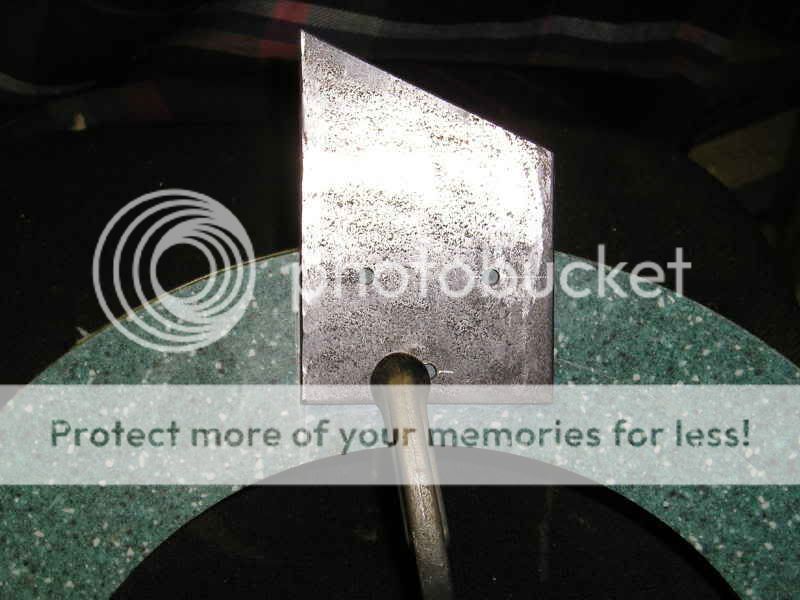
I let them cure over night then mounted them up on my lathe...
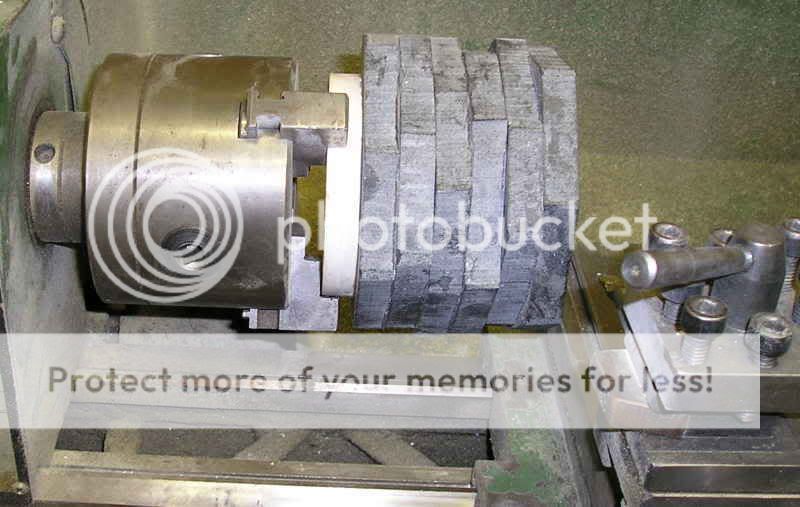
I then turned them to match the O.D. of my pipes...

I then flipped them over and turned down the shoulder pieces. These are the basis of my "feet"...
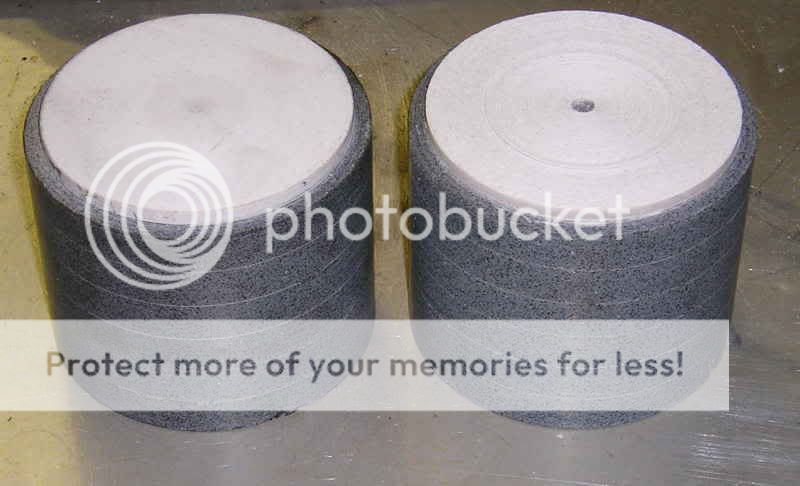
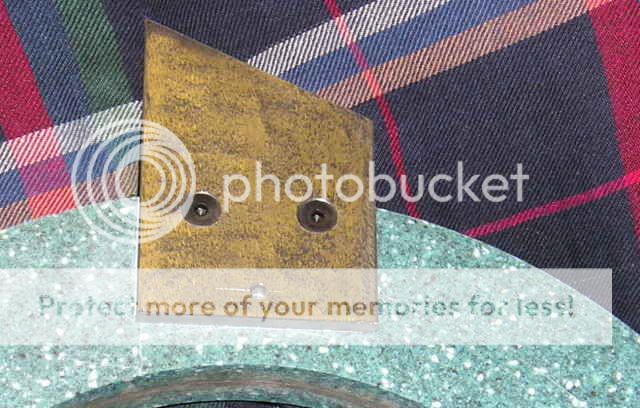
I then J-B Weld'ed them to the bottom of my pipes...
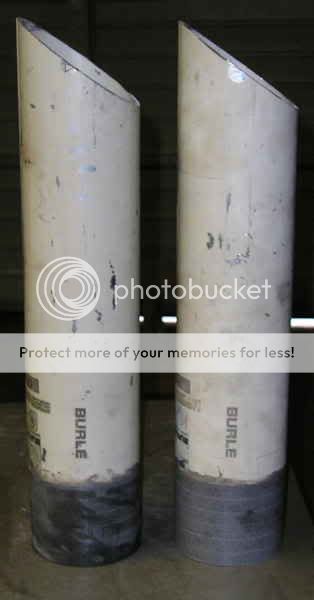
After letting the epoxy set, I mounted the pipes in my saw and cut a matching angle...
Naturally, after the hardware stores closed, the blade snapped cutting the second one...at least I was able to finish cutting one of them...
After I finish cutting through the other one, I'll drill the "feet" for the spikes.
It sure "seemed" like a simple detail
Casey
Your ribbons do look awesome though...
Thanx
This weekend proved the old saw "the devil is in the details". What seemed like a simple task turned into a project all it's own. I needed to bevel the pipe (actually the "pipes" are old school security camera housings scored dumpster diving) so that the top end wouldn't reflect the ribbon output upwards, plug the bottom to hold the sand, and make provisions to put a spike on the bottom...sounded simple enough
First was the simple matter of beveling the top. I set the band saw angle to match the mounted angle and cut off the top ends...
I then cut out some discs and epoxied them against a snap ring at the bottom of the pipe to close up the end to hold my sand...
So far things are going swimmingly...then came the setting up for the spike. Having used sand as a ballast before I know that it can find the smallest of holes and leak out. As this is going in my house, i am loathe to provide any opportunity for this so penatrating the bottom barrier isn't an option. In addition, I want the spike to mate with the floor at the standard 90 deg. I decided the best way to do this was to fabicate a piece that attached to the bottom cut at the same angle as the top. Not having any material diminsioned right for this I had to make it. I cut a couple of discs out of Corion 3 1/2" in diameter (the I.D. of my pipe), and then rough cut pieces out of Corion and laminated them together with J-B Weld...
I let them cure over night then mounted them up on my lathe...
I then turned them to match the O.D. of my pipes...
I then flipped them over and turned down the shoulder pieces. These are the basis of my "feet"...
I then J-B Weld'ed them to the bottom of my pipes...
After letting the epoxy set, I mounted the pipes in my saw and cut a matching angle...
Naturally, after the hardware stores closed, the blade snapped cutting the second one...at least I was able to finish cutting one of them...
After I finish cutting through the other one, I'll drill the "feet" for the spikes.
It sure "seemed" like a simple detail
Casey

Is that supposed to be turned slightly? It looks like it is anyways.. could just be due to the camera angle I hope?
Ya..it's the camera. The ends are square to one another.
Casey
Casey, I only disagree with one thing. A thousand almosts do not equal one ultimate. Very few people ever achieve that one true marvel. You will look back on this one day and be proud.
You go boy. Tad
I only wish you had a streaming video going most of the time. Think about how much money Bob Villa and Norm made from just letting folks watch.
You go boy. Tad
I only wish you had a streaming video going most of the time. Think about how much money Bob Villa and Norm made from just letting folks watch.
Hi Tad,
I'm not sure I agree with that. When I used the term "ultimate" I didn't mean to imply that my efforts reached the apex of ribbon design..that would be hubris to the extreme. I was trying to refer to the effort. It is however my "ultimate" to date, made possible by my "thousand almosts". Diy is a process, not an event. Sure it gives you a warm fuzzy when you end up with an excellent result, but it's the journey thats most satisfying to me.
Knowing my personality, it's more likely that it will be more "You idiot, why didn't you........?" . I do take your meaning though and thank you for the sentiment.
Casey
A thousand almosts do not equal one ultimate.
I'm not sure I agree with that. When I used the term "ultimate" I didn't mean to imply that my efforts reached the apex of ribbon design..that would be hubris to the extreme. I was trying to refer to the effort. It is however my "ultimate" to date, made possible by my "thousand almosts". Diy is a process, not an event. Sure it gives you a warm fuzzy when you end up with an excellent result, but it's the journey thats most satisfying to me.
You will look back on this one day and be proud.
Knowing my personality, it's more likely that it will be more "You idiot, why didn't you........?"
. I do take your meaning though and thank you for the sentiment.Casey
A mini update...I picked up a new blade on the way home from work and finished cutting the second pipe. There are now 2 ready to be drilled As it's indistinguishable from the first, I didn't bother with a picture.
Now to figure out how I'm going to mount the pipes on the drill press at the proper angle.
Casey
edit:typo
As it's indistinguishable from the first, I didn't bother with a picture.Now to figure out how I'm going to mount the pipes on the drill press at the proper angle.
Casey
edit:typo
kuroguy,
I think we have a small misunderstanding . I need to drill perpendicular to the cut surface of the Corion foot. I need to set up my pipe on my drill stand at the same angle it is in the last picture above leaning on the cup..the angle it will be mounted on the baffle. This way the spike will be straight down into the floor.
Casey
Use a long drill bit and drill through from the top. Once you have the hole cut, patch the tube and seal the top of the corian.
I think we have a small misunderstanding
. I need to drill perpendicular to the cut surface of the Corion foot. I need to set up my pipe on my drill stand at the same angle it is in the last picture above leaning on the cup..the angle it will be mounted on the baffle. This way the spike will be straight down into the floor. Casey
- Status
- This old topic is closed. If you want to reopen this topic, contact a moderator using the "Report Post" button.
- Home
- Loudspeakers
- Planars & Exotics
- A 60" Ribbon w/TL Loaded Extremis Hybrid