There is alsoWhere'd you get the barium loaded vinyl in Sydney?
Wavebar Original - Pyrotek Noise Control
I have to sort out the issue of W/B clear coat over a solvent based stain. This will slow me down but after all the effort involved up to now I don't want to mess up the final step. I may be quiet for a few days till the results of my experiments come in. I have a few things to go on with while waiting for paint to dry.
Hi Mal. I'm a first timer. Up till now I have been a paint roller guy, and have been quite satisfied with the results. I am aiming for something a bit better this time. I have a 40 L, 2.5 hp compressor from Bunnings and a couple of HVLP guns from fleabay, 2.0 mm and 1.4 mm tips. I used the larger tip for the baffles but I'm thinking the 1.4 mm tip might be better for the marine ply clear coat. I will be spraying Cabothane water based satin polyurethane clear. Don't be shy if you have advice, because I'm in uncharted waters here. Everything I know about spray painting is learned from Youtube.I have practised setting up the gun on cardboard tacked to the garden paling fence. Like I mentioned, the flat baffle finish was very forgiving, but I have no experience. I just plan to start with very light coats until I understand how it is going. Any tips mate?
Hi Bon
I'm coming from an automotive back ground .
If you can read the Tech data sheet for the paint you want to use and the spray gun your using . Most if not all HVLP need to have 20psi or less maitained while spraying to get proper delivery of paint so get an air reg that fits to the gun ,helps to improve paint finish and less wastage of paint .
1.8mm to 2.0mm is ideal for acrylics but again read the tech data sheet on th e type material your using .
If you follow the TDS you will find theres no need to sand between coats and waste material .Also TDS will also tell what grade sand papers to use be it for wet sand ing or dry sanding .
One thing I have noticed when people build cabs to paint they sand the job ,
Fill the joints
( make sure your primer is suited to the filler your using ,you don't want the primer to bite in to hard and cause the filler to sink back or soften ).
Sand the joints and prime ,but people seem to think the primer will hide the filled joint .Primer is there to seal the sub surface ,add in color coverage and promote adhesion for the paint its not really a fine filler to hide scratches ,lows ,pin holes etc .
Fore that you need to
prime
use a putty filler ,rud back and prime again
then paint.
Or
Use a HiFill primer which is designed to level the surface fill in small imperfections .
Rub back ,use the same product adding 10% reducer or thinner and touch up any rubbed through areas .If theres a few high fill again .
Then paint with top coat .
When it comes to HiFill primers theres a couple different types from single stage to 2pak types low build to high build.
I only use 2pak types better build and less strink back .
Paint won't hide imperfections in the base they will come through sometimes straight away othertime over a peroid of time .
Hopefully some one else will come along and fill in holes I've missed.
Cheers
Hi Bon
Read the tech data sheets") .
.
As far as wood finishes go I don't really know ,I've used Sikkens wood finishes over the years but not sprayed them .
I use 2pac HiFills ,yes you have to be more carefull but what ever you use wear the appropriate PPE .
Always good to get on some of the painter forums for info & YouTube .
Cheers
Mal
Read the tech data sheets
.As far as wood finishes go I don't really know ,I've used Sikkens wood finishes over the years but not sprayed them .
I use 2pac HiFills ,yes you have to be more carefull but what ever you use wear the appropriate PPE .
Always good to get on some of the painter forums for info & YouTube .
Cheers
Mal
I agree with checking out some pro painting forums. Years ago the use of w/b was really hit and miss. FWIW, typically, w/b over an oil stain is a no go. Since you have the material, do look into opinions of some that might be/have been using that product. As pointed out, prep is key but the stages have to be compatible.
Been many moons since I've sprayed the w/b but if I'm not mistaken, even the de-nibbing between coats needs to be performed with w/b "safe" abrasives.
Call backs/rework aren't my thing so I quit trying to make w/b work in my shop ... when I was building furniture. With solvents now, my favorite set-up was a pressure pot (gallon) regulator set @ about 18psi fluid pressure with a conventional external mix spray gun. Adjusted the fluid feed and delivery air pressure at the gun. A really nice finish can be achieved with very low over spray if you get it right. Never had to thin any of the stages with that set-up. Just dropped the pail into the pot and go. Smooth sailing.
Which ever way you go .. good luck!
Yeah ... makes the job easier/better. ... and if need be, you're just talking to one guy.
I lucked on to a real good combination carried locally. I'm sure you've had this happen to you too, 56oval ... match made in heaven. Shoot the sealer .. knock it back with 220gt ... vacuum, shoot the top coat. Never had to touch the top coat .. was like glass. Burned right into sealer taking whatever fine powder (sealer) right with it. Perfect every time.
For Bon ... I tried this a couple times to help combat grain raise when using the w/b family. First step was to shoot the work with a lacquer based sealer, thinned back at least 50%. Then follow with your w/b stain, sealer, top coat. Lacquer has to hold the fibers as well as get the color intensity you're looking for. ... so the procedure with the lacquer/sanding has to be right. You'll have to sample this out as you did with the panel displayed above. Spraying the stain is actually better ... you have more control over it.
Regards,
phil
Last edited:
Yeah ... makes the job easier/better. ... and if need be, you're just talking to one guy.
I lucked on to a real good combination carried locally. I'm sure you've had this happen to you too, 56oval ... match made in heaven. Shoot the sealer .. knock it back with 220gt ... vacuum, shoot the top coat. Never had to touch the top coat .. was like glass. Burned right into sealer taking whatever fine powder (sealer) right with it. Perfect every time.
Regards,
phil
Hi Phil
If you have trouble with a product one of the first things they will ask what brand X did you use as sealer/primer base colour and if you say you used another company's brand ,they"ll blame that first
.Automotive paints to day are a real pain in the ar5e different system requires different nozzle sizes ,but like my mate tells me if your any good use what works for you . Couple of the finishes I'm looking at painting my projects in require 1.0mm to 1.3mm nozzles ,I'm up for a new gun soon .
Cheers
Mal
Last edited:
That's what I'm after. Keeping my fingers crossed. It worked for the small sample, but I'm upscaling today with the HVLP gun... match made in heaven. Shoot the sealer .. knock it back with 220gt ... vacuum, shoot the top coat. Never had to touch the top coat .. was like glass. Perfect every time.
I don't think I have the patience for all this. Gee, it was so much easier when I knew a lot less.... I tried this a couple times to help combat grain raise when using the w/b family. First step was to shoot the work with a lacquer based sealer, thinned back at least 50%. Then follow with your w/b stain, sealer, top coat. Lacquer has to hold the fibers as well as get the color intensity you're looking for. ... so the procedure with the lacquer/sanding has to be right. You'll have to sample this out as you did with the panel displayed above. Spraying the stain is actually better ... you have more control over it.
Finishing
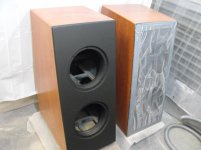
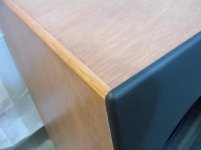
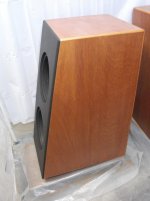
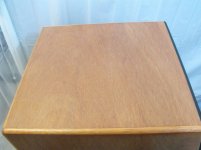
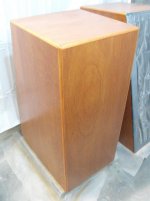
I took a few days to practice my HVLP spray gun technique. Following some Youtube tutorials, I set up the gun as recommended. I chose a 2 mm tip and set my compressor to about 30 psi. I used a 20 m hose to keep the compressor noise away from the neighbours, so the pressure at the gun might be 20-25 psi. I applied a maple solvent based stain by rag and found there was not much wipe off. The marine ply is quite thirsty. I was happy with the uniformity of the colour. I shot 5 coats of waterbased polyurethane clear, lightly rubbing back between coats with 240 and finally 400 grit sandpaper to remove nibs. The shower curtain/gazebo spray booth worked great apart from a few windy moments making the curtains flap around. I waited it out for a calmer weather. The first couple of coats did very little apart from raising the grain as people warned me. The fifth coat was where it all came good. I am happy. I was a bit nervous removing the masking tape from the matt black baffle, because it had been masked up about a week but it came off nicely with a slow peel. You can see the line between the black and timber finish is quite sharp, you have to get about 6” away to notice any imperfection. The finish is satin and I am quite content with the level of gloss. The grain can be clearly seen and slightly felt which I don’t mind because it emphasizes that it is a timber finish and not artificial. I am not a big fan of high gloss finishes. I have yet to finish the mid-tweeter enclosure, but don’t expect any problems. Getting close to stuffing, mounting the drivers and setting up the active x-over and power amps.
I took a few days to practice my HVLP spray gun technique. Following some Youtube tutorials, I set up the gun as recommended. I chose a 2 mm tip and set my compressor to about 30 psi. I used a 20 m hose to keep the compressor noise away from the neighbours, so the pressure at the gun might be 20-25 psi. I applied a maple solvent based stain by rag and found there was not much wipe off. The marine ply is quite thirsty. I was happy with the uniformity of the colour. I shot 5 coats of waterbased polyurethane clear, lightly rubbing back between coats with 240 and finally 400 grit sandpaper to remove nibs. The shower curtain/gazebo spray booth worked great apart from a few windy moments making the curtains flap around. I waited it out for a calmer weather. The first couple of coats did very little apart from raising the grain as people warned me. The fifth coat was where it all came good. I am happy. I was a bit nervous removing the masking tape from the matt black baffle, because it had been masked up about a week but it came off nicely with a slow peel. You can see the line between the black and timber finish is quite sharp, you have to get about 6” away to notice any imperfection. The finish is satin and I am quite content with the level of gloss. The grain can be clearly seen and slightly felt which I don’t mind because it emphasizes that it is a timber finish and not artificial. I am not a big fan of high gloss finishes. I have yet to finish the mid-tweeter enclosure, but don’t expect any problems. Getting close to stuffing, mounting the drivers and setting up the active x-over and power amps.
Attachments
Nice praise from you David. I have seen the high quality of your Delta finish. My generic HVLP gun does a good job when properly adjusted but the settings can drift during use, especially the fan width. I suppose good adjustability is one of the things you get if you pay 10x what I did for a spray gun. It is a good learning experience though.Very professional looking job Bon. I think I'll be using a fine spray gun (Wagner) on my next project.
I was concerned though about the effect of steel on the magnetic field of the woofer magnet. I had an email conversation with the audio consultant for WES Components, the supplier of my drivers who designs subs using these woofers. He was ok with the my application. The steel is not that close to the magnet.
Aluminium would have been another option
I have no experience with putting fasteners into aluminium. I would assume it is fairly tricky. The steel is drilled and tapped for 5 mm hardened steel socket head bolts. I won't be stripping these threads and they won't pull out or loosen. Also steel of this gauge is easy to source. Not too sure about similar gauge aluminium. If I can get my hands on some I will see how easy it is to drill and tap for future projects.Aluminium would have been another option
I've never had any trouble drilling and tapping, or even routing aluminium, just make sure to use some lubricant and you're fine. The only issue, as you noted, is with alu being softer you can strip the screw threads, but that has only happened with really thin material where there ha only been about 3mm of thread depth.
I have no experience with putting fasteners into aluminium. I would assume it is fairly tricky. The steel is drilled and tapped for 5 mm hardened steel socket head bolts. I won't be stripping these threads and they won't pull out or loosen. Also steel of this gauge is easy to source. Not too sure about similar gauge aluminium. If I can get my hands on some I will see how easy it is to drill and tap for future projects.
Drilling and tapping aluminium is very easy. I build all of my amp enclosures out of it. I usually buy 3mm, 5mm, and 10mm gauge, but there are many other thicknesses to choose from. If you use m4 bolts and anything greater than 3mm gauge aluminium you won't strip threads, in fact you will be damaging your speakers before you start stripping threads. I use hex type bolts from championparts.com.au
Last edited:
HI
Aluminium is nice to work with ,copper on the other hand is a pain in the ar5e .
If your worried about threading alloy you can always use thread inserts theres different types .
Tangless Inserts
Brass, aluminum & stainless steel inserts - Yardley
Any good engineering supply's should be able to help you .
Forgot to add select the grade of alloy for the application .
My speaker baffles are alloy and I'll be using inserts so I can torque down the screws .
Don
NIce job on the case work .
Cheers
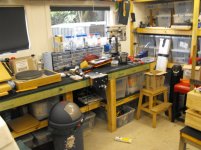
Thanks AJ. I am living a mans dream. It took a while to attain but the workshop is a very happy environment.I love your work. I love your workshop even more!
AJ
Attachments

- Status
- This old topic is closed. If you want to reopen this topic, contact a moderator using the "Report Post" button.
- Home
- Loudspeakers
- Multi-Way
- 3-way active, time aligned, constrained layer construction