The first enclosures is almost finished. We are working on the base and top hat now. The rest of the wood came in and we are planning on picking it up tomorrow.
The dagger cone slid a little before we screwed it down and is no longer perfectly centered. It can be adjusted, if it's necessary. I'm guessing we should probably do that but it's going to be a pain because we didn't notice until after the sides were attached. We will have to get at it through the woofer hole if it's critical that it be perfectly centered.
The dagger cone slid a little before we screwed it down and is no longer perfectly centered. It can be adjusted, if it's necessary. I'm guessing we should probably do that but it's going to be a pain because we didn't notice until after the sides were attached. We will have to get at it through the woofer hole if it's critical that it be perfectly centered.
Does not have to be perfectly centered as long as the seal aroiund the back of the front baffle is still airtight. Looking forward to seeing final product. Is the tophat and base removable so that the speaker can be used in simple rectangular box form for a streamlined look (if desired)?
That's good news on the off center cone! I was not looking forward to moving the cone a 1/4 inch and I think it was probably my fault it was not centered.
The Base and Top Hat will be removable for shipping, carrying and use without them. We want it to be an option to use them without the base and top, but they will look and function much better if used as designed. They are short without the base and just a simple box without the top hat. There will be 4 small holes showing on top if the top is off. They will be evenly spaced you can hide them with little wood plugs.
Another reason we made made them removable is so the look of the speaker can be changed by using a different base and top design: more or less ornate, depending on your decor.
removable is so the look of the speaker can be changed by using a different base and top design: more or less ornate, depending on your decor.
Excellent!
Btw, for anyone wanting to upgrade the XO to Miflex bypass and Mills MRA resistors, here are the links.
1st upgrade is to bypass C1 with Miflex bypass cap KPCU-01 about $20ea x 2 needed. This is a subtle change but noticeable enhancement in details of upper registers. Seems to make soundstage wider.
Miflex KPCU 0.10uF 600VDC Copper foil Poly/Paper in Oil, Sonic Craft
The other upgrade is to change the R1 and R2 to to Mills 12W MRA's 4.5ohms (nornally 4.7ohms byut 4.5ohms is close enough) x 4 needed for both channels. $7.34ea.
4.5 Ohm Mills 12 watt MRA-12, Sonic Craft
These Mills MRA's seem to be less expensive from Parts Express in case you have something else to get there.
Mills 4.5 Ohm 12W Non-Inductive Resistor $6.67ea
The Mills seems to enhance the HF output and may sound brighter to some people. YMMV.
April Fools Day FAST TL Pics
We are sharpening the blades and finishing up woodwork on the first one. We still need a base, & the sides will be chamfered and woofer hole completed. The top and base will sit on alignment boards that are held on with just two screws. They will not be attached but they sit tightly in place. There will be no visible screws.


We are sharpening the blades and finishing up woodwork on the first one. We still need a base, & the sides will be chamfered and woofer hole completed. The top and base will sit on alignment boards that are held on with just two screws. They will not be attached but they sit tightly in place. There will be no visible screws.
Beautiful work, guys! Really starting to take shape. I have received all the parts for the crossovers and will begin assembling them today. How much does this speaker weigh about? One thing to note is that the removable back panel needs to be airtight. So a foam rubber door weatherstripping gasket, etc is needed. The screw holes also need to be sealed somehow (putty etc). The concept is similar to anyone who has played a flute or recorder: if one of your finger pads does not make an airtight seal, you don’t reach the lowest note of the flute. A small air leak on one of the upper pads will make playing the low note impossible.

Last edited:
We already have the door seal on the rear panel. I'll add rubber gaskets (washers) to each of the screws to make sure nothing leaks. We are picking up the additional lumber and supplies tomorrow. The acoustic foam and butyl are probably not coming for a couple of weeks. XRK- Do you have butyl enough to do this one test speaker? We want to test this one before we build the remaining 5.
No, I do not have any of the Noico butyl left. We can add it later from the removable back panel. Go ahead and add the foam around the rear chamber adjacent to the woofer. We also need to drill a small hole in the cone about 2in from the baffle for two 20 to 22 gauge wires for the 10F to go through. Leave about 10in hanging out the front and as long of a length as we need to get to the XO. If you plan on mounting that on the divider wall on the back you may need up to 2ft. Seal the hole in the cone with hot melt glue. We will add Faston tabs to connect the driver and the crossover later.
XO Position and Wire
Vunce- The entire back panel comes off, so everything is till accessible.
I think the best place for the crossover is on the back of the center board, behind the cone. This makes for a longer run from the binding posts to crossover, but that helps us when the back is detached. The length of wire gives you room to set the back down next to the speaker while you work. I want to make the run to the woofer and full range the same length. That matters if we use different gauge wire. My preference would be to use same wire and same length for both drivers and the run from XO to binding posts. I'm very picky about that kind of thing. I always use the same length speaker wire to both speakers, even if there is slack in one. It's crazy but all these details add up, and if you are lazy on enough of them, you end up listening to "MediumFi" instead of HiFi. What gauge wire should we use? I have a large variety of good wire. My standard DIY speaker wires of 6Feet or more use good quality OFC wire that has 4 individual 16Gauge wires in them. Two 16 gauge wires together make a 13Gauge wire, overkill for this little run. What do the technical experts here say on wire for this? Any comment other than, "it doesn't matter use a lamp cord" is welcome...even if that's true, lol.
Hi Studiomic,
The wire from the binding post to the crossover can be 16ga. From the crossover to the woofer is 16ga. From the crossover to the tweeter is 20ga. I don’t like to use such thick wire on the 10F because it has a tiny 0.10 in Faston tab and that thick wire adds a lot of mechanical strain. If you really want to use 16ga here, use the super soft high current silicone insulation wire used on RC cars and RC drone battery/motor connections. It has high strand count and doesn’t strain the terminal. The crossover inductor itself is 18ga magnet wire with a 1.4ohm DCR, so running 4 ft of 16ga there is fine. The tweeter goes through a 4.7ohm series resistor so as long as the wire doesn’t change that value too much you are safe. 20ga wire is good for 1.5A and is 10ohms per 1000ft. A 4 ft run is 40mohm or negligible.
There is no need to make the wires the same length. The speed of light is 11in per nanosecond. We are dealing with trying to keep 40kHz signals phase coherent. That’s 25usec or 25,000 nano seconds or 25,000 ft or 5 miles of wire before there is a significant phase difference. So, don’t worry about it.")
The wire from the binding post to the crossover can be 16ga. From the crossover to the woofer is 16ga. From the crossover to the tweeter is 20ga. I don’t like to use such thick wire on the 10F because it has a tiny 0.10 in Faston tab and that thick wire adds a lot of mechanical strain. If you really want to use 16ga here, use the super soft high current silicone insulation wire used on RC cars and RC drone battery/motor connections. It has high strand count and doesn’t strain the terminal. The crossover inductor itself is 18ga magnet wire with a 1.4ohm DCR, so running 4 ft of 16ga there is fine. The tweeter goes through a 4.7ohm series resistor so as long as the wire doesn’t change that value too much you are safe. 20ga wire is good for 1.5A and is 10ohms per 1000ft. A 4 ft run is 40mohm or negligible.
There is no need to make the wires the same length. The speed of light is 11in per nanosecond. We are dealing with trying to keep 40kHz signals phase coherent. That’s 25usec or 25,000 nano seconds or 25,000 ft or 5 miles of wire before there is a significant phase difference. So, don’t worry about it.
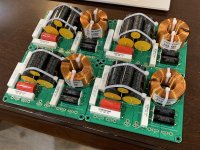
Despite “assembly line efficiency” It still took 3 hrs to assemble 4 of them.
Things like dressing the inductor wires and bending them so they are diametrically opposed with label on front takes time. The zip ties take time. Soldering both sides takes time. But they look nice and neat!
Things like dressing the inductor wires and bending them so they are diametrically opposed with label on front takes time. The zip ties take time. Soldering both sides takes time. But they look nice and neat!
Base is done
XRK- Thanks for the in depth lesson on wiring a crossover. I love how technical you are and how you don't shy away from a full explanation.
Those are some nice looking crossovers. What kind of standoffs do you normally use?
The base is done! The base centering board is not yet attached, so it's a little off center in these pictures. We are going to cut a little height off the top hat to get a better ascetic balance between base and top hat. I am a little worried that the top will vibrate because it just sits on to. It's easy enough to screw it down from inside the speaker later. Just some router work, filling & sanding left for the woodworking phase of the prototype.
I had to order 80 Mil Butyl from another vendor to get it here: I can't wait a month for it from Noico.


Those standoffs look fine. Never seen offset ones like that but it is a good idea. The speaker looks great. Don't forget to cut the rebates in the two side panels for the woofer bezel to sit flush. That would not have been a problem with a flat front baffle but you wanted to see the end grain, so...
I think these standoffs are excellent because you can use appropriate screws for whatever material you are connection them to. I've had issues using computer standoffs with the threads that are made for tapped metal.
There are still some router cuts and the woofer hole to modify. I have not been to the wood-shop today to check on the progress. They might be ready for the next phase but I don't have all the supplies.
There are still some router cuts and the woofer hole to modify. I have not been to the wood-shop today to check on the progress. They might be ready for the next phase but I don't have all the supplies.
These XO boards are quite heavy, you may consider just screwing them directly to the divider panel with drywall or wood screws and a layer of paded foam or felt underneath - no standoffs to rattle loose. It is not a problem for the board to touch the wood. Padding will help absorb any annoying rattling etc. There is a lot of vibration in this cabinet since it is a speaker. Different than a PC CPU case.
#6 Panhead x 3/4in wood screws like this should be perfect (or similar from HD etc).
Parts Express #6 x 3/4" Deep Thread Pan Head Screws Black 100 Pcs.
#6 Panhead x 3/4in wood screws like this should be perfect (or similar from HD etc).
Parts Express #6 x 3/4" Deep Thread Pan Head Screws Black 100 Pcs.
Last edited:
- Home
- Loudspeakers
- Full Range
- 10F/8424 & RS225-8 FAST / WAW Ref Monitor