It's so easy with the FR EQ to dial in more or less low and/or high frequencies. The EQ was originally set up when I used a B1 buffer in my system, but when I started using the IronPre, slight adjustments to the EQ configuration was necessary to get the sound just right.
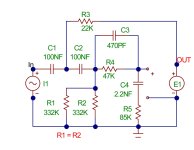
The female header pins that I installed for C1, C2, C4, R3 & R4 when I built the EQ makes it easy to quickly drop in new values. The other components don't make much difference, so I soldered in stock values there.

The female header pins that I installed for C1, C2, C4, R3 & R4 when I built the EQ makes it easy to quickly drop in new values. The other components don't make much difference, so I soldered in stock values there.
Part numbers would be most helpful for those header pins ") Also tips for installing them. I have some that take the cap and resistor leads nicely, but the male pin diameter is a bit small, so getting it soldered while keeping it perpendicular to the board can be a challenge. I fully agree that your approach is the right one (I hate rework). I'm doing up my second filter soon, the first was fully standard and soldered directly.
Also tips for installing them. I have some that take the cap and resistor leads nicely, but the male pin diameter is a bit small, so getting it soldered while keeping it perpendicular to the board can be a challenge. I fully agree that your approach is the right one (I hate rework). I'm doing up my second filter soon, the first was fully standard and soldered directly.
Thanks,
Skip
Also tips for installing them. I have some that take the cap and resistor leads nicely, but the male pin diameter is a bit small, so getting it soldered while keeping it perpendicular to the board can be a challenge. I fully agree that your approach is the right one (I hate rework). I'm doing up my second filter soon, the first was fully standard and soldered directly.Thanks,
Skip
Admittedly, it's not easy to solder these female header turrets after removing one from the plastic. I used small long nosed pliers to hold each one perpendicular to the board while soldering - and had to adjust a few after soldering.
I don't have a Mouser part number, because I got it from the local robotics store.

I don't have a Mouser part number, because I got it from the local robotics store.
Yes, that looks like what I've used.
I like to use the sockets with wire wrap pins. If the square pin is too large for the hole, just use a jewelers file to knock down the corners to fit.
Much easier to keep the pins perpindicular to the PCB.
Mouser 855-D01-9952042
If you have the small pins as above, insert the component into socket before soldering. Only one dimension to staighten that way.
Much easier to keep the pins perpindicular to the PCB.
Mouser 855-D01-9952042
If you have the small pins as above, insert the component into socket before soldering. Only one dimension to staighten that way.
If you have the small pins as above, insert the component into socket before soldering. Only one dimension to staighten that way.
That's a great idea.
I've just ordered a couple of boards from the DIY Audio Store, I think it might be interesting to try some equalisation on my back-loaded horns - Whilst I love so much of what these speakers do I've always had a slight nag about the overall balance being dominated a little too much in the mid range and perhaps a little bass light. I use Lowther EX4 drive units and I'm wondering if anyone has any thoughts on a starting point for the frequency/attenuation settings for the mid range - just looking for a starting point and I'm happy to explore and use the Micro-cap software. The sockets look like a good approach to experimenting too and I'll assemble one of the boards with them.
Last edited:
If you want to null the DC offset of the obsolete & unobtanium BUF-03, you'll need to lay out a brand new PCB which accommodates its TO-99 package and which includes a footprint for the DC offset trimmer potentiometer. I'd suggest you go ahead and spend the extra money to create a four layer PCB, so it will have an ultra low impedance ground network -- an important consideration when using video speed parts.
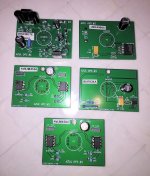
Perhaps you might consider also building a "BUF-03 emulator" daughter card, which plugs into a TO-99 socket and behaves exactly as a BUF-03 behaves, but is built using modern, widely available, low cost parts. Then during prototyping and testing, when something goes badly wrong: you destroy an easily replaceable emulator board instead of an irreplaceable BUF-03. I did this myself on the Azul HPA, exhibited at Burning Amp 2019. The obsolete and expensive LH0033 was socketed, and various cheapo emulator boards were built which plugged into that socket. It's mentioned in this post, I've copied the photo below.
_
Attachments
Thank you Mark, I will check that link out later. I already have a PCB laid out for BUF-03 devices with DC nulling components, albeit just a two layer board (bottom layer is a ground plane) as I have used them to very good affect as the buffer stage to modify a passive attenuator (I'll resist using the term pre-amp). I'm in the lucky position of having half a dozen of them available. I use the BUF-03s in DIP8 sockets via adaptor PCBs.
I guess the first step is to take Nelson's Micro-cap schematic, modify it and run some simulations.
I guess the first step is to take Nelson's Micro-cap schematic, modify it and run some simulations.
This is what I have for the Lii Silver 10 in their bass reflex enclosure.
I haven't had the time to test my other Lii samples....
Hi All,
Just got this board for the Lii silver 10. Not being the most savvy, what would I use for the R6-R11 and C5 and C6? Even better a parts list for this particular speaker would be much appreciated. Have some wine to trade for it.
Thanks in advance!
C
- Home
- Amplifiers
- Pass Labs
- Full Range EQ