Laser cut stainless steel will add 80 euro more.
Regards,
Tibi
if 10 mm top plate and Laser cut stainless steel ,what is the price ?
also the bottom plate ?
")
if 10 mm top plate and Laser cut stainless steel ,what is the price ?
also the bottom plate ?
3mm is the maximum for laser cut that I can provide now.
For 10mm top and bottom plate entire design need to be changed and more cnc work to be done in order to accommodate CD mechanism. This will take time and money ...
Regards,
Tibi
3mm is the maximum for laser cut that I can provide now.
For 10mm top and bottom plate entire design need to be changed and more cnc work to be done in order to accommodate CD mechanism. This will take time and money
ok, what is the price for top and bottom plates only ?
I just tried the damping of the crystal that we were discussing on page 779.
I cut a small 2cm MDF disc 3mm thick, opened a 3mm hole in it and slipped it on the crystal.
The results αρε not that big, but I can hear the highs being less harsh. Some rubber or silicon bands would probably work better, but I have none for now.
I cut a small 2cm MDF disc 3mm thick, opened a 3mm hole in it and slipped it on the crystal.
The results αρε not that big, but I can hear the highs being less harsh. Some rubber or silicon bands would probably work better, but I have none for now.
Last edited:
3mm is the maximum for laser cut that I can provide now.
For 10mm top and bottom plate entire design need to be changed and more cnc work to be done in order to accommodate CD mechanism. This will take time and money
ok, what is the price for top and bottom plates only ?
I have price only for entire enclosure. I'll ask and let you know.
Regards,
Tibi
The enclosure presented here http://www.diyaudio.com/forums/digi...ansport-shigaclone-story-778.html#post3870270
is 440 euro. Enclosure is full aluminum CNC made, with 10mm laterals and top 3mm laser cut stainless steel.
A cheaper version with top and bottom plates made from alubond and 8mm aluminium laterals is 225euro.
I'll take preorders via webshop starting with 1st August.
Regards,
Tibi
What is the different between 225 euro and 440 euro version ?
What is the different between 225 euro and 440 euro version ?
The 440euro is full aluminium, with 10mm laterals and top 3mm laser cut stainless steel. Top and bottom is 5mm Al.
The 225euro have top and bottom from alubond and lateral 8mm aluminum.
Regards,
Tibi
From the post of tvicol I see the following:What is the different between 225 euro and 440 euro version ?
- top and bottom plates made from alubond and 8mm aluminum laterals is 225euro
- full aluminum CNC made, with 10mm aluminum laterals and top 3mm laser cut stainless steel 440 euro
------------------------------------
I made some research about alubond and it seems that this material is as follow :
http://karachi.olx.com.pk/alubond-usa-aluminum-composite-panels-iid-233092187
Last edited:
Shiga MKII transformer is magnetic shielded.
Even so, the transformer must be as close to input power socket and as far as possible to main board and s/pdif output.
Thanks to Shiga MKII construction, the main board can be placed at a safe distance from main trafo.
Regards,
Tibi
One qustion : why the power trans sec voltages is 9-0-18 and not 12-0-12 ?
if use higher VA , like 100VA , sound can be better ?
Thanks
Ang
One qustion : why the power trans sec voltages is 9-0-18 and not 12-0-12 ?
if use higher VA , like 100VA , sound can be better ?
Thanks
Ang
In fact power sec is 0-9-18 Vac. or 9-0-9 Vac (depending on your reference point) and after rectification and filtering you get 12.7-0-12.7 Vcc. This is 4,7V drop over 7808. At 1A will dissipate 4.7W which will require a very large heat-sink. Luckily Shiga do not have a continuous current requirement and will peak current to 1A .
Higher voltage means higher dissipated power by main regulator LM7808 and for sure will not sound better, but will make more heat. You can go for 10-0-10Vac trafo @ any amperage you consider enough.
Regards,
Tibi
I remember reading somewhere that the noise in the LM78xx series is minimized when the drop voltage is bigger than 8volts. I think it was somewhere in the Salas psu thread.
If you found that post please put here a link.
For more than 8V drop, a trafo with sec 12-0-12Vac should be used.
Regards,
Tibi
Last edited by a moderator:
I could not find the post. It could be on the Greek forum that Salas writes. I ll keep an eye open for this.
In the meantime, if you check the datasheet, you can see 2 very interesting facts.
http://www.mouser.com/ds/2/149/LM7808-195669.pdf
The first is on page 5 with the electrical characteristics of LM7808. If you check the regulator specs, you can see that it specifies that regulation should be better if Vin is >11.5V and <17V and Iout is >250mA and <750mA.
The second is on figure 3 on page 17, you will see that the output current capacity peaks at 2.2A when the difference between input and output voltage is at around 7Vs which kind of verifies that something nice is happening for the old LM78xx in that spot.
Thanks for this information, dimkasta.
Latest transformers I have included in KIT are 10-0-10Vac @ 2.5A (this is the reason for price increase as well).
Running 78xx at 14,1Vcc already start to heat regulator.
On my scope noise figures do not show any improvement, but at least mechanic operation is much firm.
Regards,
Tibi
Latest transformers I have included in KIT are 10-0-10Vac @ 2.5A (this is the reason for price increase as well).
Running 78xx at 14,1Vcc already start to heat regulator.
On my scope noise figures do not show any improvement, but at least mechanic operation is much firm.
Regards,
Tibi
I was doing some reading again on super regs, and I remembered a link posted by 6L6 a while back about how to tweak and optimize an LM317 reg, so I did a few tests today to try the led reference thingy again (no zener this time) which lowers output impedance significantly.
I must say I am impressed. There was a very distinct boost in dynamics compared to the LM7808, mostly obvious in the impact of drums.
However the chip got hot really fast, probably from oscillation. I need to work on it a bit more, find proper output cap types and sizes, perhaps even hookup a tracking preregulator too, and I will get back to you.
It might also be interesting to use a gyrator as a tracking preregulator.
In the meantime, if you feel like reading, here is the article
Using 3-pin regulators off-piste: part 1
Last edited:
Here is the schematic I am currently working on. It also works without changes with LM317.
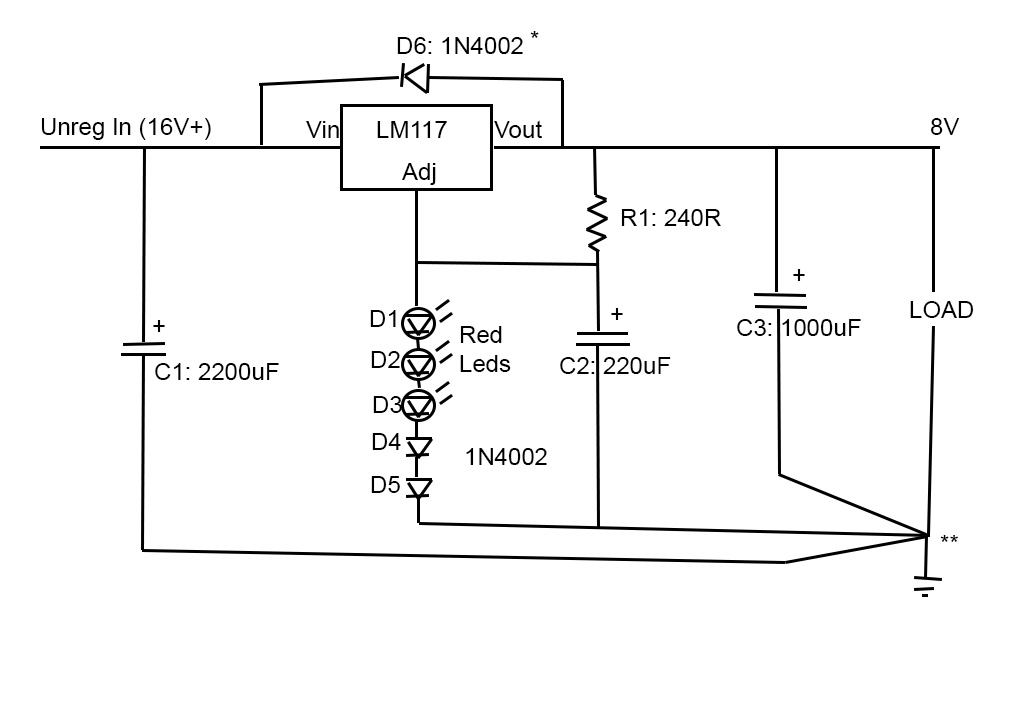
C1: Use your favorite input cap. usually 2200uF/25V. Keep it close to the LM
C2: 220uF. Use low ESR. The lower, the better for the output impedance of the regulator. My choice is Panasonic FR at 16V.
C3: 1000uF. This must NOT BE LOW ESR otherwise the regulator will oscillate and overheat with unpredictable results. My choice is Nichicon Muse 1000uF/25V
D1-D3: 3mm Red leds. Do not use ultra bright. The cheapest you can find. If you get a bit more Vout, you can switch to green to lower it a few 10s of mVs
D4-D5: Plain old 1N4002. I used them because I had them and their voltage drop fitted perfectly.
D1-D5: The Vout is 1,25V+the sum of the voltage drops. For 5V you can use just two red leds. For 8Vs you need 3 red leds and 2 diodes. You can match or select your items after measuring them.
D6*: This is not necessary, but it protects the LM from the capacitor discharge during power down. I do not use it with LM117 since it has some internal resistance in the output, so it kinda protects itself up to a few amps.
**: Keep the ground star on the load to take advantage of the sensing function of the reference. It keeps parasitic resistances and voltage drops at bay by compensating for them. This significantly improves output impedance as well.
BTW, please do not use CAT5 wire for the PSU. You are killing your output impedance benefits. I am switching to 1.5mm solid copper wire.
Oh and it works perfectly with 12VAC, but some more headroom could make it work even better.
Sonically is very nice now.
Attachments
For 5V Salas was very nice, although it requires some attention to compensate for the swings of the digital load and prevent oscillations...
On 8V with ~1,5A for the shunt, the heatsink required was HUGE and I did not feel very comfortable shunting that kind of power. Plus the sonic improvement was not that big from the 7808, so I forgot about it and kept 7808 in there.
On 8V with ~1,5A for the shunt, the heatsink required was HUGE and I did not feel very comfortable shunting that kind of power. Plus the sonic improvement was not that big from the 7808, so I forgot about it and kept 7808 in there.
For 5V Salas was very nice, although it requires some attention to compensate for the swings of the digital load and prevent oscillations...
On 8V with ~1,5A for the shunt, the heatsink required was HUGE and I did not feel very comfortable shunting that kind of power. Plus the sonic improvement was not that big from the 7808, so I forgot about it and kept 7808 in there.
You try on LT1806 ?
- Home
- Source & Line
- Digital Source
- Finally, an affordable CD Transport: the Shigaclone story