Finished B1
Hi")
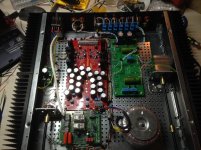
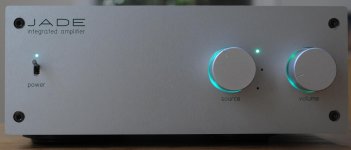
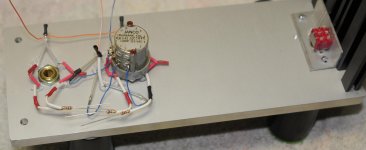
Here she is, the finished B1 preamp
I'm totally hooked on this sound! Changed the 1K resistors for naked foils... that was a BIG difference!
Beautifull detail and I never heard that much headroom. Time to enjoy
Love it!
Merry Christmas to all!!!!
Hi
Here she is, the finished B1 preamp
I'm totally hooked on this sound! Changed the 1K resistors for naked foils... that was a BIG difference!
Beautifull detail and I never heard that much headroom. Time to enjoy
Love it!
Merry Christmas to all!!!!
Attachments

Engraving
Hi WalterW,
Thanks! I did put a lot on effort in it! Glad it shows
I like over the top But it's not that much Only an input selector board and a beafy PSU
The engraving, milling and drilling is done at Modushop in Italy. That's where the enclosure comes from. Just send a DWG of how you want the front and backpanel, and they make it custom.
Wow , nice build Sjoerd! That's a lot of extra components for such a simple buffer
Where did you do the engraving of your frontpanel?
Hi WalterW,
Thanks!
I did put a lot on effort in it! Glad it shows I like over the top
But it's not that much Only an input selector board and a beafy PSU The engraving, milling and drilling is done at Modushop in Italy. That's where the enclosure comes from. Just send a DWG of how you want the front and backpanel, and they make it custom.
Local Mudushop
I hear you! Price is pretty steap! But I must say they do terrific work. I have not found a CNC company that does custom work for less than Modu.... So I guess that's the bottomline for now
Yeah, I've done some business with them too, but I am still searching for a local Dutch 'modushop'
I hear you! Price is pretty steap!
But I must say they do terrific work. I have not found a CNC company that does custom work for less than Modu.... So I guess that's the bottomline for now Toroid
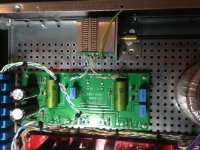
Don't know how NP's vision has anything to do with the specs of a toroid
But generally it is about about 40 degrees rise by full operational power and 25 degrees ambient..... My 50 cents
What is a NP approved rule of thumb for toroid temp rise?
Don't know how NP's vision has anything to do with the specs of a toroid
But generally it is about about 40 degrees rise by full operational power and 25 degrees ambient..... My 50 cents
Hi
Here she is, the finished B1 preamp
I'm totally hooked on this sound! Changed the 1K resistors for naked foils... that was a BIG difference!
Beautifull detail and I never heard that much headroom. Time to enjoy
Love it!
Merry Christmas to all!!!!
Cool looking pre-amp.
Can you show some closeups of how you integrated the modushop knobs? I once bought some of their biggest, but I cannot figure out how to integrate in a way that looks nice.
Knobs
Hi cviller,
The knobs are 39mm(biggest they have around). I just milled out 40mm, 4mm deep. Well, Modushop did that Because I said so
Cool looking pre-amp.
Can you show some closeups of how you integrated the modushop knobs? I once bought some of their biggest, but I cannot figure out how to integrate in a way that looks nice.
Hi cviller,
The knobs are 39mm(biggest they have around). I just milled out 40mm, 4mm deep. Well, Modushop did that
Because I said so 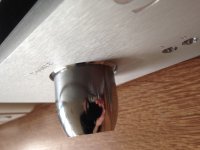
Modushop
Yep, very nice! This is my second case I got from them. And again, just perfect! I sent them the DWG drawing and this is what came back
They know what they are doing!
Happy new jear!
Thanks.
Very nice people at modushop.
Yep, very nice! This is my second case I got from them. And again, just perfect! I sent them the DWG drawing and this is what came back
They know what they are doing!
Happy new jear!
Note: In my B1 there is no temp. rise at all..... because no power is drawn.....
Must produce really black background. Many of us have been shaped by rules of thumb from around here. They are addicting and help us avoid analysis paralysis
Another great way to mount the modushop knobs is to fully drill the front panel with slightly larger hole than needed and then "float" the pot and knob inside the chassis using a L shaped piece of aluminium. Must be tight tolerance so the knob doesn't scratch the hole. But looks nice!
A 100 gram knob is too heavy for that, imo.
For such knobs and bigger, better to press a ball bearing in the panel and use an extension shaft.
That's what I was trying to describe, hanging the knob directly on the pot's shaft will stress it too much.
Knobs
I agree. But I like the idea of sticking the knob through the front panel.... I like these knobs but they do stick out a bit much.... So that could be the answer. The extension shafts I used are glassfiber. They are really strong! I did not use ball bearings but perfect through hole fittings. Works perfectly!
For now the build is done But there's allways an improvement to be done More of that in the new jear!
See you guys in 2014!
A 100 gram knob is too heavy for that, imo.
For such knobs and bigger, better to press a ball bearing in the panel and use an extension shaft.
I agree. But I like the idea of sticking the knob through the front panel.... I like these knobs but they do stick out a bit much.... So that could be the answer. The extension shafts I used are glassfiber. They are really strong! I did not use ball bearings but perfect through hole fittings. Works perfectly!
For now the build is done
But there's allways an improvement to be done More of that in the new jear! See you guys in 2014!
Last edited:
Ok, here's a picture of how it looks upclose
SjoerdSmits:
If you drill a few 3mm holes in the milled area, you can mount LEDs behind the knob, which will illuminate the narrow band surrounding the knob. I like the effect.
Regards,
Scott
Attachments
- Home
- Amplifiers
- Pass Labs
- Pictures of your diy Pass amplifier