It's not correct to assume orange peel affects only the amateur sprayer, I have seen new BMW vehicles with evidence of this although certainly not in recent times.
What I have failed completely to master is keeping dust from settling on wet surfaces despite wetting down floors & walls in the area.
Absolutely! The only difference is a pro knows how to deal with it while it's still wet.
I was cautioned not to try, ditto ridding the air of the plethora of little flying critters we have around here beyond damping the ground/floor. Much can be buried in, or at least sanded/buffed out of, a finished paint job.
GM
Last edited:
I would argue that the expense and time preparing, cleaning, mixing and generally experimenting with proper equipment isn't necessarily worth it if you are only ever finishing one small pair of stand mount speakers. I and others have demonstrated that satisfactory results can be achieved relatively easily with cans.
But don't get me wrong, I completely agree that properly used equipment is better in every way, and is certainly the right approach for painting any surface larger than one or two square meters. Not to mention that the cost of spray cans will exceed the cost of equipment and paint for anything much bigger than a medium sized stand-mount.
But don't get me wrong, I completely agree that properly used equipment is better in every way, and is certainly the right approach for painting any surface larger than one or two square meters. Not to mention that the cost of spray cans will exceed the cost of equipment and paint for anything much bigger than a medium sized stand-mount.
Orange peel means you're either spraying from too far away and/or at too high a pressure, which is another way of saying that it's congealing from evaporation during its flight through air.
FWIW, historically, mineral spirits or Xylene was the thinner of choice to allow the sufficient 'flow' time required for enamel, so I'm guessing that Acetone is required these days to meet EPA emission standards.
Lacquer is a 'hot' thinner, so not only will it stick to enamel, it will melt it, so a sealer is required; though in cold weather I would add a little to thinned enamel to get some initial 'bite'.
GM
Thanks for the tips GM! I was spraying at about 8" and the gun has no pressure adjustment. It just shoots air out of the nossle constantly and when I push the trigger it releases paint with the air... I do have some odorless mineral spirits at my disposal, should I try that or go with with a 1:1 acetone mixture.
Before moving to an alternative coating type I would recommend contacting the "tech support" section of the manufacturer. They generally can tell you informally what works best & this info often is not found on the side of the can.
For me dilution with mineral turps to about 20 - 30% has worked.
What I have failed completely to master is keeping dust from settling on wet surfaces despite wetting down floors & walls in the area.
Yeah, maybe I shold contact tech support and see waht they say, but last night I put on a bit of Deft brushing lacquer on top of the enamel and see if it would react.I didn't notice any bubbles or anythig inmmediately, I will check what happens tonight.
Keeping dust away is impossible for me too. I built a small paint booth with an exhaust fan and there was still dust on the speaker wehn I sprayed it
I also did pour over epoxy and let it sit over night in the paint booth.... a bunch of annoying dust was stuck to it and I have to live with that :/. I also did a smaller piece and covered it right after i poured and I sill couldnt keep it off. You need air flow from one side to another, look up clean rooms. it is really hard for me and my little garage.
I'd just like to throw in a reminder that the finishing technique discussed at the start of this thread is for 'low investment' finishing....
A couple of things to watch out for:
- Edges are unbelievably vulnerable when sanding; you will almost certainly sand down to the primer so take extra extra care here.
Good luck and if you're just doing one or two pairs of speakers, I advise that it isn't worth the expense or hassle of getting into proper spray pump systems. People seem all to quick to spend hundreds on equipment for one off projects.
Cheers
I definately plan on doing other project and painting them. I plan on doing my whole living room furniture and definatley more speakers in the future
") .
.Yes you are absolutely correct about the edged, hardest part. Easy to sand and polish trough. What I do to mitigate this is spray the edges once by themselves, than be careful not to sand them trough when removing orange peel, than put on a bunch of clear top coats and be careful not to sand/polish trough the edges when buffing and removing some orange peel
High quality tools perform better and give better results than "el cheapo" ones. The resale value is high also if they are relatively new. So how much DID you spend on Drivers? and What is your time worth? (rhetorical)
Ron
I said to myself later last year that I need to use the "Buy it for LIFE" philisophy about tools and certain things..... but I just didnt have the heart to spend $400-750 on decent spray system :/. Although now I saw a 23 galon 90psi Pressure tank with 5.5 SCFM for $200 and a $70 spray gun that would fit nicely with it :/
Please do share! lolAbsolutely! The only difference is a pro knows how to deal with it while it's still wet.
GM
BMWs like all new cars today are sprayed by machines.......
Yeah you can see that the paint in most cars is rather ineven and the images are distorted... aparently, I read, that that is the paint texture and not orange peel. You wont feel the bumps of orange peel but you would see the orange peel/distortion effect. Stil some cars have terrible color texture when you look at them!
I would argue that the expense and time preparing, cleaning, mixing and generally experimenting with proper equipment isn't necessarily worth it if you are only ever finishing one small pair of stand mount speakers. I and others have demonstrated that satisfactory results can be achieved relatively easily with cans.
But don't get me wrong, I completely agree that properly used equipment is better in every way, and is certainly the right approach for painting any surface larger than one or two square meters. Not to mention that the cost of spray cans will exceed the cost of equipment and paint for anything much bigger than a medium sized stand-mount.
- Both true! I did use cans before but I did some calculations and since this wont be my only project requiring painting I decided on a gun.... $150 spray system that is still inexpensive.
Getting the right paint and coating is extremely important!
Pro tip: If you find a series of paint that provides primer, base, and clear coat STICK TO IT!!!!
I used freaking shellack sanding sealer, with oil-based enamel, and I will top coat it with sprayed "brushing lacquer". All different brands! I should have found one supplier with lacquer primer, lacquer color coat, and lacquer clear coat and be a happy! lol
Btw this is what I will spray on top of the oil-based enamel!
Clear Wood Finish Brushing Lacquer | Deft Inc | Trade
Lots of people say it's good to spray as lon as you thin it. Why the manifacturor recommends only brushing is because this particular lacquer is designed to be brushed on and dry slower than regular laquer... therefore removing the brush strokes and leveling itself.
Spray brushing lacquer? - by Tim Kindrick @ LumberJocks.com ~ woodworking community
I was following along earlier in the thread and Sherwin William's Armorseal waterborne urethane paint seemed to produce excellent results, was inexpensive and easy, but then all talk of it suddenly ended. Is Lacquer currently the preferred finish?
I was following along earlier in the thread and Sherwin William's Armorseal waterborne urethane paint seemed to produce excellent results, was inexpensive and easy, but then all talk of it suddenly ended. Is Lacquer currently the preferred finish?
Oh yeah it looks awesome with that Armorseal... the problem is buying it! This I believe is a contractor item therefore regular joes like me can't buy it.
I should have followed up on my findings since my last post, but what happened is I made a bunch of mistakes and re-did a couple of things.
I will put a more detailed message with pics later this week but basically I ended up using a spray can lacquer on top of my oil based enamel :O
Yep most will cringe but it was ok for the most part.
OK, that crappy oil based Rustoleum (Quart Can) from Lowes is garbage so that is where my problem lied.
I was able to thin it 1:1 ratio and spray it on pretty decent with managable orange peel BUT the damn thing never dries and will NEVER pass the nail test. On top of that you can't polish it at all. It always smears and it gets even worse, evena fter two weeks letting it dry.
What I did is put on a clear coat of lacquer (Duplicolor from Autozone) but it ended up sagging the first spray around. I also mistook a bunch of fish eyes and craters for sagging but they were there and it was a pain! I had to resand everything to the base coat (Rustoleum oil) and sprayed it again witht he Duplicolor lacquer. I think therre was some contamination in my gun and i got real bad fish eyes and craters on one spot of the baffle and i got frustrated.
I ended up using a couple of spray cans of lacquer on top of the base coat to cover the whole speaker. Than I was able to polish the lacquer after a few days to a very mirrory finish! IT however is also not completely dry and there are scrateches that are still there that the polishing can't get, but from two feet away you cant tell at all. And with artifical light it might as well be piano finish.
Right now one of my speakers has the high gloss lacquer clear coat and the other has the base coat only. The base coat only looks real good but it feels and looks saten compared to the lacquer clear. From listening position you can't tell. I will have to finish the 2nd speaker at a later time.
LESSON LEARNED: Don't try to polish enamel! If you want hi-gloss or piano finish I would go with lacquer. It will get harder and it will be polishable.
The spray can's I got didn't get the lacquer finish hard enough tho, I am not sure but I think I used Velspar Laquer Clear Can. It didn't pass the nail test but it polished to a mirror reflection with a bunch of hairline scratches that are not easily visible. (I will post pics)
However I did spray a Rustoleum Professional Flat Black from a can and that layed down PERFECT and got hard within a day or two! I would recommand using that for a base coat. You have to apply it in thin coats and it is OK if you do apply it thin, because it comes out gorgeous like a monolith anyways. What I am doing now is repainting a cover for a CD player black and will use that Rustoleum Flat Black as the base color and a Krylon Clear Lacquer for the clear coat and see how that combination comes out. The Krylon Clear Lacuqer Spray can is advertises as drying super quick and being a real hard finish.
I am begining to regret my HVLP gun purchase. Probably my cheap gun but those contaminants really F*%d up my work and it's a pain to clean and you can't clean it out completely at some crevaces. I had to switch between oil based and lacquer paint, and condensation, so maybe that's why i got those fish eyes the 2nd time.
I've also read that this (Clearcoats - Speedokote LLC Inc) is the best clear coat for the money. Gets hard like a rock in a couple of hours. I have not used it
I haven't found the perfect combination yet but lacquer looks pretty good to me. Just stick to the same line of paint from primer to clear....
The local paint dealer says best way to go is two-stage (basecoat/clearcoat) Urethane, but it's expensive because I'd need sanding sealer, primer, activator, sealer, base coat, reducer, hardener, and clear coat. It comes to over $250. I'm seeing that often single-stage (clear mixed with base) is preferred with black because it appears a deeper black, and two-sage looking more like glass over a single layer black surface (less depth in the actual black component) with almost a silver sheen in side by side comparison. I believe I'd prefer the deeper black than the slightly silvery look for this. Single stage is also much easier to repair.
Here's a two-stage (basecoat/clearcoat) black:
http://i221.photobucket.com/albums/dd44/n_knight/IMG_8309.jpg
Here's a single-stage black:
http://autopia.org/forum/click-brag/84390-2006-black-lexus-ls460-l.html
This Urethane kit comes with everything needed to do the outer panels of an entire car for only $102, and it's low VOC, the site has numerous recommendations over Summit paints:
5 Star Xtreme Gloss Black Urethane Paint Kit - 8000 Automotive Paint, Auto Paint, Car Paint
This is in a newer "Urethane Acrylic" pre-mixed formulation that's easier because you just pour and spray without mixing, and costs less, but supposedly a bit less glossy:
Super Gloss Jet Black Urethane Acrylic Paint Kit Automotive Paint, Auto Paint, Car Paint
I'm probably going to give the single-stage pure Urethane kit a try.
If it was nitro-cellulose lacquer that you were using, I hope you had the proper breathing elements / mask / fresh air and I hope it does not crack later. Lacquer is known for cracking / crazing after it dries. If it stunk like the devil and made you sick to your stomach it was lacquer. Otherwise it was something else like a poly.
I buy and spray a water based product that is called "lacquer" but has no lacquer in it. Go figure.....marketing.
I buy and spray a water based product that is called "lacquer" but has no lacquer in it. Go figure.....marketing.
Finding some bad reviews out there for the paint I linked to. Even for how inexpensive it is, it may not be worth it. Summit should be better for almost the same cost.
Also, Summit and Eastwood appear to be repackaged Kirker which is hit or miss as far as quality from various comments out there, with those who've used the expensive name brand stuff noticing the difference. I'll probably go with a pint of name brand color coat and head to a friend's autobody shop, throw him some bucks for the additives and spray it there.
Also, Summit and Eastwood appear to be repackaged Kirker which is hit or miss as far as quality from various comments out there, with those who've used the expensive name brand stuff noticing the difference. I'll probably go with a pint of name brand color coat and head to a friend's autobody shop, throw him some bucks for the additives and spray it there.
finally got around to it....
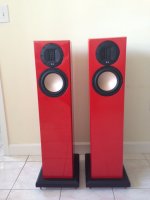
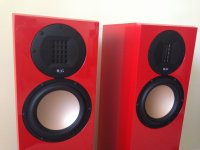
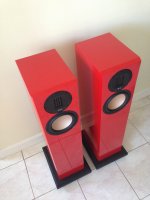
OK here are my "Satisfactory" Results
The Right Speaker has no Lacquer Clear coat.
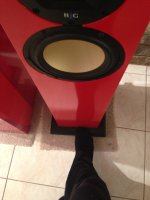
The Left Speaker has Lacquer Clear Coat and the Baffle was fine grit sanded and polished.
My formula:
- Shellac Seal Coat (dont over apply it and get runs because it doesnt dry and becomes like gum when sanding... sigh. I put wayy too much)
- Zinnister BIN Primer (white. It dries super quick.. 30 min. You can apply multiple coat and it sands real good. I dry sanded but I should have wet sanded instead. I sanded it perfectly flat before base coat)
- Rustoleum Oil Based Crimson Red Quart (Piece of crap paint from Lowes... too bad I didn't know better. I ended up spraying this paint thinned 1:1 with Acetone. Once I was done screwing around I was able to spray it pretty well with little orange peel. Look at pics for the worst orange peel on the top of the speaker)
- Velspar Clear High Gloss Lacquer (spray can. It sucks also, maybe you need to apply thin coats but if you do that you get a ton of orange peel and it doesnt cover well. Maybe 2.5 cans per speaker... $5 a can)
My Right speaker came out pretty good with just the Oil based paint but that paint will never polish or dry. You can leave some nasty smudges that are super hard to get off because of the paint. Maybe I applied too thick but it came out decent and it can be left like that and most people wouldn't mind at all, from a few feet away it looks awesome. The reflection is not as great tho, kind of muddy.
My left speaker got the full treatment but I only polished the baffle. It took me a good 2 hours to get the shine and cover the scratches that I wanted. Mixing the Oil based paint with a Lacquer clear coat is not optimal but it worked. You do need a decent amount of lacquer tho so you wont rub out the corners when you are polishing... because polishing is not easy but it is polishable compared to the Oil based paint.
I finally figued out how to make a coupe of passes with the Lacquer can. I would do it in a left-to-right motion and go over again from right-to-left. Than carefuly overlap the previous spray and continue to cover the whole thing. I would call that one coat. Do two or three coats withing 15-30min intervals per side. I layed my speakers flat when painted and did each side individually over 1 week maybe.
I also waited for 1 week fo it to "dry" but it never passed the nail test... maybe because of the oil based undercoat or crappy lacquer clear.. or both being crappy alltogether.
Polishing: Using a rotary Ryoby Buffer.
- Wet sand down imperfection in the coat till satisfactory and finish with 2000 grit
-Turtle Wax Polishing Compound (it is rough and gray looking. Use it to reduce the scratches and get a bit of sheen on the surface. look at my pics). I used the buffer, several passes, reapplying compound, untill i got a bit of a reflection.
-Meguires Ultra Cut Compound (apply on buffing pad and go to town, several passes were made at each section and reaplying the compound) I was lucky to not have rubbed off any of the clear coat but you need be careful. I made sure to put on an extra layer of Clear on my edges and corners. That might have helped.
TAfter of two hours polishing JUST THE BAFFLE he final results were good but not piano gloss. As you can see from the pics there were these scratches/paint texture cracks that I couldn;t buff out or reappeared rigght after. The clear was not nail test proof so that might be the cause but at that point I had a hard time photographing those texture marks/cracks and from two feet away I couldn't tell unless the light was just right and i was really looking at it.
Anyhow. Hope that helps. MY formula is not complete yet but one day it will be!
Better paint definately! Spray Gun too! I could have saved me time with Spray cans actually and mayve gotten the same results... sigh.
I am currently working on repainting a DVD cover with automotive spray cans... new formula lol.
typos everywhere, I know :/ ... deal with it
OK here are my "Satisfactory" Results
The Right Speaker has no Lacquer Clear coat.
The Left Speaker has Lacquer Clear Coat and the Baffle was fine grit sanded and polished.
My formula:
- Shellac Seal Coat (dont over apply it and get runs because it doesnt dry and becomes like gum when sanding... sigh. I put wayy too much)
- Zinnister BIN Primer (white. It dries super quick.. 30 min. You can apply multiple coat and it sands real good. I dry sanded but I should have wet sanded instead. I sanded it perfectly flat before base coat)
- Rustoleum Oil Based Crimson Red Quart (Piece of crap paint from Lowes... too bad I didn't know better. I ended up spraying this paint thinned 1:1 with Acetone. Once I was done screwing around I was able to spray it pretty well with little orange peel. Look at pics for the worst orange peel on the top of the speaker)
- Velspar Clear High Gloss Lacquer (spray can. It sucks also, maybe you need to apply thin coats but if you do that you get a ton of orange peel and it doesnt cover well. Maybe 2.5 cans per speaker... $5 a can)
My Right speaker came out pretty good with just the Oil based paint but that paint will never polish or dry. You can leave some nasty smudges that are super hard to get off because of the paint. Maybe I applied too thick but it came out decent and it can be left like that and most people wouldn't mind at all, from a few feet away it looks awesome. The reflection is not as great tho, kind of muddy.
My left speaker got the full treatment but I only polished the baffle. It took me a good 2 hours to get the shine and cover the scratches that I wanted. Mixing the Oil based paint with a Lacquer clear coat is not optimal but it worked. You do need a decent amount of lacquer tho so you wont rub out the corners when you are polishing... because polishing is not easy but it is polishable compared to the Oil based paint.
I finally figued out how to make a coupe of passes with the Lacquer can. I would do it in a left-to-right motion and go over again from right-to-left. Than carefuly overlap the previous spray and continue to cover the whole thing. I would call that one coat. Do two or three coats withing 15-30min intervals per side. I layed my speakers flat when painted and did each side individually over 1 week maybe.
I also waited for 1 week fo it to "dry" but it never passed the nail test... maybe because of the oil based undercoat or crappy lacquer clear.. or both being crappy alltogether.
Polishing: Using a rotary Ryoby Buffer.
- Wet sand down imperfection in the coat till satisfactory and finish with 2000 grit
-Turtle Wax Polishing Compound (it is rough and gray looking. Use it to reduce the scratches and get a bit of sheen on the surface. look at my pics). I used the buffer, several passes, reapplying compound, untill i got a bit of a reflection.
-Meguires Ultra Cut Compound (apply on buffing pad and go to town, several passes were made at each section and reaplying the compound) I was lucky to not have rubbed off any of the clear coat but you need be careful. I made sure to put on an extra layer of Clear on my edges and corners. That might have helped.
TAfter of two hours polishing JUST THE BAFFLE he final results were good but not piano gloss. As you can see from the pics there were these scratches/paint texture cracks that I couldn;t buff out or reappeared rigght after. The clear was not nail test proof so that might be the cause but at that point I had a hard time photographing those texture marks/cracks and from two feet away I couldn't tell unless the light was just right and i was really looking at it.
Anyhow. Hope that helps. MY formula is not complete yet but one day it will be!
Better paint definately! Spray Gun too! I could have saved me time with Spray cans actually and mayve gotten the same results... sigh.
I am currently working on repainting a DVD cover with automotive spray cans... new formula lol.
typos everywhere, I know :/ ... deal with it
Attachments
-
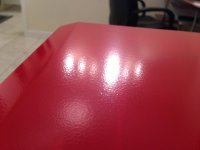 photo_2.JPG471.9 KB · Views: 470
 -
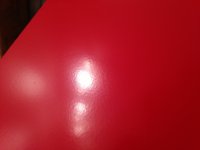 photo_3.JPG444.7 KB · Views: 444
 -
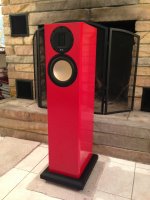 photo_4.JPG675.5 KB · Views: 446
 -
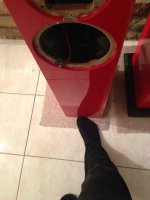 photo_13.JPG559.6 KB · Views: 228
 -
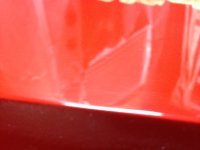 photo_12.JPG685.9 KB · Views: 229
 -
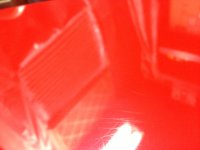 photo_11.JPG683.1 KB · Views: 206
 -
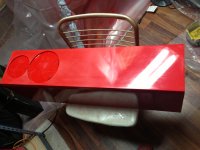 photo_10.JPG571.2 KB · Views: 181
 -
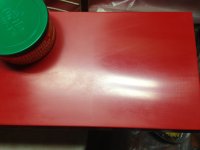 photo_9.JPG412.7 KB · Views: 164
 -
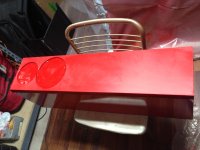 photo_6.JPG574.6 KB · Views: 404
 -
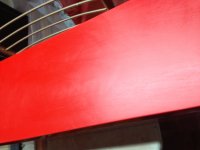 photo_5.JPG532.8 KB · Views: 429


OK, as this is the most current post discussing MDF finishing here, I am going to tag on instead of starting anew.
I too have gotten finishes as dramatic and successful as these red beauties, only to have the seams start to show 6 months later. I did some recent tests where I glued MDF corners up, covered them with two coats of poly resin, sanded smooth and painted to see no trace of the joint at all. None. 2 months later, I see the seam sinking in. Here is my thought: It is the water based glue. As dry as we think it is, over time it continues to dry shrinking the seam.
So, 6 test blocks were made up. 2 glued with Titebond, 2 with epoxy and 2 with polyester resin. I am thinking of just sealer/primer/enamel on one set, two coats of resin/primer/paint the second set of three and let them sit for 6 months. I will bake them all at 125 for an hour to stabilize the humidity as much as I can. They will have 3/4 radius on the endgrain.
Yes the culprit is the glue. PVA based glues shrink and are not solid so the joint moves around a tiny amount. In the UK we can get a glue called Cascamite that is a urea formaldehyde powder you mix with water. This glue has no give and will sort the problem, even though it's water based the shrinkage is stopped after a few hours. Your epoxy should also be effective. Polyester resin should also work from a cosmetic viewpoint, but it does not adhere well to MDF and the joint will be relatively weak.
Last edited:
OK, as this is the most current post discussing MDF finishing here, I am going to tag on instead of starting anew.
I too have gotten finishes as dramatic and successful as these red beauties, only to have the seams start to show 6 months later. I did some recent tests where I glued MDF corners up, covered them with two coats of poly resin, sanded smooth and painted to see no trace of the joint at all. None. 2 months later, I see the seam sinking in. Here is my thought: It is the water based glue. As dry as we think it is, over time it continues to dry shrinking the seam.
So, 6 test blocks were made up. 2 glued with Titebond, 2 with epoxy and 2 with polyester resin. I am thinking of just sealer/primer/enamel on one set, two coats of resin/primer/paint the second set of three and let them sit for 6 months. I will bake them all at 125 for an hour to stabilize the humidity as much as I can. They will have 3/4 radius on the endgrain.
Yes the culprit is the glue. PVA based glues shrink and are not solid so the joint moves around a tiny amount. In the UK we can get a glue called Cascamite that is a urea formaldehyde powder you mix with water. This glue has no give and will sort the problem, even though it's water based the shrinkage is stopped after a few hours. Your epoxy should also be effective. Polyester resin should also work from a cosmetic viewpoint, but it does not adhere well to MDF and the joint will be relatively weak.
Indeed. For what it's worth, I also found that a 2-part urethane paint (Isolack, if I recall correctly) seemed to have a bit of "give" in that it resisted the MDF joint movement. Not nice stuff to spray though (isocyanate -> dangerous)
Whilst I haven't tried it, one technique I've seen mentioned was to glue your joints, then use a 'V' groove router bit to cut a shallow channel along the glue line (just a couple of mm deep/wide), and fill with an automotive filler (e.g. P38 in the UK).
I believe that Ant (ShinOBIWAN) has sometimes glued a thin layer of a cheap wood veneer over a face with joints, as that can sand & fill flat, and will hide the joint movement).
If flat joints, then things like routing them out may work. I do full 3/4 or larger radius on all 12 edges. It makes quite a difference in HF response. If you need to cut into the joint, then I believe there is something wrong with the joint. Let's fix what is wrong. I do not believe it is movement, but a sinking of the PVA and/or MDF as it drys over a long period. Just the same, pin-holes appear. This is not at all unlike automotive issues.
Quite a few companies produce mirror-finish that does not have seam issues. HOW?
Yea. Imaron is tough paint. I don't have a full suit and pressurized breathing so I can't use it. It will not cover up an insecure foundation though. I used Dupont Centari with good results, but a year later, the seams sunk in. That set had sanding sealer, several coats of auto lacquer primer, several color coats. If I scuffed them and shot a few coats of clear, that may hide the seams, but the year wait is not very "production"
Day one.
I made up 10 test pieces. Each of two sets was glued with PVA, Poly resin, epoxy, superglue, and Locktight G06. (some new stuff). All seem strong enough. All soaked into the surface a little. It was hard to get the super glue thick enough to really fill the joint. Gell may be better.
Day two:
Routed the edge with a 3/4 roundover. So, the seam is just at the edge of the contour. I sanded true with 120 and a belt sander. Then 220 pad sander. I coated one set with 50% varnish and thinner, the other set with a lacquer based "sanding sealer". The burnished surface of the MDF was scuffed. I am trying to avoid the sealing with poly resin. It actually works very well ( at least two coats), but spraying it is a mess and the goal here is to establish what is wrong with the glue joint. Then I will worry about the perfect flat substrate to shoot the color on. It takes too long for the resin sealer coat to sink in. It will in a year.
Day three:
Sanded the varnish set with 320. End grain was still rough. Re-coated with the 50-50 and it soaked it up just as quick as the first coat. Set off to dry. Sanding sealer sealed much better, filled the end grain much better, but was un-sandable. It gums up even gentle hand sanding with 220 or 320. Forget a machine. The hint is the label says "easy sand" I should know, the first rule of advertising is to take your worst attribute and advertise it. I am going to see if a bake at 120 will harden it up.
Of course, hose them down with bed liner and you get a textured almost indestructible finish that could be good for panel resonance suppression.
- Status
- This old topic is closed. If you want to reopen this topic, contact a moderator using the "Report Post" button.
- Home
- Design & Build
- Construction Tips
- A 'how to' for High Gloss Finishing