Alberti,
Here are your rings. Just cut them out and center on the cone. Apply the pattern blocks just enough above the guide surface to keep them from bleeding onto the guides, about the space between the block rings on the guide.
Now, do not touch the driver until you have practiced using the pen tips upside down. If you are not familiar with what I am writing you need to journey back to the first few pages of this thread and re read the tutorial and then go look at the pictures. The set for treating the Lowther DX4 have the pen orientation shown.
I have also attached the text file that has the URL's for most of the EnABL related locations so you can quickly find the pictures should you need to.
Bud
Attachments
Last edited:
Take a picture with you...

dave
I once again went down to Michael's and asked the store keeper for the glue. She showed me to another column with lots ZIG glue on the wall.
Ah.... wonderful to know that the girl knows better than the shop manager.
Nothing new there. In any company, the women are the only one's who have a clue, especially receptionists! The men are all focused on whatever crossed their minds last.... usually the women....
Incidentally, when you print the patterns make sure that the PDF print scaling and rotation blocks are unchecked.
Bud
Incidentally, when you print the patterns make sure that the PDF print scaling and rotation blocks are unchecked.
Bud
I am interested in treating some CHR 70.3's that I have for my home system. I have been looking for some examples of what is typically done to these drivers or if there is a specific template for them. If anyone can point me in the right direction that would be great.
Dave @ planet10 - If you see this and have any advice I would be most appreciative.
I am getting a kit from Ed as soon as he responds to my message.
Also, I am wondering if there would be any appreciable difference noticed in treating Pro Audio drivers with this process? In particular, I have some short line arrays using four 6" eminence alpha 6 drivers and a row of tweeters.
Furthermore, would this process benefit speakers that horn loaded? ie. Bill Fitzmaurice DR series of speakers shown here: http://t1.gstatic.com/images?q=tbn:ANd9GcRyg46ndJNKsuvc4Ch5Nk74IWXPJkI2Ix103qNwZEEbEkwatGbx
Or a folded horn subwoofer?
I do pro sound and would like to try to create a rig that can create incredible fidelity and detail while at high SPL.
Thanks,
Benj
Dave @ planet10 - If you see this and have any advice I would be most appreciative.
I don't know if i got pics of the CHR70.3 i've done, i'll look when i next get downstairs... I will finish doing up our set over the next couple days so will have pics of those.
{attern sets VERY similar to CHR70.2 http://www.diyaudio.com/forums/plan...-not-easy-being-green-apologies-kermit-9.html
Also, I am wondering if there would be any appreciable difference noticed in treating Pro Audio drivers with this process?
I have done up a set of Eminence co-ax with good results and will do the 12LTA when i get at them.
dave
PS: practise on some cheap speakers befire tackling the CHR. And approach will caution, it is all too easy to crease a cone.
Pattern finished
Bud,
I have my AN12 pattern finished. Please take a look and see if there is anything I can do better before I apply glue on the cone.
I know I have to put glue to the back and front of the whizzer and at the back of the main cone from surround down 25%.
1/10 gloss to the back of the whizzer and cover the glue at back of the main cone. 50/50 one coat at front of whizzer, 2 coats at main cone. Please correct me if I was wrong.
Should I do anything purposely to kill the 1.2k, 2.5k and 5k as of the advise from Michael Chau, especially the 2.5k.
Thanks
Albert
Attachments
Alberti,
This looks like a very good start.
I am pretty sure you will need two more ring sets on the main cone, between the mid cone ring and outer ring to address the frequency issues you note. You will have to apply yourself to the tap test subtleties to find these, though your applied rings will make it easier to do. Then, please listen to the drivers mounted in their enclosures before applying anything else. No glue, no gloss coat.
Doing this will allow you to learn what EnABL is teaching about reproduced intelligible signals. It does take a while to get up to speed and initially you are likely to be confused about what you hear. The drivers will no longer sound like speakers and you have to get used to this more natural presentation before you alter the whizzer output and correct for the Raleigh wave out on the outer 25% of the cone.
This is the way I go about treating new to me drivers and I will be able to help you decide what and how much of the glue and gloss to apply after you are familiar with the sound and have begun to isolate what is still incorrect in the time alignment presentation of note and transient specific gradient of tone.
Bud
makingmoney,
http://www.diyaudio.com/forums/multi-way/119677-enabl-technical-discussion-88.html#post2349611 mige0 wavelets
Scroll down to post 880 for the blink comparisons. Note that the non wavelets presentations show little change, other than a general sharpening of peaks and valleys. The wavelet analysis shows a very clear pattern of reprinted signal, in time, from the untreated drivers and the treated drivers show a more ballistic decay, with only a slight amount of reprinting in time.
This data is on the technical thread, not this one, for listening and techniques.
ncdrawl,
I will have your patterns up later today.
Bud
Alberti,
It is unlikely that you will need more rings between the innermost ring and the middle ring. Most high frequency disasters occur between the mid cone ring and the outer ring. I realize that it is counter intuitive to a pistonic understanding of drivers, but the outermost ring controls the highest frequency dispersion. As frequency drops so do the sizes of rings needed to disperse the disruptions caused at those frequencies, that narrow their dispersion. These disruptions also create the sharp FR peaks and valleys, shown in a CSD plot, that interfere with the coherence of phase or timing within notes etc. These are notes and transients have a portion of their time structure disturbed by these non pistonic activities on the surface of the cone and in adjacent air.
The added rings on the main cone, if needed, will come between the outer ring and the mid ring. It is possible that a fourth ring will need to be added to the whizzer in the corresponding area of the whizzer cone. All of this to be determined by tap test results and listening. Do the listening fiurst please, just as they are now.
Bud
ncdrawl,
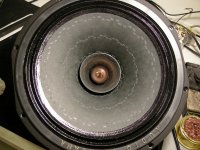
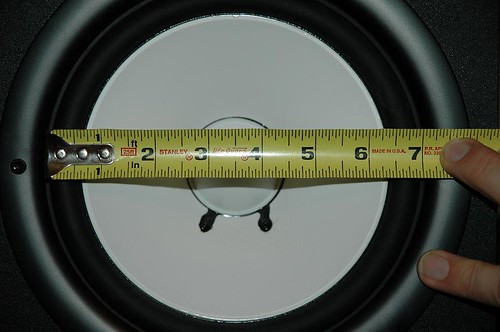
Here is your pattern guide and a pic of where the final patterns must go for EnABL 1.0. Note that the inner ring pattern guide is bigger than the patterns you will apply at the dome / cone junction so use the inside of the ring guide.
You will need to add a third ring as shown on the pic, up on the beginning of the wall of the dome, so three rings here rather than two as out at the surround.
Should you want to step up to EnABL 2.0, a tap test and additional ring sets will be needed. The applied ring sets will not need to be altered.
Also note the center dome pattern shown on the pic, though most of it is on the ruler. This will be a necessary addition that does not have a pattern guide.
Likely two coats of 30% Gloss to water will be needed for the cone and a single coat for the dome.
You must practice your pen techniques before treating these speakers. Buy some cheap 4 inch junk and practice the upside down technique for block applications.
Bud
Attachments
Bud,
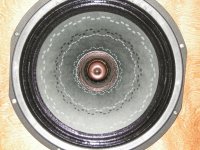
After listening for almost 20 hours and I should say I wholeheartedly respect your innovation. It works for me and the patterns kill almost 90% of those problem areas. The speakers are almost disappearing and I could only feel the wide sound stage. The sound come in layers and the imaging is very good indeed. I don't know how to tell the sound, but I really like it.
I can still find the glare/shout on the highest note of the violin and the soprano. There is also a kind of congestion on complex music. I don't know what frequency that areas belong to and I test the cone again in between the outer/ mid ring and I tap found that is a area just above 8mm on top of the mid ring. I put a ring on that area - the one with darker color. Please take a look and see if I have done anything wrong. Will test it tomorrow night.
Regards
Albert
Attachments
- Home
- Loudspeakers
- Multi-Way
- EnABL - Listening impressions & techniques