Hi Everyone,
Just exercise some caution and read up on this before simply running out to buy chemicals and begin mixing them. That's all we ask, just try to be safe. Keep your wits about you as you attempt things like this.
Members in Canada and the northern USA, it's cold out now. The garage may be the place to work, but cold weather increases the risks simply because most of you will not have a supply of fresh air.
Be safe everyone.
-Chris
Are you saying copper chloride is much more dangerous than ferric chloride? Can you elaborate?I would NOT rely on differences in MSDS to determine safety. I am an old chemist, and to become an old chemist, one must be a careful chemist.
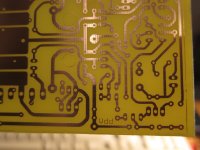
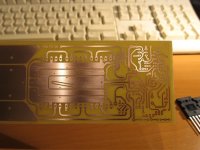
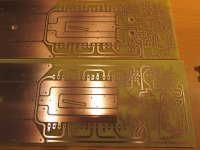
I was blessed recently with good photo paper and here's what I am getting pretty easily out of my Samsung laser printer.
Paper peels off when cooled down to room temp, leaving plastification on top of toner, protecting copper perfectly. Letters and circles on the photo are 2 mils, tracks are 32 and 50. 10mils can be done in a snap.
Paper peels off when cooled down to room temp, leaving plastification on top of toner, protecting copper perfectly. Letters and circles on the photo are 2 mils, tracks are 32 and 50. 10mils can be done in a snap.
Attachments
I was blessed recently with good photo paper and here's what I am getting pretty easily out of my Samsung laser printer.
Paper peels off when cooled down to room temp, leaving plastification on top of toner, protecting copper perfectly. Letters and circles on the photo are 2 mils, tracks are 32 and 50. 10mils can be done in a snap.
What are the specifics of your method? Did you iron on or use a laminator? What was the paper?
What are the specifics of your method? Did you iron on or use a laminator? What was the paper?
Those are amazingly good! I tried the paper that Digikey used to sell ($1 each) and it just didnt work. The printers/copiers that I used had re-cycled toner cartridges, so this could be a reason for the failure. I suspect that the toner that you use is suited for this process, so can you tell us which brand of toner you use?
vkj
From:
Perchloric acid - Wikipedia, the free encyclopedia
"Given its strong oxidizing properties, perchloric acid is subject to extensive regulations.[9] It is highly reactive with metals (e.g., aluminium) and organic matter (wood, plastics). On February 20, 1947, in Los Angeles California, 17 people were killed and 150 injured when a bath, consisting of over 1000 litres of 75% perchloric acid and 25% acetic anhydride by volume, exploded. The plant, 25 other buildings and 40 automobiles were obliterated and 250 nearby homes were damaged. The bath was being used to electro-polish aluminum furniture. In addition, organic compounds were added to the overheating bath when an iron rack was replaced with one coated with cellulose acetobutyrate (Tenit-2 plastic). A few minutes later the bath exploded.[10][11]
Work conducted with perchloric acid must be conducted in fume hoods with a wash-down capability to prevent accumulation of oxidisers in ductwork."
What are the specifics of your method? Did you iron on or use a laminator? What was the paper?
The one thing that might be critical is the type of paper. I am in Belgium, so if you are not, you are very likely not to find the exact one. It's actually cheapest, noname brand sold in Makro/Metro around Europe called "Aro". It's semi-gloss, medium thick.
The PCB is prepared by 000 steel wool and wiped off with acetone. Transfer is done with usual Philips steam iron, with no water, hottest setting. Printing is done with Samsung ML1640, with refilled toner (not critical for success). Darkest setting, economy off, 1200dpi. Paper is a bit hard, so it could happen that cheap 40eur Samsung either gets stuck or paper moves while printing. Check geometry of the print afterwards, especially if you are doing double sided boards. You might be luckier with better printers.
I press paper with iron without moving for 15s or so, to make sure it sticks to the pcb first. Then I start sliding over it with iron's edges, the straightest one you can find, to maximize pressure on every spot. I then alternate flat ironing with "edge slide", making sure I cover all of the surface. My iron's edges are not straight, so I am planning to find one with at least one straight edge. I keep alternating flat and edge ironing, to prevent pcb from cooling down during the process.
Pressing is done after 5mins or so. I leave it to cool down to 20C, then I start taking the paper off slowly, by keeping one finger at the paper, sliding it as paper detaches. I pull the paper with other hand, to prevent violent detach that might pull toner off. I usually put thin 2mil edges around my PCBs so that I have and indication that things will stay in place when I start pulling.
Cut with hacksaw and soak in FeCl3.
The whole process is done in half hour time. Remove toner with acetone.
Hope this will help you guys spend some more time with your kids
First attempt with hot iron for 30 secs did not adhere the toner to the board.
I tried again for over a minute and it worked.
I'm just using pages out of "Cycling" magazine, but any thin magazine glossy paper seems to work. They have to be thick enough not to jan in the printer though.
I tried again for over a minute and it worked.
I'm just using pages out of "Cycling" magazine, but any thin magazine glossy paper seems to work. They have to be thick enough not to jan in the printer though.
I found this method fine for audio work where track clearances are about 15 thou, however, I did have to run a sharp knife between some of the closer tracks.
If you do this before etching it makes for a better finished product.
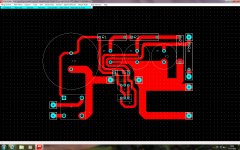
With my design there were problems with tracks touching each other.
This is a simple design, how would it be with more complex designs.
If you do this before etching it makes for a better finished product.
With my design there were problems with tracks touching each other.
This is a simple design, how would it be with more complex designs.
Attachments
Last edited:
- Status
- This old topic is closed. If you want to reopen this topic, contact a moderator using the "Report Post" button.
- Home
- Design & Build
- Construction Tips
- making pc boards