Does anyone have a suggestion for making simple, but elegant rotary audio dial scales, - bass - treble, volume, balance, rotary switch selector scales etc. I need to be able to select start & finish points, number of ticks, & appropriate number marks etc.
The idea then is to simply copy & paste them into "Word or Paint" programs & print them out after adding other labelling etc.
I have done this successfully before but not with dial scales. Once printed, they can be laminated & paisted onto a panel with quite good results. (KISS principle applies !)
I don't want to have to spend hours learning a complicated CAD program.
How about using the American version of "Front Panel Designer"?
https://www.frontpanelexpress.com
Relatively easy to learn and then use the printer to print your creation.
https://www.frontpanelexpress.com
Relatively easy to learn and then use the printer to print your creation.
Thanks Joe, but this looks like a big learning curve.
I tried it, but cannot see how to put in a "0" at the top of the scale (12 o'clock pos), and + or - signs on each digit, 1 - 5 on each side (Tone Control). likewise for Balance I need to put 5 on each side without the sign.
I tried the Help but it was absolutely useless.
Thanks for your suggestion though.
Check out Corel Draw, free trial.
CorelDRAW Free Download
Or LibreCAD, free.
LibreCAD - Free Open Source 2D CAD
CorelDRAW Free Download
Or LibreCAD, free.
LibreCAD - Free Open Source 2D CAD
Last edited:
Thanks Joe, but this looks like a big learning curve.
I tried it, but cannot see how to put in a "0" at the top of the scale (12 o'clock pos), and + or - signs on each digit, 1 - 5 on each side (Tone Control). likewise for Balance I need to put 5 on each side without the sign.
I tried the Help but it was absolutely useless.
Thanks for your suggestion though.
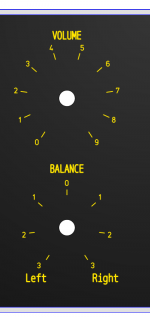
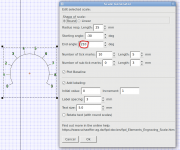
How about some samples? Perhaps that will help.
First picture is the one I designed for my front panel using the European version of that Designer.
Then a few sample to give you some feeling which parameters to fiddle to get things done.
Attachments
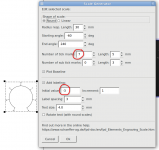
Thanks Joe, that's just what I want and I understand these parameters OK, but how do you place a Zero at the top of a scale with 1 to 5 on each side & -1 to -5 on the other side, similar to your balance control.
I cannot see how to set these in the scale generator.
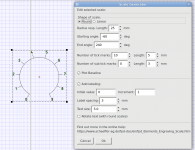
Something like this ?
You can also, after you have made something do a little nudging by double clicking on it and then you have the possibility to do some rotation.
Hope this will be of some help.
Attachments
Thanks a lot Joe, - very helpful. Easy when you know how.
O.K., glad to be of any help
") .
.Joe.
Joe, I'm still struggling, but thanks to you, the scales do look good !
I just want to create a library of separate scales that I can edit, (as a picture), & place them into MS Paint or Word.
This gives me the freedom of enlarging or reducing them into whatever artwork & panel size I use.
I tried saving as a bitmap (.bmp), but these files are not recognised.
I tried printing a scale out, directly from Designer after moving the scale upwards from the grey box.
The scale prints & looks fine, but there is no centre dot & the page position in Designer does not correspond to the page print position which is very awkward.
Also, how do you remove the grey area for printing ?
Any suggestions ?
galva presentationDoes anyone have a suggestion for making simple, but elegant rotary audio dial scales, - bass - treble, volume, balance, rotary switch selector scales etc.
This freeware have riches features and allow many original scales. Comming from ham world it need to learn interpreter code but easy to use after...
Joe, I'm still struggling, but thanks to you, the scales do look good !
I just want to create a library of separate scales that I can edit, (as a picture), & place them into MS Paint or Word.
This gives me the freedom of enlarging or reducing them into whatever artwork & panel size I use.
I tried saving as a bitmap (.bmp), but these files are not recognised.
I tried printing a scale out, directly from Designer after moving the scale upwards from the grey box.
The scale prints & looks fine, but there is no centre dot & the page position in Designer does not correspond to the page print position which is very awkward.
Also, how do you remove the grey area for printing ?
Any suggestions ?
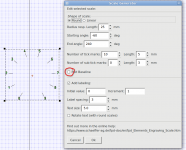
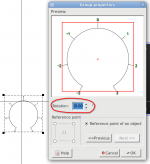
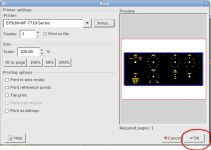
You can tic "print referent points" and "print to file", save it somewhere and then use a document viewer to open and print that .prn file. I am using Atril Document Viewer ( I have a Linux O.S.).
Do not know what you mean with "grey area" though.
It seems that "print as bitmap" does not work. At least when I tic that possibility nothing happens after I hit the OK button.
Attachments

Thanks Joe. - Good suggestion about print to file, except that I cannot get it to work !
I'm using old versions of MS Word - (2003 & 2007) because they basically work fine for me & actually my real preference is the earlier one as it is a lot easier to work with.
Print to file just pulls up my actual printer menu even after I have selected "Print to File" & named it. Then all it does is take me back to the actual printer menu (Canon 8760) with either print (on the actual printer) or cancel.
I tried doing a screenshot but resolution suffers.
I think the simplest way is now to make the dials I need in a large format & simply print them out & photograph them.
I can then put them into a photo editor & reduce as needed.
"....Then all it does is take me back to the actual printer menu (Canon 8760) with either print (on the actual printer) or cancel."
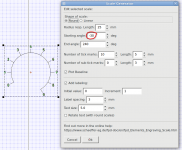
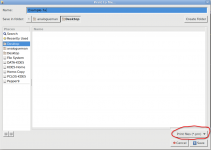
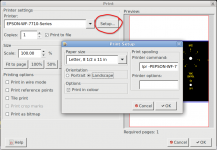
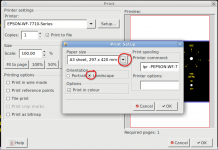
That is strange. I get the following when I am starting to print:
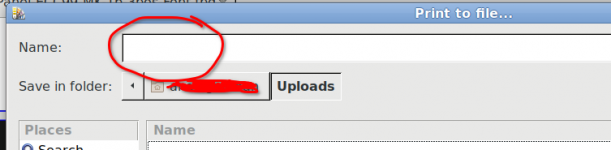
The last picture let me choose a file name after navigating to the directory where you want to put that .prn file.
I do not understand why it is not possible in your Windows system to simply print it. I cannot help you here because to test I need a computer with Windows which I do not have. The only Windows I have are in the walls of my house .
That is strange. I get the following when I am starting to print:
The last picture let me choose a file name after navigating to the directory where you want to put that .prn file.
I do not understand why it is not possible in your Windows system to simply print it. I cannot help you here because to test I need a computer with Windows which I do not have. The only Windows I have are in the walls of my house
.Attachments
Good explanation & screen shots Joe, - thanks.
Obviously mine works very differently as your print to file appears at the end and gives you a path to save etc. Mine has the print to file first and then returns to a normal printer menu.
Maybe I will try it on my Mac but same printer though.
Obviously mine works very differently as your print to file appears at the end and gives you a path to save etc. Mine has the print to file first and then returns to a normal printer menu.
Maybe I will try it on my Mac but same printer though.
Good explanation & screen shots Joe, - thanks.
Obviously mine works very differently as your print to file appears at the end and gives you a path to save etc. Mine has the print to file first and then returns to a normal printer menu.
Maybe I will try it on my Mac but same printer though.
What happens when, after again adjusting the printer parameters, you hit the OK button? Does it gives you then the possibility to navigate to the place where you want that .prn file?
Joe, I have just loaded all into the Mac & there is no provision to print to file there either.
Even when I selected print as a bitmap it would still only allow me to do a physical print on the Printer.
Is it some quirk with the program ?
Regards.
But now I am a little bit confused I am afraid.
I thought it WAS your intention to PRINT your panel wasn't it?
At least that is what I do after I am content with what I have made. My next step is then to print it out on a large format (A3) premium glossy 0.27 mm photo paper.
Then after the ink is fully dry, I use "hollow paper" drills (sorry I do not know the correct English expression for them) to get the holes free of paper.
Then I glue that paper panel on the aluminium panel.
Yes Joe, you're partly right !
I do intend to print them out but I just use MS word or Paint to do my layout & labelling.
But I need good dial scales to import into these programs & once I'm happy with the placement I can then label the various knobs & functions etc.
As not all my panels are the same size, I simply re-size individual scales to suit.
This is why I thought it simple just to have a set of large, (un-labelled except for the circular numbers), individual scales - Volume balance tone etc that I just import & re-size as necessary. Hence they need to be in a picture format (jpeg), to be able to do this.
When I'm satisfied I simply print them out on suitable paper, - usually buff colour, & then matt laminate & glue them onto my panels which can be plastic (Jiffy box) or aluminium.
But now, at last, I think I have solved the problem by saving the scales as a PDF & then doing a file convert to jpeg which seems to work.
- Status
- This old topic is closed. If you want to reopen this topic, contact a moderator using the "Report Post" button.
- Home
- Design & Build
- Software Tools
- Front Panel audio dial scales