I am trying to make my own voice-coil from scratch with the following specifications. I know were to get the materials, but don't know the process. Or maybe there's an easier way?
aluminum former length - 0.394" - 10.00mm
aluminum former inner diameter - 2.008" - 51.00mm
wire height - 0.150" - 3.82mm
aluminum former width - 0.003" - 0.08mm
aluminum former + wire width - 0.019" - 0.50mm
wire awg width - 0.008" - 0.22mm
wire number of layers - 1
Voice coil outer diameter - 2.027" - 51.50mm
It's not rocket science. ")
You need access to a lathe (or a friendly lathe man) for the winding core, and will need to buy (or DIY) a hand winding machine.
Not worth it for just one or 2 (I doubt you can have it for less than 80U$), but if you think you will have use for it in the future, go ahead.
I mean, it can be done if round copper enamelled ("Magnet") wire will do.
Forget it if you need edgewound ribbon coils, an entirely different game .
Some of the data you provide above contradicts itself, I guess some will have to be remeasured.
Also I'll suggest names for stuff so we avoid confusion.
Copying and pasting your data :
aluminum former length - 0.394" - 10.00mm <-- agree.
aluminum former inner diameter - 2.008" - 51.00mm <-- agree
wire height - 0.150" - 3.82mm <-- please call this "winding length or height"
aluminum former width - 0.003" - 0.08mm <-- you mean thickness?
aluminum former + wire width - 0.019" - 0.50mm <-- you mean thickness?
wire awg width - 0.008" - 0.22mm <-- you mean diameter?
I have a problem with this wire diameter, even if allowing for enamel thickness.
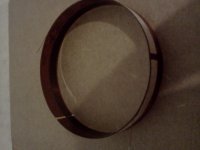
wire number of layers - 1 <-- are you sure? How does wire "exit" the winding? A 2 layer coil starts and ends "on the top side", a single layer one has one end "on top", the other "on the bottom", how does the end reach top again to be connected to the outside world? Post a picture of the coil you are copying.
Voice coil outer diameter - 2.027" - 51.50mm <-- mmmmhhhh
If Inner Diameter (ID) is 51 mm and former+wire thickness is 0.50mm, outer diameter (OD) is 52mm , not 51.50mm.
Another problem: a (calculated from your data) 18 turn single layer coil of 0.20mm (net diameter) wire wound on a 51mm ID form, will have: 0.051M x 3.14 x 18=2.88M length.
Given an average resistance of 0.535 ohms/M it will have a DC resistance of: 1.54 ohms, or around 2 ohms impedance.
Not matching the Dayton Audio RS52AN-8 8 ohms stated impedance.
I'm sure you have a thinner wire there .
Carefully burn enamel with a lighter set to minimum (thin wire is *easy* to melt into a blob), and carefully wipe carbon away with thin steel wool; do not use emery paper or similar because it will "eat" copper and give you a fake reading.
You need access to a lathe (or a friendly lathe man) for the winding core, and will need to buy (or DIY) a hand winding machine.
Not worth it for just one or 2 (I doubt you can have it for less than 80U$), but if you think you will have use for it in the future, go ahead.
I mean, it can be done if round copper enamelled ("Magnet") wire will do.
Forget it if you need edgewound ribbon coils, an entirely different game
.Some of the data you provide above contradicts itself, I guess some will have to be remeasured.
Also I'll suggest names for stuff so we avoid confusion.
Copying and pasting your data :
aluminum former length - 0.394" - 10.00mm <-- agree.
aluminum former inner diameter - 2.008" - 51.00mm <-- agree
wire height - 0.150" - 3.82mm <-- please call this "winding length or height"
aluminum former width - 0.003" - 0.08mm <-- you mean thickness?
aluminum former + wire width - 0.019" - 0.50mm <-- you mean thickness?
wire awg width - 0.008" - 0.22mm <-- you mean diameter?
I have a problem with this wire diameter, even if allowing for enamel thickness.
wire number of layers - 1 <-- are you sure? How does wire "exit" the winding? A 2 layer coil starts and ends "on the top side", a single layer one has one end "on top", the other "on the bottom", how does the end reach top again to be connected to the outside world? Post a picture of the coil you are copying.
Voice coil outer diameter - 2.027" - 51.50mm <-- mmmmhhhh
If Inner Diameter (ID) is 51 mm and former+wire thickness is 0.50mm, outer diameter (OD) is 52mm , not 51.50mm.
Another problem: a (calculated from your data) 18 turn single layer coil of 0.20mm (net diameter) wire wound on a 51mm ID form, will have: 0.051M x 3.14 x 18=2.88M length.
Given an average resistance of 0.535 ohms/M it will have a DC resistance of: 1.54 ohms, or around 2 ohms impedance.
Not matching the Dayton Audio RS52AN-8 8 ohms stated impedance.
I'm sure you have a thinner wire there .
Carefully burn enamel with a lighter set to minimum (thin wire is *easy* to melt into a blob), and carefully wipe carbon away with thin steel wool; do not use emery paper or similar because it will "eat" copper and give you a fake reading.
re-measured
OK, here is the new chart.
aluminum former length - 0.394" - 10.00mm
aluminum former inner diameter - 2.008" - 51.00mm
wire winding height - 0.150" - 3.82mm
aluminum former thickness - 0.003" - 0.08mm
aluminum former + wire thickness - 0.019" - 0.50mm
wire diameter/AWG - 30awg since I measured the diameter to be 25mm
I guess the outer diameter of the voice coil can be 52mm when rounded. I have re-checked and it seems to be 2 layers not 1
1) you must make a core so you wind around it.
Nominally 51mm, but the final check is that it slides in/out of the coil you are cloning with a little friction.
Length to suit, anything from 25 to 50mm is fine.
Surface must be polished.
Chrome plating it is best, second best is using brass, for lowest cost just to try the idea you *may* use aluminum, but finished coil may stick to it.
A former employee who learnt from me, nowadays repairs "any speaker", specially weird car speakers with odd sized coils, and he makes his own cores out of some hardwood, but I don't recommend it for any serious work.
He does it for cost, of course, plus most are never seen again (and car speakers have terrible tolerances).
You need a center hole in the core to mount it to some kind of hand crank.
2) winding:
look at this video which shows it reasonably well:
[How It's Made] Building a Speaker - YouTube
Start at: 2:24
a) the core is mounted on the winding machine.
Manual is the same (or better), only problem is speed.
Since actual hand winding takes 1 or 2 minutes, no big deal.
b) you must pre-cut the strip which will be your VC form.
Then degrease it very well with some kind of solvent and never ever again touch its surface.
Best sounding and easiest to wind and glue is paper, only problem is that it does not handle much power.
In the video they use Kapton.
What they do not show is that being non porous adhesives don't stick very well to the raw surface, it needs some treatment , chemical or mechanical.
You can "scratch " it with fine emery paper, until it's uniformly dull.
Same for aluminum.
c) you momentarily stick your form strip around the core.
4) modern factories use advanced coated wires, with adhesive enamel pre-applied, which is made "sticky" by brushing it with a solvent.
Final curing is in an oven, or with an infrared lamp or heat gun.
I suggest you use what I do: Industrial Epoxy (forget Home/Hobby type "5 minutes"), the kind that hardens overnight at 25ºC , stays usable for around 1 hour , and if in a hurry, can be heated for faster curing.
Apply it with a small brush, wind the first layer, apply a little more, wind the second, heat the coil a little with a heat gun so it becomes "more liquid" so it "wets" the former and the wire for better adhesion and set it aside for curing.
5) momentarily you hold the still free start and end wires with a small piece of tape.
Tomorrow you pull the tape, put wire ends where they belong, apply a little epoxy to them, temporarily hold the unglued long ends (which will later be connected to tinsel wires) with some extra tape, if you wish you can add a "neck" of paper, also glued with epoxy,which later will help adhesion to cone.
If this is a midrange or tweeter VC, you need no "neck" (as shown in the video) and you will save weight.
6) when the epoxy is cured, you slide the VC out of the core.
7) if you do not need a lot of power handling, (as in a midrange), you can wind the first layer "dry", apply some good Cyano acrylate (Crazy glue) which will spread evenly thanks to capillarity, and in a couple minutes wind the second layer, also "dry" and repeat cyano glueing.
Personally I don't use it because mine are routinely abused guitar/bass speakers, so I use Epoxy, but maybe you should explore cyanos.
Loctite or Hernon have a whole range specific for speakers.
NOTE: be very careful to avoid adhesives going where they should not.
If the VC sticks to the core, you'll have to destroy it and maybe damage the core in the process.
Keep some acetone close by, worst case wet VC and core with it so you can pull it away (destroying it in the process).
That's why a polished chrome plated core is best.
Good luck.
Nominally 51mm, but the final check is that it slides in/out of the coil you are cloning with a little friction.
Length to suit, anything from 25 to 50mm is fine.
Surface must be polished.
Chrome plating it is best, second best is using brass, for lowest cost just to try the idea you *may* use aluminum, but finished coil may stick to it.
A former employee who learnt from me, nowadays repairs "any speaker", specially weird car speakers with odd sized coils, and he makes his own cores out of some hardwood, but I don't recommend it for any serious work.
He does it for cost, of course, plus most are never seen again (and car speakers have terrible tolerances).
You need a center hole in the core to mount it to some kind of hand crank.
An externally hosted image should be here but it was not working when we last tested it.
2) winding:
look at this video which shows it reasonably well:
[How It's Made] Building a Speaker - YouTube
Start at: 2:24
a) the core is mounted on the winding machine.
Manual is the same (or better), only problem is speed.
Since actual hand winding takes 1 or 2 minutes, no big deal.
b) you must pre-cut the strip which will be your VC form.
Then degrease it very well with some kind of solvent and never ever again touch its surface.
Best sounding and easiest to wind and glue is paper, only problem is that it does not handle much power.
In the video they use Kapton.
What they do not show is that being non porous adhesives don't stick very well to the raw surface, it needs some treatment , chemical or mechanical.
You can "scratch " it with fine emery paper, until it's uniformly dull.
Same for aluminum.
c) you momentarily stick your form strip around the core.
4) modern factories use advanced coated wires, with adhesive enamel pre-applied, which is made "sticky" by brushing it with a solvent.
Final curing is in an oven, or with an infrared lamp or heat gun.
I suggest you use what I do: Industrial Epoxy (forget Home/Hobby type "5 minutes"), the kind that hardens overnight at 25ºC , stays usable for around 1 hour , and if in a hurry, can be heated for faster curing.
Apply it with a small brush, wind the first layer, apply a little more, wind the second, heat the coil a little with a heat gun so it becomes "more liquid" so it "wets" the former and the wire for better adhesion and set it aside for curing.
5) momentarily you hold the still free start and end wires with a small piece of tape.
Tomorrow you pull the tape, put wire ends where they belong, apply a little epoxy to them, temporarily hold the unglued long ends (which will later be connected to tinsel wires) with some extra tape, if you wish you can add a "neck" of paper, also glued with epoxy,which later will help adhesion to cone.
If this is a midrange or tweeter VC, you need no "neck" (as shown in the video) and you will save weight.
6) when the epoxy is cured, you slide the VC out of the core.
7) if you do not need a lot of power handling, (as in a midrange), you can wind the first layer "dry", apply some good Cyano acrylate (Crazy glue) which will spread evenly thanks to capillarity, and in a couple minutes wind the second layer, also "dry" and repeat cyano glueing.
Personally I don't use it because mine are routinely abused guitar/bass speakers, so I use Epoxy, but maybe you should explore cyanos.
Loctite or Hernon have a whole range specific for speakers.
NOTE: be very careful to avoid adhesives going where they should not.
If the VC sticks to the core, you'll have to destroy it and maybe damage the core in the process.
Keep some acetone close by, worst case wet VC and core with it so you can pull it away (destroying it in the process).
That's why a polished chrome plated core is best.
Good luck.
Last edited:
Hey all - very interesting thread! I may take a shot at making a coil for an old project subwoofer drive I have been messing with for a while.
Here's a question: would anyone know of a source for 24 AWG flat magnet wire, that will sell in low quantity? I can only find 10 lbs min. quantity and that is quite a lot of wire!
Thanks,
Jim
Here's a question: would anyone know of a source for 24 AWG flat magnet wire, that will sell in low quantity? I can only find 10 lbs min. quantity and that is quite a lot of wire!
Thanks,
Jim
Very hard to find, unless somebody sends you a couple ounces "free sample".
Personally I'd bite the bullet and use roundwire.
Yea, I know, it's not the same .... but you will save your speaker.
Remember that even powerful Eminence and Celestion use copper round wire in 99.9% of their products.
Personally I'd bite the bullet and use roundwire.
Yea, I know, it's not the same .... but you will save your speaker.
Remember that even powerful Eminence and Celestion use copper round wire in 99.9% of their products.
Very hard to find, unless somebody sends you a couple ounces "free sample".
Personally I'd bite the bullet and use roundwire.
Yea, I know, it's not the same .... but you will save your speaker.
Remember that even powerful Eminence and Celestion use copper round wire in 99.9% of their products.
Hi JM,
Thank you for your response. Yes, I agree - it is hard to find in low quantities. I am leaning towards round wire. I was hoping with flat wire I could get a few more turns in the gap.
I'll post up some pics if I decide to try and make my own coil. Have a good evening,
Jim
*IF* you are really really into it, you can flatten roundwire (that's what the original flatwire JBL VC were made of in the 40's).
I did it myself, just I didn't find it worth the effort.
Get in touch with a Jeweller, they have a machine called a laminator:
If you are reasonable (say, not reducing beyond 3:1 or 4:1), modern enamel stands the lamination crush.
And you end up with a nice "ribbon", only its edges are still somewhat rounded.
I did it myself, just I didn't find it worth the effort.
Get in touch with a Jeweller, they have a machine called a laminator:
An externally hosted image should be here but it was not working when we last tested it.
If you are reasonable (say, not reducing beyond 3:1 or 4:1), modern enamel stands the lamination crush.
And you end up with a nice "ribbon", only its edges are still somewhat rounded.
Hi JM,
Thank you for your suggestion! I appreciate that you would try to offer an alternative to my situation. Thankfully this is just a hobby project for me, and it is not critical that I make the coil exactly as an OEM replacement. If that were the case I would consider your solution, but I think for the effort I will just try round conductor. I'll post up my results if you are interested, though I am a novice with this sort of thing and the quality may not be great!
Thank you for your suggestion! I appreciate that you would try to offer an alternative to my situation. Thankfully this is just a hobby project for me, and it is not critical that I make the coil exactly as an OEM replacement. If that were the case I would consider your solution, but I think for the effort I will just try round conductor. I'll post up my results if you are interested, though I am a novice with this sort of thing and the quality may not be great!
Hi Magnasanti,
I've just come across you're "nicely built voice coil," and I think I need to create something very similar. The mid range unit on my Celestion Ditton 66's has a slightly damaged voice coil which I need to repair. (MD500 unit.) Did someone make this voice coil for you, or did you manage to do it yourself?
Best,
Colin
*IF* you are really really into it, you can flatten roundwire (that's what the original flatwire JBL VC were made of in the 40's).
I did it myself, just I didn't find it worth the effort.
Get in touch with a Jeweller, they have a machine called a laminator:
An externally hosted image should be here but it was not working when we last tested it.
If you are reasonable (say, not reducing beyond 3:1 or 4:1), modern enamel stands the lamination crush.
And you end up with a nice "ribbon", only its edges are still somewhat rounded.
Proper name is Calender. Worked on ones in the 100ton class and smaller.
- Status
- This old topic is closed. If you want to reopen this topic, contact a moderator using the "Report Post" button.
- Home
- Loudspeakers
- Planars & Exotics
- winding a voice coil