I am starting a new project. I am updating the satellite speakers of my system.
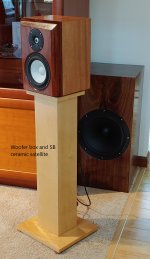
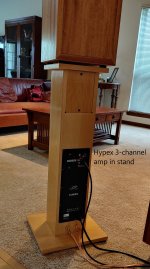
Last year I completed an active 3-way system with SB 12” woofer, SB 6” ceramic mid driver, and SB 1” ceramic dome tweeter. The Hypex amps located in the satellite stand, providing 250 W for the woofer, 250 W for the mid, and 100 W for the tweeter. The bass driver is mounted in its own cabinet, located a few feet behind the satellite. Crossovers are 200 Hz and 2 kHz. I have been astonished at how excellent the SB ceramic drivers have been. https://www.diyaudio.com/forums/multi-way/352767-active-3-hypex-sb.html
I always intended this system to be a learning experience, and I had always planned to build a more refined system later using better drivers. Originally, I was leaning toward ScanSpeak revelators or illuminators. I plan to keep the woofer boxes, and with the modular design with the amps in the stands and separate woofer boxes I can painlessly update the satellite speakers.
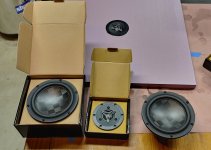
In October I purchased a pair of Satori textreme tweeters and a pair of Satori textreme 6” mid drivers. I made a set of measurements using a 24” x 24” test baffle, and later a prototype box. I posted the results here Link. https://www.diyaudio.com/forums/multi-way/343831-sb-acoustics-textreme-61.html post 608
I have begun construction of the new satellite speakers. The new cabinets will be similar, but not quite identical to the old ones. Like the SB ceramic boxes, I do plan to build a double thick front baffle, 1.5 inch thick. The sides will be profiled with a 1.5 inch radius round-over bit, exactly like the SB ceramic boxes. This new build will use a 2 layer plywood baffle instead of a composite solid wood / plywood baffle. Before I did not have enough experience with veneer to confidently apply it over a curve, so I used solid wood. Now I know I can do it with veneer. The top edge will be chamfered at 45 degrees to a depth of 1.5 inch.
The SB ceramic box is 13" H x 10" W x 9" D. The new box will be 13.5" H x 10" W x 9.75" D. So slightly taller, slightly deeper. The arrangement of the internal braces will be different. I learned a lot while making the first cabinets ("learning" is code word for screw-ups). I attached my simulation of the baffle diffraction effect on the tweeter response.
I do not have any digital representations of the cabinet design (CAD or Sketchup). I did that kind of thing for 30 years and it feels too much like work... I like pencil and paper.
I value everyones input. As I optimize the filters, I will share my measurements, subjective opinions, and my thought process...
Last year I completed an active 3-way system with SB 12” woofer, SB 6” ceramic mid driver, and SB 1” ceramic dome tweeter. The Hypex amps located in the satellite stand, providing 250 W for the woofer, 250 W for the mid, and 100 W for the tweeter. The bass driver is mounted in its own cabinet, located a few feet behind the satellite. Crossovers are 200 Hz and 2 kHz. I have been astonished at how excellent the SB ceramic drivers have been. https://www.diyaudio.com/forums/multi-way/352767-active-3-hypex-sb.html
I always intended this system to be a learning experience, and I had always planned to build a more refined system later using better drivers. Originally, I was leaning toward ScanSpeak revelators or illuminators. I plan to keep the woofer boxes, and with the modular design with the amps in the stands and separate woofer boxes I can painlessly update the satellite speakers.
In October I purchased a pair of Satori textreme tweeters and a pair of Satori textreme 6” mid drivers. I made a set of measurements using a 24” x 24” test baffle, and later a prototype box. I posted the results here Link. https://www.diyaudio.com/forums/multi-way/343831-sb-acoustics-textreme-61.html post 608
I have begun construction of the new satellite speakers. The new cabinets will be similar, but not quite identical to the old ones. Like the SB ceramic boxes, I do plan to build a double thick front baffle, 1.5 inch thick. The sides will be profiled with a 1.5 inch radius round-over bit, exactly like the SB ceramic boxes. This new build will use a 2 layer plywood baffle instead of a composite solid wood / plywood baffle. Before I did not have enough experience with veneer to confidently apply it over a curve, so I used solid wood. Now I know I can do it with veneer. The top edge will be chamfered at 45 degrees to a depth of 1.5 inch.
The SB ceramic box is 13" H x 10" W x 9" D. The new box will be 13.5" H x 10" W x 9.75" D. So slightly taller, slightly deeper. The arrangement of the internal braces will be different. I learned a lot while making the first cabinets ("learning" is code word for screw-ups). I attached my simulation of the baffle diffraction effect on the tweeter response.
I do not have any digital representations of the cabinet design (CAD or Sketchup). I did that kind of thing for 30 years and it feels too much like work... I like pencil and paper.
I value everyones input. As I optimize the filters, I will share my measurements, subjective opinions, and my thought process...
Attachments


Very nice.. I am curious to hear your impression on the differences between the ceramic and textreme drivers
An update: Construction is going well.
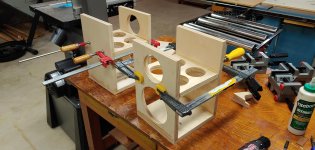
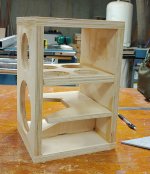
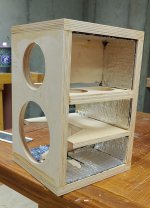
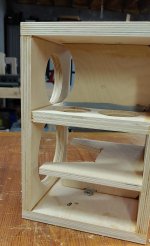
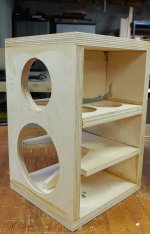
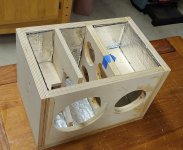
I have included some photos to show the complete bracing scheme I am using. In my SB ceramic build last year I used a full “wall to wall” matrix design. It was a difficult construction because of dimensional tolerance build-up in all the internal parts. Every brace had to have a precise meet-up on all four edges. This time I thought about how to achieve the same level of stiffness but with a design that was more forgiving of small variations in dimensional tolerance. With this new design, only the main bulkhead brace (the horizontal shelf with four holes) is dimensionally constrained on all four edges. The other bracing is constrained on just two or three edges.
I am covering the interior walls with Noico butyl sound deadening mat. I am using two layers of 80 mil. I do not expect this to have much effect on structural resonances, but it will help with ordinary sound transmission. ¾ inch plywood has a transmission loss of 15 dB (low frequency) to 25 dB (high frequency). I think this Noico will add another 5 to 6 dB to that.
I will use long fiber wool for the acoustic damping (stuffing). I may not have enough, so I will augment it with some Ultratouch shredded denim as needed.
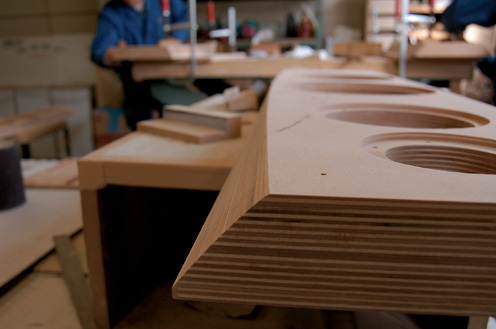
After the two side panels go on, the outer baffle will be fitted and the outer holes cut with a router. Then I will profile the baffle side edges with a 37 mm radius roundover bit. The top edge will be profiled on the table saw to a beveled edge of approximate 45 degree angle.
I have not decided which veneer I will use. Sapele sounds intriguing, as does figured cherry. We shall see.
I have included some photos to show the complete bracing scheme I am using. In my SB ceramic build last year I used a full “wall to wall” matrix design. It was a difficult construction because of dimensional tolerance build-up in all the internal parts. Every brace had to have a precise meet-up on all four edges. This time I thought about how to achieve the same level of stiffness but with a design that was more forgiving of small variations in dimensional tolerance. With this new design, only the main bulkhead brace (the horizontal shelf with four holes) is dimensionally constrained on all four edges. The other bracing is constrained on just two or three edges.
I am covering the interior walls with Noico butyl sound deadening mat. I am using two layers of 80 mil. I do not expect this to have much effect on structural resonances, but it will help with ordinary sound transmission. ¾ inch plywood has a transmission loss of 15 dB (low frequency) to 25 dB (high frequency). I think this Noico will add another 5 to 6 dB to that.
I will use long fiber wool for the acoustic damping (stuffing). I may not have enough, so I will augment it with some Ultratouch shredded denim as needed.
After the two side panels go on, the outer baffle will be fitted and the outer holes cut with a router. Then I will profile the baffle side edges with a 37 mm radius roundover bit. The top edge will be profiled on the table saw to a beveled edge of approximate 45 degree angle.
I have not decided which veneer I will use. Sapele sounds intriguing, as does figured cherry. We shall see.
Attachments
I've used the SB ceramics in two builds and they sound great. I will be interested in your opinion of them compared to the Textremes. I hope it isn't that much of an improvement or I might get the itch again.🙂
Nice project! We are waiting with anticipation for your review of the textreme midranges. I have to SB MR16-4 and they are really nice but part of the hobby is discovering what is new/better(?)
As far as making mistakes; I used to watch the New Yankee Workshop show with Norm when I initially get into woodworking. His prototypes were always better than anything that I could build!! It was still inspirational.
As far as making mistakes; I used to watch the New Yankee Workshop show with Norm when I initially get into woodworking. His prototypes were always better than anything that I could build!! It was still inspirational.
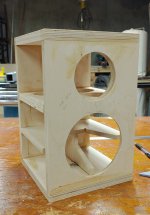
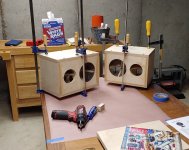
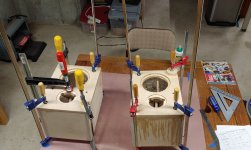
Another update: the main carcass of the cabinet is assembled. Now I am machining the holes in the outer baffle. Just this morning I routed out the frame recess for each driver... after lunch I plan to router out the thru-holes.
I ordered the veneer for these satellites. I plan to use sapele, which is similar to African mahogany. Acoustic guitars often use sapele for the back and sides of the body, and it is becoming more common in furniture.
I am also coming up with a test plan to do outdoor ground plane measurements. We don't get very many good days this time of year, modest temperature, low wind, no rain/snow... when one of those days shows up, I want to be ready to capture all the measurements I will need.
Attachments
Very exciting! I used the Noico product on the entire insides of my cabinets, including the braces. It doesn't have a huge effect, but every little bit helps. Beautiful cabinet construction!
The Textreme Satori's are #1 on the top of my wish list. It's obvious that you're not messing around🙂
The Textreme Satori's are #1 on the top of my wish list. It's obvious that you're not messing around🙂
Last edited:
I don't expect the Noico (soft butyl rubber self adhesive with aluminum foil backing) to have any effect on resonances the way a proper CLD construction would. But it does seem to improve ordinary wide-band sound transmission.
I am tempted to install the drivers and give them a listen before I apply the veneer and varnish... tempted, but I will resist that tempation. It adds a lot of needless work.
Thanks !... Not beautiful yet, but getting there. They are heavy little beasts though... That noico is heavy stuff. This is the fourth set of cabinets I have built in the last 12 months... each time I do it it gets a little easier.Beautiful cabinet construction!
I am tempted to install the drivers and give them a listen before I apply the veneer and varnish... tempted, but I will resist that tempation. It adds a lot of needless work.
The CLD baffle thing is still not proven yet with measurements, so I'm not totally sure about it's efficacy. After I get the Vibration sensor/DI box situation finetuned, I'll hopefully be able to find out how effective or ineffective it is. To be honest, the theory sounds good, but it may make it worse(At least in the way that I did it). I just won't know for sure until I test and compare🙂
Was the double thick baffle part of the plan all along? I like the way your doing it.
Was the double thick baffle part of the plan all along? I like the way your doing it.
Last edited:
A double wall baffle was always part of the plan. The inner baffle is encased on all four edges, the outer baffle will have all four edges exposed (like an overlay door).
Augerpro showed that a cabinet wall consisting of two moderately thin layers of MDF bonded together with Weicon adhesive would have a reasonable CLD effect. It seems if a person wanted to do significantly better than his simple two-layer-with-weicon method, there would be A LOT MORE work. Your build strikes me as being an extreme attempt at internal structural damping, so it is likely yours is even better. I hope your measurements prove it is highly effective (I believe it will).
I am conservatively sticking to a technique I know will work, one that I can comfortably construct... The very high stiffness approach. It does not require special damping materials or multiple layers. It simply involves thick, stiff walls and lots of bracing. The bracing and walls must be tightly fit. The general rule is that any spot on the cabinet wall must be within 3 inches of a brace or orthoganal wall. This pushes resonances up to high frequency and makes them high Q... That makes them non-audible on program material.
For most speakers sizes, I use 3/4 inch baltic birch plywood, with a double layer for the front baffle. Planet10 has written extensively about how to make this kind of cabinet. His guidelines and photos have been helpful.
I do not believe there is a huge difference between MDF and BB plywood. Both can work well, and the differences in performance are small. With MDF I might put my bracing a little closer together. But plywood is so much easier to work with. MDF dulls tools much quicker than ply, and sawing/routing MDF produces a lot more fine dust than ply.
In some areas of the world, BB ply is hard to get and expensive. I am fortunate that the custom cabinet industry in the midwest of the US creates a big demand for BB ply. It is always available. A 60" x 60" sheet of 3/4" is about $45, but I have to drive about 20 miles to get it. It is not stocked at normal hardware stores, lumber yards, Lowes or Menards...
j.
Last edited:
We both use the same build style, double baffle and plenty of bracing. For the double baffle I use 1/4 dowels to keep the two baffles aligned. Before I cut out the driver holes I clamp the two baffles together with 3/4 + inch on every edge. I think drill 1/4 holes for my circle jig and 4 more holes to use for alignment. Then I cut my driver cutouts, when it is time to put the outer baffle on there is never the cutouts are perfectly aligned and all I need to do is trim the the excess with a router.
I have to pay $75.00 for 3/4 BB hear in New England.
I have to pay $75.00 for 3/4 BB hear in New England.
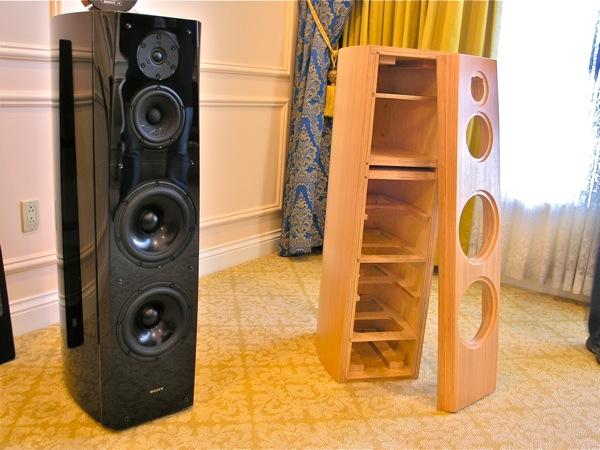
Well, it's beautiful material and well worth it, I'm sure. I saw this raw Sony SS-AR1 cabinet at a show several years ago and it left a big impression on me.
Last edited:
More woodworking... almost done making wood chips and dust (!)
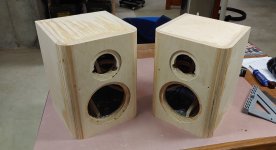
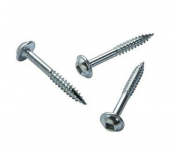
I glued on the outer baffle. Mtidge - Interesting that you used dowels to align things. I have done that a few times on furniture projects. In this case I use temporary screws as alignment pins. Since I am going to fully veneer the cabinet, all those holes will get filled with a little bondo. You can see the screws in the first photo. I use #8 washer head 1-1/2" screws, and I re-use them for a lot of jigs and fixtures in my workshop.
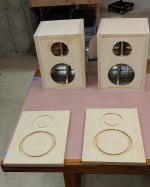
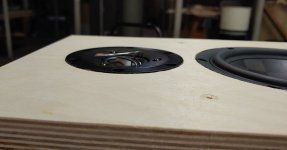
The next photo shows a check for driver fit. The recesses look perfect (this is the first time I got them all perfect the first time).
The next photo shows the round-over cut on the sides. This is a 37 mm radius round-over. I think I made over a cubic foot of shavings. Running the router table is my least favorite part of any woodworking project.
Next step is to bevel the top edge, which I will cut on the table saw. Fedex will be delivering the veneer this weekend.
A few words about glue: Up to now I have always used just two adhesives in speaker cabinets... Titebond (PVA) wood glue was used for most joints. Where I needed gap filling capability, I used West system epoxy thickened with microfibers and colloidal silica. I always have West epoxy on hand for boat repair work and I have a lot of experience with it. However, I was advised by several folks on this forum to try Loctite PL. So instead of epoxy, I used Loctite PL-Max whenever I needed a gap-filling adhesive. It seems to have worked really well, and was significantly less messy.
j.
I glued on the outer baffle. Mtidge - Interesting that you used dowels to align things. I have done that a few times on furniture projects. In this case I use temporary screws as alignment pins. Since I am going to fully veneer the cabinet, all those holes will get filled with a little bondo. You can see the screws in the first photo. I use #8 washer head 1-1/2" screws, and I re-use them for a lot of jigs and fixtures in my workshop.
The next photo shows a check for driver fit. The recesses look perfect (this is the first time I got them all perfect the first time).
The next photo shows the round-over cut on the sides. This is a 37 mm radius round-over. I think I made over a cubic foot of shavings. Running the router table is my least favorite part of any woodworking project.
Next step is to bevel the top edge, which I will cut on the table saw. Fedex will be delivering the veneer this weekend.
A few words about glue: Up to now I have always used just two adhesives in speaker cabinets... Titebond (PVA) wood glue was used for most joints. Where I needed gap filling capability, I used West system epoxy thickened with microfibers and colloidal silica. I always have West epoxy on hand for boat repair work and I have a lot of experience with it. However, I was advised by several folks on this forum to try Loctite PL. So instead of epoxy, I used Loctite PL-Max whenever I needed a gap-filling adhesive. It seems to have worked really well, and was significantly less messy.
j.
Attachments
I used screws on my first build, but I find the dowels make for a better alignment and I can cut them flush before the final glue up if I need to fix any routing mistakes. I wish I had a router table to make those big round-overs, but more importantly room for it.
Jim
I hope this doesn't sound too wacko🙂, but when it comes to stuffing the cabinets, you can try filling them up completely with 100% wool dryer balls. The density of these things are perfect for eating up a lot of noise in the cabinet, and they're very inexpensive for what they are. They are also easy to apply after wiring. If I had thought of it sooner, I would have definitely gone this rout instead of the synthetic, high density felt sheets that took forever to cut and put in after the wiring the speakers. Oh yeah, I actually am using them in the bass cabinets.
Anyway, you can buy them by the dozen on Amazon, and they're about 3.5" in diameter.
https://www.amazon.com/ZG-Home-Zgh-4pack-Dryer-Balls/dp/B07CV1LXG2
Last edited:
I found the best stuffing scheme for a fairly small sealed box was car underfelt and low density fibreglass.
The combination was very cheap and worked surprisingly well.
Here is a link to where I compared various different materials with impedance measurements before deciding on the best one.
Full Range TC9 Line Array CNC Cabinet
I've got some high density felt on my front baffle and it is surprisingly reflective 🙄
For sound absorption a larger amount of material that has a lower gas flow resistivity works better. Making the impedance change gradual by having a light material in front of a more dense one also works well.
Thanks for the suggestions - I have a supply of long fiber wool from the previous project, and it may be enough. Remlab I followed your thread about the wool dryer balls - it is a great addition to our set of tools...
- Home
- Loudspeakers
- Multi-Way
- New active Satori Textreme