I've built a ton of 3D printed waveguides, and a handful of 3D printed speakers, including some 3D printed midbasses.
Because you can 3D print exotic shapes, 3D printed speakers work surprisingly well.
When you think about it, a loudspeaker is basically trying to blow up the walls of the box like it's a balloon. Therefore, spherical or egg shaped enclosures can work surprisingly well.

Here's one I made.
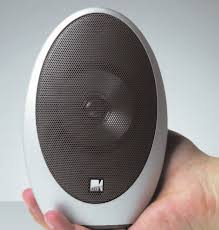
Kef's home theater satellites are made out of aluminum. The aluminum is only about 3-5mm in diameter.

Gedlee Summas were my reference speakers from about 2008 until 2012. The Summas were probably the most "inert" speakers I've ever owned. If you rapped your knuckles on them, it was like a piece of marble. I'd long assumed that the Summas were MDF wrapped in carbon fiber, or plywood wrapped in carbon fiber.
When I sold them, I opened them up, and much to my surprise: they're foam. Like a surfboard.

Here's how surfboards are made. Foam wrapped in fiberglass, with a wood stringer going down the middle.
With the 3D printed speakers, I think the challenge is that the walls of a 3D printed enclosure need to be REALLY thick, much thicker than you'd use with a wood speaker.

Ikea furniture is another example of that. The reason that their furniture is rigid and relatively light is because it's a CLD sandwich of HDF, then cardboard, then HDF.
In summary:
I think that 3D printed enclosures could potentially be as rigid as an MDF enclosure. The "trick" is that we'd have to figure out how to make the walls VERY thick, as much as 1.5" - 2" in diameter. And then there would have to be a way to fill the enclosure walls. Foam would be the obvious filling, perhaps polyurethane foam from Home Depot.
And idea that I had before, was to put holes in the enclosure, which you could use to fill the cavity between the inner and outer wall. Visualize a surfboard that's hollow and 3D printed, with dozens of holes in the outer walls, so you can fill the surfboard.
The downside with this method, is that it's going to require a lot of finishing. You'll have to trim the excess foam, and then use fiberglass or something similar to fill in the holes.

Rockport has solved all these problems in a really elegant way: SoundStage! InSight - Rockport Technologies Lyra Loudspeaker (November 2019) - YouTube
Their loudspeaker has an inner shell, and an outer shell. None of that is particularly innovative.
What I dig about the Rockport speaker is those channels. Instead of using hollow walls, there are a series of channels. The channels add strength, but they also allow the builder to line everything up perfectly. Another advantage to those channels is that the foam will be distributed evenly.
The inner shell slides into the outer shell, and then the channels are filled. Rockport uses polyurethane. I would use foam, simply because I don't want a speaker that weighs 500lbs each.

Here's a cutaway
Years ago I tried making a subwoofer with hollow walls, which I then filled with foam. What I found was that the foam *exploded* the walls out! Basically the foam generates a LOT of force when it expands.
I think this method holds potential for a number of reasons:
1) 3D printing allows us to make shapes that are complex, with repeatable finishes that can look really good.
2) But 3D printed speakers aren't rigid, because the walls are too thin. The walls must be much MUCH thicker.
3) We should be able to finish the loudspeaker in finishes that are similar to what you can achieve with a car or a bicycle. IE, the finishing options are really good. This construction method should yield a finished product that can look very professional. I think this is something that many of us have struggled with in DIY projects, it's a bummer to invest six months building a loudspeaker, only to have it look like a science project.
Because you can 3D print exotic shapes, 3D printed speakers work surprisingly well.
When you think about it, a loudspeaker is basically trying to blow up the walls of the box like it's a balloon. Therefore, spherical or egg shaped enclosures can work surprisingly well.
Here's one I made.
Kef's home theater satellites are made out of aluminum. The aluminum is only about 3-5mm in diameter.
Gedlee Summas were my reference speakers from about 2008 until 2012. The Summas were probably the most "inert" speakers I've ever owned. If you rapped your knuckles on them, it was like a piece of marble. I'd long assumed that the Summas were MDF wrapped in carbon fiber, or plywood wrapped in carbon fiber.
When I sold them, I opened them up, and much to my surprise: they're foam. Like a surfboard.
Here's how surfboards are made. Foam wrapped in fiberglass, with a wood stringer going down the middle.
With the 3D printed speakers, I think the challenge is that the walls of a 3D printed enclosure need to be REALLY thick, much thicker than you'd use with a wood speaker.
Ikea furniture is another example of that. The reason that their furniture is rigid and relatively light is because it's a CLD sandwich of HDF, then cardboard, then HDF.
In summary:
I think that 3D printed enclosures could potentially be as rigid as an MDF enclosure. The "trick" is that we'd have to figure out how to make the walls VERY thick, as much as 1.5" - 2" in diameter. And then there would have to be a way to fill the enclosure walls. Foam would be the obvious filling, perhaps polyurethane foam from Home Depot.
And idea that I had before, was to put holes in the enclosure, which you could use to fill the cavity between the inner and outer wall. Visualize a surfboard that's hollow and 3D printed, with dozens of holes in the outer walls, so you can fill the surfboard.
The downside with this method, is that it's going to require a lot of finishing. You'll have to trim the excess foam, and then use fiberglass or something similar to fill in the holes.
Rockport has solved all these problems in a really elegant way: SoundStage! InSight - Rockport Technologies Lyra Loudspeaker (November 2019) - YouTube
Their loudspeaker has an inner shell, and an outer shell. None of that is particularly innovative.
What I dig about the Rockport speaker is those channels. Instead of using hollow walls, there are a series of channels. The channels add strength, but they also allow the builder to line everything up perfectly. Another advantage to those channels is that the foam will be distributed evenly.
The inner shell slides into the outer shell, and then the channels are filled. Rockport uses polyurethane. I would use foam, simply because I don't want a speaker that weighs 500lbs each.
Here's a cutaway
Years ago I tried making a subwoofer with hollow walls, which I then filled with foam. What I found was that the foam *exploded* the walls out! Basically the foam generates a LOT of force when it expands.
I think this method holds potential for a number of reasons:
An externally hosted image should be here but it was not working when we last tested it.
1) 3D printing allows us to make shapes that are complex, with repeatable finishes that can look really good.
2) But 3D printed speakers aren't rigid, because the walls are too thin. The walls must be much MUCH thicker.
3) We should be able to finish the loudspeaker in finishes that are similar to what you can achieve with a car or a bicycle. IE, the finishing options are really good. This construction method should yield a finished product that can look very professional. I think this is something that many of us have struggled with in DIY projects, it's a bummer to invest six months building a loudspeaker, only to have it look like a science project.
I like the idea and it doesn't seem too hard to achieve even without a 3d printer.
If you only had holes for the foam to escape on the inside of the enclosure there would not be too much time lost as it would not have to look pretty.
Cheers,
Rob.
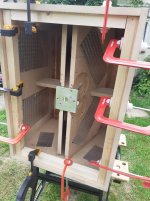
Edit: maybe I should fill up the voids in the back of this horn with expanding foam ?
If you only had holes for the foam to escape on the inside of the enclosure there would not be too much time lost as it would not have to look pretty.
Cheers,
Rob.
Edit: maybe I should fill up the voids in the back of this horn with expanding foam ?
Attachments
Last edited:
You can just bond thin wood on foamcore or XPS. The foam in Summa provides the strength through a high area moment of inertia (distance between the walls). It happens to dampen vibrations as well. CLD can be done without foam. Latex caulking works well as it is flexible and rubbery. You want rubbery.
For 3D printing, just print the “foam” a low density high void plastic matrix.
For 3D printing, just print the “foam” a low density high void plastic matrix.
The thicker the spacing between the solid walls, the better stiffness. Bracing can do wonders. But 10mm is small unless a little satellite housing for a 3in driver. On a normal full size speaker, go for 25mm or more. Think surfboard - they are thick but strong. Only needs maybe 2-3layer solid wall. 7% to 12% infill and use hexagonal/honeycomb pattern.
Just to nitpick here, it's an example of sandwich composite construction (skins over honeycomb) but not necessarily CLD.Ikea furniture is another example of that. The reason that their furniture is rigid and relatively light is because it's a CLD sandwich of HDF, then cardboard, then HDF.
Just some more examples of loudspeaker manufacturers using sandwiching technologies in their cabinets.
Vivid are using "fiberglass-reinforced composite sandwiching a core of balsa wood".
Source: SoundStage! Hi-Fi | SoundStageHiFi.com - Vivid Audio Giya G2 Series 2 Loudspeakers
And Marten Audio are using "Aluminium sandwich honeycomb".
Source: Mingus Twenty - Marten
Vivid are using "fiberglass-reinforced composite sandwiching a core of balsa wood".
Source: SoundStage! Hi-Fi | SoundStageHiFi.com - Vivid Audio Giya G2 Series 2 Loudspeakers
And Marten Audio are using "Aluminium sandwich honeycomb".
Source: Mingus Twenty - Marten
7% to 12% infill and use hexagonal/honeycomb pattern.
Cura does not have honeycomb. Use Gyroid?
I would be tempted to print the part at reduced size and build a duplicator that scales up and router it out of wood. Inner and outer made of wood, then fill in with foam.
Rough cut and laminate Baltic birch to reduce waste.
Based on 3D print times, you might not spend more calendar time than just printing it.
Would be lots of time on the router though.
Rough cut and laminate Baltic birch to reduce waste.
Based on 3D print times, you might not spend more calendar time than just printing it.
Would be lots of time on the router though.
Double sized machining is not that fast. Print can be quicker/cleaner and no problem to get 1kg/hour but one must use pellets or PET regranulate because fialment price is absolute crazy. I've checked timing and typical floorstander is 2 days on Volcano 1mm nozzle 1mm outline 7% infill, weight 2-3kg.
Sychan - have you tried TPU?
Sychan - have you tried TPU?
I would be tempted to print the part at reduced size and build a duplicator that scales up and router it out of wood. Inner and outer made of wood, then fill in with foam.
Rough cut and laminate Baltic birch to reduce waste.
Based on 3D print times, you might not spend more calendar time than just printing it.
Would be lots of time on the router though.
That is one advantage of 3D printing -- though it can take a LONG time to do, it's the printer's time and not your time!
But one disadvantage is that the longer the print time, the higher the likelihood of a malfunction or print failure during its printing.
Vivid are using "fiberglass-reinforced composite sandwiching a core of balsa wood".
Source: SoundStage! Hi-Fi | SoundStageHiFi.com - Vivid Audio Giya G2 Series 2 Loudspeakers
And Marten Audio are using "Aluminium sandwich honeycomb".
Source: Mingus Twenty - Marten[/QUOTE]
Those are boat building techniques from building sailboats basically. Balsa core is common but on large scale the Al honeycomb is pretty expensive.
Sychan - have you tried TPU?
For my boys, I printed a few things out of relatively firm glow in the dark TPU on my Ender 3. Had to dial down the print speed to 20mm/s. It printed reasonably cleanly, but I have the narrower inside diameter Bowden tubes and a slightly upgraded extruder and did few rounds of tuning temperature and retraction. At some point I'll finish upgrading my printer and get the Bondtech direct drive setup going, which should bump up the print speed a good bit.
I suspect it might be easiest to just print separate inner and outer enclosures out of PLA separated by an adhesive backed EVA foam for the CLD and then just friction fit them together.
- Status
- This old topic is closed. If you want to reopen this topic, contact a moderator using the "Report Post" button.
- Home
- Loudspeakers
- Multi-Way
- 3D Printed CLD Speakers?