I wanted to start a build thread for my MWAF project this year, calling them Strafi, wanted to do something special and really push my building skills, there is a restaurant that has a light fixture that inspired me along with a build method I've been wanting to try for a while.
Traditional translam builds create tons of waste, I've had the idea of simply using thinner strips of wood, glued or attached at the corners to create the work envelope from which the final shape is created. This eliminates all the wasted material in the middle and keeps it to whatever is around the edges, very minimal. I'm sure this has been done though haven't seen it, regardless it looked fun and I wanted to give it a try =)
For MWAF I wanted to do something with Pro Audio drivers and a horn since I didn't see any of that last year, I've also been thrilled with the results I've been getting from those projects using PA drivers. I've been eyeing the FaitalPro 8PR200 for a while, after modeling about 50 pro audio 8" woofers, nothing came even close to it with regard to bass performance and clean FR higher up. They are also light neo drivers and I'm going to have to ship these suckers to Ohio this summer.
I decided to do a tower speaker with two 8" in a 2.5 way configuration, as, well, I really like bass. I will be pairing these to a Faital HF10AK 1" compression driver and LTH102 horn which is very well built and cast aluminum. I plan on doing a high order (3rd or 4th electrical) around 1khz, will be experimenting with that later on.
So now, on to the construction. After mulling around a bunch of ideas, I settled on doing a solid hardwood enclosure using Poplar (no shoot you say) and Mahogany. Each enclosure will be made up of about 43 layers each (may vary 1 layer here or there once I get closer to finalizing things).
Each layer is made from 4 pieces of precisely cut lumber, layers stagger every other between a long center Mahogany plank and a short one. When the Mahogany is short, the poplar end grain shows on the sides of it, and this creates a stitched interlacing pattern up the sides. I chose to do this to create a striking visual contrast and I really love the variability in color and grain of the Poplar wood I chose. I have no real idea how this will look when it's done, but I'm excited to see it come together.
Over the past week I sourced the lumber, cut sections to precise lengths and ripped pieces to precise widths and have been gluing them up in batches of 4 using 4 fixtures I built to precisely control the inside and outside dimensions. I'm still using A LOT of lumber, over 55 linear feet of 7.25" wide Mahogany and 11.25" wide poplar.
The dust collection system I put in has been working overtime and working very well might I add =) Once I glue up a layer I can let it set up for about 45 minutes, pull it out of the fixture and slap in new pieces for another round. Over the past week I've been doing one batch at 6:45am when I wake up and right before I make the kid's lunches, then I drop the kids off at school, do another batch at 7:30 right before I leave for work. Then another batch when I get home around 7pm, one at 8:30 and a couple more until midnight or so. Each batch takes about 15 minutes to pull out of fixtures and glue up new pieces, the quick clamps really make things much easier and very accurate.


My cut lists, a pretty extensive spreadsheet with formulas, was very helpful in calculating exactly how much material I'd need.


Individual layer pieces organized and ready to glue up

Two layers glued up and drying


Seams are clamped to align pieces as well as possible, the Mahagany and Poplar are slightly different thicknesses, which will be corrected by the drum sander

Layers stacking up! You can see the alternate layers each in their own stack.

Chop saw fixtures makes quick and accurate work, I have the chop saw adjusted perfectly square for accurate cuts. The ID dimensioned pieces are the most critical, the outside overlapping pieces aren't as critical as that material will be trimmed off.


I should have all layers done by tomorrow, more to come!
Thanks!
Javad Shadzi
Traditional translam builds create tons of waste, I've had the idea of simply using thinner strips of wood, glued or attached at the corners to create the work envelope from which the final shape is created. This eliminates all the wasted material in the middle and keeps it to whatever is around the edges, very minimal. I'm sure this has been done though haven't seen it, regardless it looked fun and I wanted to give it a try =)
For MWAF I wanted to do something with Pro Audio drivers and a horn since I didn't see any of that last year, I've also been thrilled with the results I've been getting from those projects using PA drivers. I've been eyeing the FaitalPro 8PR200 for a while, after modeling about 50 pro audio 8" woofers, nothing came even close to it with regard to bass performance and clean FR higher up. They are also light neo drivers and I'm going to have to ship these suckers to Ohio this summer.
I decided to do a tower speaker with two 8" in a 2.5 way configuration, as, well, I really like bass. I will be pairing these to a Faital HF10AK 1" compression driver and LTH102 horn which is very well built and cast aluminum. I plan on doing a high order (3rd or 4th electrical) around 1khz, will be experimenting with that later on.
So now, on to the construction. After mulling around a bunch of ideas, I settled on doing a solid hardwood enclosure using Poplar (no shoot you say) and Mahogany. Each enclosure will be made up of about 43 layers each (may vary 1 layer here or there once I get closer to finalizing things).
Each layer is made from 4 pieces of precisely cut lumber, layers stagger every other between a long center Mahogany plank and a short one. When the Mahogany is short, the poplar end grain shows on the sides of it, and this creates a stitched interlacing pattern up the sides. I chose to do this to create a striking visual contrast and I really love the variability in color and grain of the Poplar wood I chose. I have no real idea how this will look when it's done, but I'm excited to see it come together.
Over the past week I sourced the lumber, cut sections to precise lengths and ripped pieces to precise widths and have been gluing them up in batches of 4 using 4 fixtures I built to precisely control the inside and outside dimensions. I'm still using A LOT of lumber, over 55 linear feet of 7.25" wide Mahogany and 11.25" wide poplar.
The dust collection system I put in has been working overtime and working very well might I add =) Once I glue up a layer I can let it set up for about 45 minutes, pull it out of the fixture and slap in new pieces for another round. Over the past week I've been doing one batch at 6:45am when I wake up and right before I make the kid's lunches, then I drop the kids off at school, do another batch at 7:30 right before I leave for work. Then another batch when I get home around 7pm, one at 8:30 and a couple more until midnight or so. Each batch takes about 15 minutes to pull out of fixtures and glue up new pieces, the quick clamps really make things much easier and very accurate.
My cut lists, a pretty extensive spreadsheet with formulas, was very helpful in calculating exactly how much material I'd need.
Individual layer pieces organized and ready to glue up
Two layers glued up and drying
Seams are clamped to align pieces as well as possible, the Mahagany and Poplar are slightly different thicknesses, which will be corrected by the drum sander
Layers stacking up! You can see the alternate layers each in their own stack.
Chop saw fixtures makes quick and accurate work, I have the chop saw adjusted perfectly square for accurate cuts. The ID dimensioned pieces are the most critical, the outside overlapping pieces aren't as critical as that material will be trimmed off.
I should have all layers done by tomorrow, more to come!
Thanks!
Javad Shadzi
Another major part of the project will be the router template which allows me to create the final shape of the enclosure, since I have so many layers and I want them to be very accurate, I will be CNC machining an aluminum router template to make things easier. Also full disclosure, I employ 3 amazing ME's and 2 master machinists so I may or may not be using resources at hand =)
Yes I should probably pay someone like Kevin to just rip these out in a CNC router, but I enjoy this stuff and I'm a glutton for punishment!
The template/s will have the following features:
1 - Will set the outside and inside profiles
2 - There will be two templates to create alternating inside layers to crate uneven surfaces inside the enclosure
3 - A drill guide to allow Q4 1/4" holes to allow dowels to align the layers to each other. I'm currently machining the templates and should be routering by early next week.
I also have a JET 16" drum sander on the way, though the layer pieces are well aligned to each other, I need each layer to be very flat as I want to minimize any gaps or unevenness between layers.


More to come!
Javad
Yes I should probably pay someone like Kevin to just rip these out in a CNC router, but I enjoy this stuff and I'm a glutton for punishment!
The template/s will have the following features:
1 - Will set the outside and inside profiles
2 - There will be two templates to create alternating inside layers to crate uneven surfaces inside the enclosure
3 - A drill guide to allow Q4 1/4" holes to allow dowels to align the layers to each other. I'm currently machining the templates and should be routering by early next week.
I also have a JET 16" drum sander on the way, though the layer pieces are well aligned to each other, I need each layer to be very flat as I want to minimize any gaps or unevenness between layers.
More to come!
Javad
Will you include a few X-Cross Brace translam layers?
I remember simulations favoring a translam layering which included both a corner-corner X_brace, plus alternating front-rear brace with side-side brace. One top-bottom brace with slots cut to lock into the horizontal braces was the final step before the bottom panel was glued.
=========
A 7" deep horn creates a large physical time delay. Marco studied passive crossovers which time and phase shift the outputs of the two drivers to help the impulse response. You may need to accept a funky-frequency near your 1kHz goal.
=============
ACCORDING TO MARCO: Here's a list of approved “quasi-optimal” crossovers in order of increasing offset:
3rd order Butterworth Low Pass, -3dB @ Fx*0.87 (+)
3rd order Butterworth High Pass, -3dB @ Fx*1.15 (-)
Offset = 0.22*c/Fx
4th order L-R Low Pass, -6dB @ Fx (+)
3rd order Bessel High Pass, -3dB @ Fx*1.4 (-)
Offset = 0.29*c/Fx
4th ordrer Butt Low Pass, -3dB @ Fx* 0,93 (+)
4th order L-R High Pass, -6dB @ Fx (-)
Offset = 0.31*c/Fx
6th order Bessel Low Pass, -6dB @ Fx*1.25 (+)
2nd order Butterworth High Pass, -3dB @ Fx*1.3 (-)
Offset = 0.40*c/Fx
6th order L-R Low Pass, -6dB @ Fx * 1.06 (+)
3rd order Butterworth High Pass, -3dB @ Fx* 1,13 (-)
Offset = 0.445 c/Fx
6th order L-R Low Pass, -6dB @ Fx * 1.07 (+)
4th order L-R High Pass, -6dB @ Fx * 0.92 (-)
Offset = 0.465 c/Fx
Attachments
Done cutting and gluing for now, have 43 layers of each, whew!


I'll be mocking up and gluing the top panels, found this gorgeous Mahogany that I'll likely use.

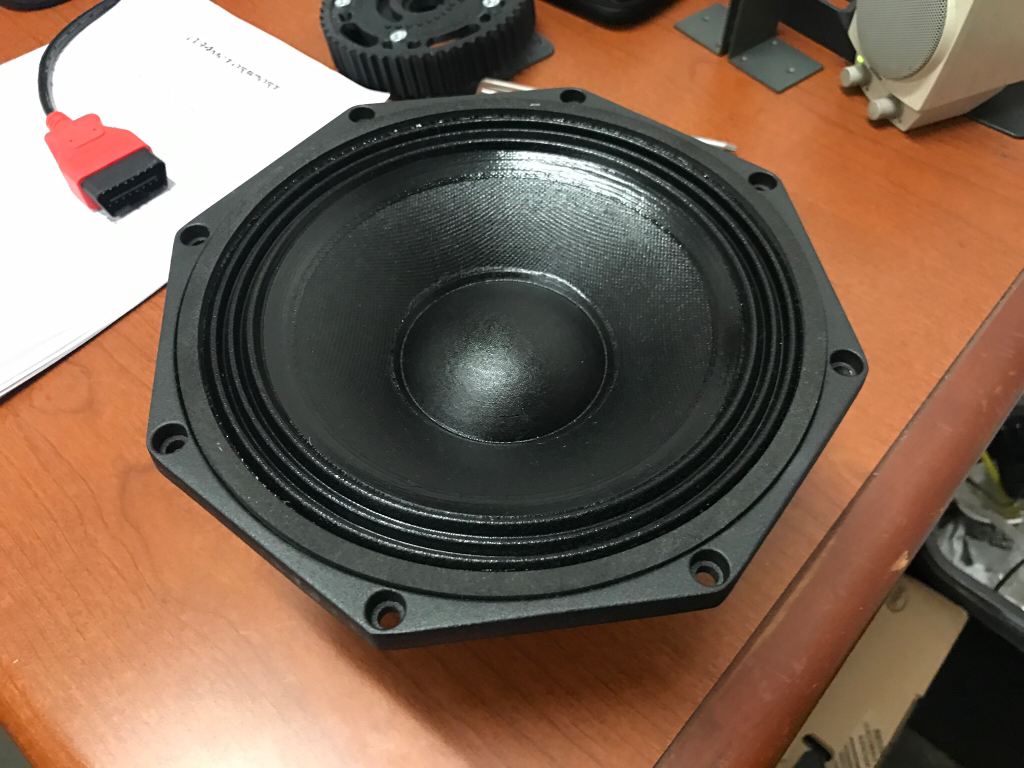
I'll be machining the template this week and should have a lot of router info in my near future. Drivers showed up!
FaitalPro stuff always impresses with their attention to detail, gorgeous drivers. I plan on dampening the horn as well.


Javad
I'll be mocking up and gluing the top panels, found this gorgeous Mahogany that I'll likely use.
I'll be machining the template this week and should have a lot of router info in my near future. Drivers showed up!
FaitalPro stuff always impresses with their attention to detail, gorgeous drivers. I plan on dampening the horn as well.
Javad
Will you include a few X-Cross Brace translam layers?
I remember simulations favoring a translam layering which included both a corner-corner X_brace, plus alternating front-rear brace with side-side brace. One top-bottom brace with slots cut to lock into the horizontal braces was the final step before the bottom panel was glued.
=========
A 7" deep horn creates a large physical time delay. Marco studied passive crossovers which time and phase shift the outputs of the two drivers to help the impulse response. You may need to accept a funky-frequency near your 1kHz goal.
=============
ACCORDING TO MARCO: Here's a list of approved “quasi-optimal” crossovers in order of increasing offset:
3rd order Butterworth Low Pass, -3dB @ Fx*0.87 (+)
3rd order Butterworth High Pass, -3dB @ Fx*1.15 (-)
Offset = 0.22*c/Fx
4th order L-R Low Pass, -6dB @ Fx (+)
3rd order Bessel High Pass, -3dB @ Fx*1.4 (-)
Offset = 0.29*c/Fx
4th ordrer Butt Low Pass, -3dB @ Fx* 0,93 (+)
4th order L-R High Pass, -6dB @ Fx (-)
Offset = 0.31*c/Fx
6th order Bessel Low Pass, -6dB @ Fx*1.25 (+)
2nd order Butterworth High Pass, -3dB @ Fx*1.3 (-)
Offset = 0.40*c/Fx
6th order L-R Low Pass, -6dB @ Fx * 1.06 (+)
3rd order Butterworth High Pass, -3dB @ Fx* 1,13 (-)
Offset = 0.445 c/Fx
6th order L-R Low Pass, -6dB @ Fx * 1.07 (+)
4th order L-R High Pass, -6dB @ Fx * 0.92 (-)
Offset = 0.465 c/Fx
Thanks for the input @linesource! I'll review your XO recommendations, I have a lot of experimenting to do.
And yes I will be bracing extensively but adding them to the layers as I didn't want to add additional complexity to an already complex process.
Thanks!
Javad
Ok template drawings finished and I'll be cutting aluminum this weekend, for a quick confirmation I did a paper print of the template and put it on one of the layers (as you know there are two different style layers that interlace), it's a great fit.
Sander shows up Monday morning and I suspect I know what I'll be doing the rest of that day =)


Thanks!
Javad
Sander shows up Monday morning and I suspect I know what I'll be doing the rest of that day =)
Thanks!
Javad
Got the sander today and I got right to work!


Really nice unit, essentially acts like a planer and accurately takes off whatever thickness you'd like, does well with 1/64" passes when using 120 grit which is what I used. As a bonus it is 16" wide and you can run up to 32" wide in 2 passes.
My goal was to take off as little as needed to make a very flat layer, I ended up needing to take off less than 1/32" per layer though some needed more.
The proof was initially, the stack of 43 layers didn't sit flat and was wobbly, after sanding the layers sat flat and the tower was rock solid stable leaning on it and rocking.
Took about 4 hours to run them all through. I was able to get both stacks w/in 1/32" in overall thickness too.

Currently CNC machining the router templates, will post more about those soon.
Thanks!
Javad
Really nice unit, essentially acts like a planer and accurately takes off whatever thickness you'd like, does well with 1/64" passes when using 120 grit which is what I used. As a bonus it is 16" wide and you can run up to 32" wide in 2 passes.
My goal was to take off as little as needed to make a very flat layer, I ended up needing to take off less than 1/32" per layer though some needed more.
The proof was initially, the stack of 43 layers didn't sit flat and was wobbly, after sanding the layers sat flat and the tower was rock solid stable leaning on it and rocking.
Took about 4 hours to run them all through. I was able to get both stacks w/in 1/32" in overall thickness too.
Currently CNC machining the router templates, will post more about those soon.
Thanks!
Javad
Templates are coming along, should have them all done tomorrow, there are several router templates:
1 - layer templates, there are two, one for each type of layer, they feature the same outside profile, the main difference being the alternating inside pattern.
2 - flush mount template, this is a template that orients the drivers on the baffle, since all 3 drivers aren't round and odd shapes, this template will make things much easier.
3 - driver cutout templates, these fit inside the flush mount template and accurately orient the cutouts as well as the mounting screws. They also act as a support surface for the router base in the adjacent driver position.
Raw material securely clamped in the Haas CNC, all material is 1/4" thick 6061 aluminum.

Probing the workpiece during the CAM programming process, this let's the machine know where 0 is.

Outside cut

Inside cut
 and down, these are very simple pieces.
More to come!
Javad
1 - layer templates, there are two, one for each type of layer, they feature the same outside profile, the main difference being the alternating inside pattern.
2 - flush mount template, this is a template that orients the drivers on the baffle, since all 3 drivers aren't round and odd shapes, this template will make things much easier.
3 - driver cutout templates, these fit inside the flush mount template and accurately orient the cutouts as well as the mounting screws. They also act as a support surface for the router base in the adjacent driver position.
Raw material securely clamped in the Haas CNC, all material is 1/4" thick 6061 aluminum.
Probing the workpiece during the CAM programming process, this let's the machine know where 0 is.
Outside cut
Inside cut
More to come!
Javad
Back at it, some good progress.
Got one of the layer templates finished today.
Chips and coolant flying!


The 1/4" drill guides, I was going to use a shelf pin drill jig but during some testing determined it wouldn't drill all the way through 3/4" stock, so I used these press fit guides


The small holes are to screw the template to the layer using a #6 screw

Template screwed to a layer


This is the bad boy I'll be using to remove wood

Stacks ready to go

Tomorrow I'll be making some dust
Thanks,
Javad
Got one of the layer templates finished today.
Chips and coolant flying!
The 1/4" drill guides, I was going to use a shelf pin drill jig but during some testing determined it wouldn't drill all the way through 3/4" stock, so I used these press fit guides
The small holes are to screw the template to the layer using a #6 screw
Template screwed to a layer
This is the bad boy I'll be using to remove wood
Stacks ready to go
Tomorrow I'll be making some dust
Thanks,
Javad
Got some real work done today, things are coming together!

I started with one of the template styles, I did some experimenting and determined I wouldn't be able to just hog them out due to some Poplar chipout going with the grain, the end grain machines perfectly (mahogany wasn't an issue really). I was really hoping chip out wasn't going to be a problem as the amount of work just increased substantially.
So what I'm doing is screwing the template to the layer, tracing the template in pencil, remove template, rough cut with jigsaw (w/in 1/16-1/8"), screw template back on and then router flush, drill 8 dowel holes, remove template, use sanding block to quickly deburr. Each layer takes about 15 minutes all said and done and there are 86 layers currently in both speakers (I made more layers than that).
Aluminum makes an amazing router template material BTW, holds up so much better than any wood I've used and results in a very smooth finish.
In about 10 hours today I got about 30 layers done, I ended up scrapping 3 so far but those were early sacrifices as I was getting the process figured out. I figure I should have all the layers done routering in the next week.
Template screwed to a layer and trimmed

Flush cut


Drilling dowels

And done


Dowel hole close up

Dowels for a test fit

Stacked with dowels

Each layer weighs about a pound

Thanks!
Javad
I started with one of the template styles, I did some experimenting and determined I wouldn't be able to just hog them out due to some Poplar chipout going with the grain, the end grain machines perfectly (mahogany wasn't an issue really). I was really hoping chip out wasn't going to be a problem as the amount of work just increased substantially.
So what I'm doing is screwing the template to the layer, tracing the template in pencil, remove template, rough cut with jigsaw (w/in 1/16-1/8"), screw template back on and then router flush, drill 8 dowel holes, remove template, use sanding block to quickly deburr. Each layer takes about 15 minutes all said and done and there are 86 layers currently in both speakers (I made more layers than that).
Aluminum makes an amazing router template material BTW, holds up so much better than any wood I've used and results in a very smooth finish.
In about 10 hours today I got about 30 layers done, I ended up scrapping 3 so far but those were early sacrifices as I was getting the process figured out. I figure I should have all the layers done routering in the next week.
Template screwed to a layer and trimmed
Flush cut
Drilling dowels
And done
Dowel hole close up
Dowels for a test fit
Stacked with dowels
Each layer weighs about a pound
Thanks!
Javad
Last edited:
Hey JShadzi. Am really enjoying watching this build. Excellent job minimizing waste. I wish more people did translams like this!
Hey JShadzi. Am really enjoying watching this build. Excellent job minimizing waste. I wish more people did translams like this!
Thanks for the comments guys!
Javad
Got some more work done today, for about 10 more layers done, I basically have all one one layer style done, I'll spend time this week to get the other style done and I should have all my layers routered by week's end.
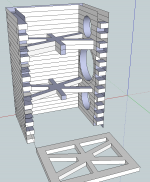
One thing I did today is I started working on what I call the "port layers", I'll have 2 3" ports on the back of the enclosure and to do this I'll want a flat area to work with, this I am doing 6 layers towards the bottom of the enclosure with a flat profile along the back, that way I can recess a port receptacle in a flat section. Those layers have his inside back profile:


I will also make the bottom removable to make port tuning easier and to give access to the inside, XO mounting, etc. I will also be doing CLD to the top and bottom of the enclosure to ensure they are well dampened and non resonant. In addition there will be a 1.25" hardwood dowel spine that will connect too and bottom panels as well as connecting to internal brace layers.
Thanks!
Javad
One thing I did today is I started working on what I call the "port layers", I'll have 2 3" ports on the back of the enclosure and to do this I'll want a flat area to work with, this I am doing 6 layers towards the bottom of the enclosure with a flat profile along the back, that way I can recess a port receptacle in a flat section. Those layers have his inside back profile:
I will also make the bottom removable to make port tuning easier and to give access to the inside, XO mounting, etc. I will also be doing CLD to the top and bottom of the enclosure to ensure they are well dampened and non resonant. In addition there will be a 1.25" hardwood dowel spine that will connect too and bottom panels as well as connecting to internal brace layers.
Thanks!
Javad


- Status
- Not open for further replies.
- Home
- Loudspeakers
- Multi-Way
- Strafi Translam FaitalPro Tower Build