Just to clarify the grounding of the thermal transfer block from the chip to the chassis: The block itself can be bolted to the thermal pad of the TPA3255 directly. No shoulder washers or insulation or ceramic pad needed. However, the thermal block needs to be electrically insulated from the chassis. This can be done with silicone sheet.
The way you did it works too - isolate the thermal block from the PCB 0v and TPA3255 thermal pad. Then the thermal block can be in electrical contact with the chassis.
The nice thing about the silicone thermal spacer is it allows some give so that the height differences are accommodated somewhat.
Ah yes - what I didn't show was there are a bunch of screws up through the bottom chassis plate into threaded holes in the bar, clamping it down nice and tight, so I very much have an electrical connection to the chassis there. Quite possible I have over-engineered that a bit but it's extremely solid.
Oh I did not see the Speakons - black on black! I like your Speakon PowerCon too. I night some and have been looking for an amp to use it in.
The PowerCon is great, I really like the solidity of the cable connector and that they latch. Sticking with circular connectors lets you build the whole thing with just normal drill bits and a 4-30mm step drill Security Check. No need to hack out odd shapes for IEC connectors.
I also use 16ga silicone wire for speaker internal connects now too. Great stuff.
Please double check your left and right inputs. This amp board right input is on left side and output on right side. It crosses over since TPA3255 is on underside. Your photo shows left driving right and vice versa. Just swap the output wires from the THAT1646 to the amp.
Oh ha! Completely didn't spot that! Thanks 🙂
Hi Folks,
Here is an updated BOM with all the changes needed to make the production board. If you buy the bare PCBs please use this BOM and PM me for an updated schematicw which I am not posting publicly but, only available to customers.
Here is an updated BOM with all the changes needed to make the production board. If you buy the bare PCBs please use this BOM and PM me for an updated schematicw which I am not posting publicly but, only available to customers.
Attachments
What I find interesting is that your H3 was reduced depending on the PSU used..this is the first time I am seeing this
Hi Folks,
Just to clarify, the revised BOM goes with the rev002 (Mar 2020) version of the TPA3255 (green PCB). If you have the rev001 (Oct 2019) a blue PCB, I have already contacted you via Etsy's messaging system to let you know that you can get a replacement to the new rev002 at no charge. The new BOM can also be applied to the rev001 PCBs minus 4 resistors. It will have a lower value 220R input reistors vs 2k2 which will increase the amp gain. The 2k2 was used in conjunction with a 220pF NP0 cap to ground as an input RFI filter - but it was found to operate very quietly with only 220R or even 51R and gave a few dB greater gain to reduce your preamp drive requirements. All of the shipped RTR amps already have the smaller 51R resistors installed.
The rev001 amp works fine and sounds excellent and will have about 21dB of gain vs the rev002 which only has 15dB of gain and 6 to 7 dB less THD than rev001.
Sorry for any inconvenience this may have caused.
Thanks,
X
Last edited:
What I find interesting is that your H3 was reduced depending on the PSU used..this is the first time I am seeing this
In any audio ampliier, PSU quality has always had an impact on amplifier sound quality. What the exact mechanism is in this case, I cannot say, but lower noise PSU's may affect the harmonic profile through minor secondary effects,
Hi Folks,
Here is an updated BOM with all the changes needed to make the production board. If you buy the bare PCBs please use this BOM and PM me for an updated schematicw which I am not posting publicly but, only available to customers.
BOM has errors:
Part# for C133, C261-264 is incorrect
Part# for R1021-R1024 is incorrect.
I wish I verified this before placing Mouser order...
The new BOM has errors or the old BOM has errors? Sorry for the trouble - I thought I found all the errors in the new BOM.
The new one, with may-7-2020 in a name.
No big deal for me, added correct parts into the next order.
No big deal for me, added correct parts into the next order.
I have received my assembled amp, thanks X looks great.
The reason for the post (in reference to Redjr) was to add that I will be using an SMPS from connex electronics too, as im already using two 300 watt ones from connex to power two mono 3e audio TPA3255 amps. Although they are in Tupperware boxes they seem to me to be pretty good and I can only hear a slight hiss with my ear pressed next to the LS50’s they’re powering.
I hope once they are properly grounded in an Alu case and with a balanced input they will be even quieter. Currently however I would recommend their products.
I got the board and now and I'm so stoked. This is a GORGEOUS board. I can't stop thinking of all the details to make a nice power amp with it, but I'm a newbie that is slowly learning through this forum.
The Power Supply: I want to use a Meanwell RPS-500-48 but do I need the enclosed type (no FG) or the PCB type (w/FG or no FG)?
Also, I would like to improve a bit the SMPS ripple before going into the amplifier. I just want to use one cap in parallel. I was thinking of a 56uF 80V aluminum polymer OS_CON. But would an MMLC be better?
The balanced Line: I want to go straight from my DAC into the PA but it's not a balanced DAC (Topping D10). I'm opting for the THAT1646 with a Meanwell dual power supply but is it better to use a +12/-12 1A or a +15/-15 0.8A
Also, the Cine-mag input transformer option, I saw a version of the TPA3116 YJ black and blue board using it for balanced line input, what are the pros and cons of that option?
Any advice would be greatly appreciated.
Attachments

Hi Francis,
Glad to see the green lights!
The choice of PSU with or without case is up to you. The main thing is to replace the fan with a quieter Noctua, or add a speed reduction resistor, or defeat the fan completely. I am not sure what is meant by FG? It seems the cased one has a fan built in. The open ones expect you to provide air flow.
You don’t need to add parallel caps - not going to do anything as there is 4700uFx2 of on board bulk caps already. 56uF won’t do much compared to 10,000uF. The thing to do is listen to it and if there is no PSU switch noise or hum audible, you are good to go.
These are very handy PSUs for the THAT1646. They are very quiet in the audio band as they switch in MHz. The +/-15v or +/-12v is fine for your application.
DC-DC Step-up Boost Converter +-5V +-9V +-12V +-15V +-24V Dual Output Power Supply | eBay
If you wanted (not needed), get the +/-24 and use linear 7815 and 7915 TO220 regulators to really get a “linear” supply. Feed them with a small tap from the +12v solder bridge Wxx on the TPA3255 or use external Class 2 12v wall wart (500mA to 1000mA).
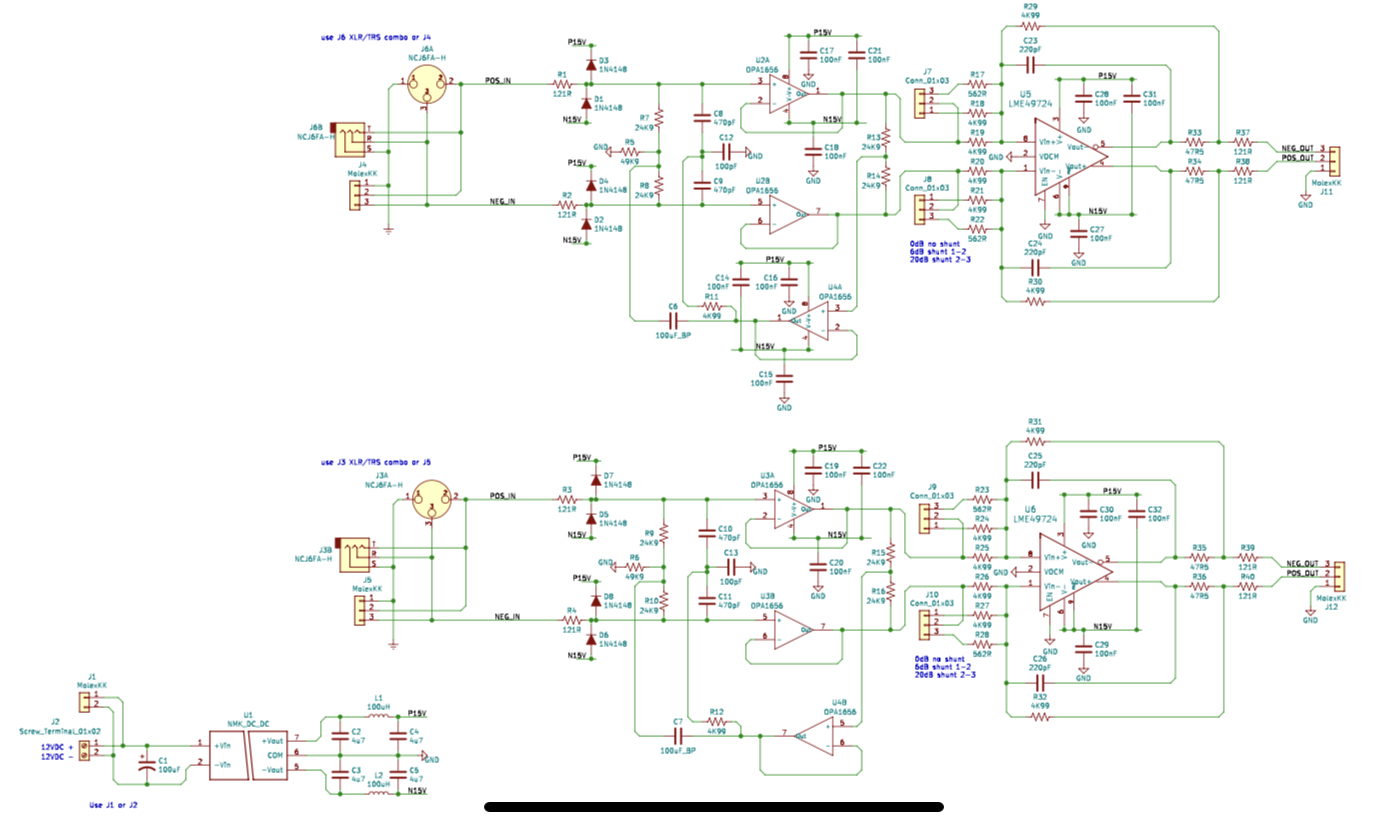
I have a new Bal/SE to Bal converter with 0dB/6dB/20dB gain that jhofland made for me especially for this amp. It uses state of the art OPA1656 and LME94724 for balanced driver. Super low noise and low distortion device - probably immeasurably low distortion unless using an AP. I need to build it and test it. I have the PCB already. It has a built in +/-15v supply fed from 12v. Would folks be interested in it?
Glad to see the green lights!
The choice of PSU with or without case is up to you. The main thing is to replace the fan with a quieter Noctua, or add a speed reduction resistor, or defeat the fan completely. I am not sure what is meant by FG? It seems the cased one has a fan built in. The open ones expect you to provide air flow.
You don’t need to add parallel caps - not going to do anything as there is 4700uFx2 of on board bulk caps already. 56uF won’t do much compared to 10,000uF. The thing to do is listen to it and if there is no PSU switch noise or hum audible, you are good to go.
These are very handy PSUs for the THAT1646. They are very quiet in the audio band as they switch in MHz. The +/-15v or +/-12v is fine for your application.
DC-DC Step-up Boost Converter +-5V +-9V +-12V +-15V +-24V Dual Output Power Supply | eBay
If you wanted (not needed), get the +/-24 and use linear 7815 and 7915 TO220 regulators to really get a “linear” supply. Feed them with a small tap from the +12v solder bridge Wxx on the TPA3255 or use external Class 2 12v wall wart (500mA to 1000mA).
I have a new Bal/SE to Bal converter with 0dB/6dB/20dB gain that jhofland made for me especially for this amp. It uses state of the art OPA1656 and LME94724 for balanced driver. Super low noise and low distortion device - probably immeasurably low distortion unless using an AP. I need to build it and test it. I have the PCB already. It has a built in +/-15v supply fed from 12v. Would folks be interested in it?
Last edited:
Thanks for the quick answers!
In the Meanwell data sheet they say that only the pcb type can work with FG (floating ground) or without FG. I don’t know what I need here. My understanding of Ground in very limited.
As for the aluminium polymer cap, I read that they do better with high frequency ripple but I like your ear to the speaker method and will use it instead.
I would be interested in the unbalanced-balanced board. One thing though, if you add a unbalanced output as well, it would give a neat solution to implement a subwoofer in a 2.1 system. I’m not sure if that makes any sense, just a thought.
You only need floating ground if you intend to put in series for a dual rail supply. So not important in this case. The chassis ground should be connected to the protective earth (PE) connector on the amp. It’s got an NTC and 22nF cap for a ground loop breaker.
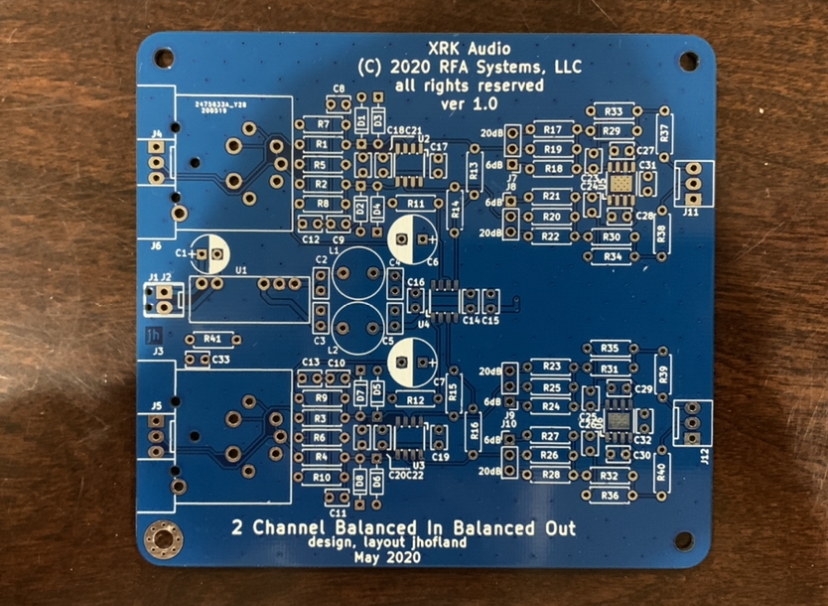
Here is the board. I just ordered the BOM and will be assembling it as soon as parts arrive. It should sound completely transparent like it’s not there but provide the gain needed and conversion to balanced if needed.
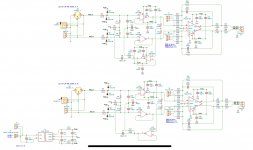
Here is the schematic. Excuse the low resolution image - screenshot of a big pdf from my phone was best I could do.

Here is the schematic. Excuse the low resolution image - screenshot of a big pdf from my phone was best I could do.
Attachments

I have a new Bal/SE to Bal converter with 0dB/6dB/20dB gain that jhofland made for me especially for this amp. It uses state of the art OPA1656 and LME94724 for balanced driver. Super low noise and low distortion device - probably immeasurably low distortion unless using an AP. I need to build it and test it. I have the PCB already. It has a built in +/-15v supply fed from 12v. Would folks be interested in it?[/QUOTE]
Sounds great please go for it!
Sounds great please go for it!
Hi X,Here is the board. I just ordered the BOM and will be assembling it as soon as parts arrive. It should sound completely transparent like it’s not there but provide the gain needed and conversion to balanced if needed.

Here is the schematic. Excuse the low resolution image - screenshot of a big pdf from my phone was best I could do.
I would be very interested in this board. Right away! 🙂 I was looking for a workable solution to allow for dual inputs (Bal or SE) to build into my amp. I was going for some type of active switching off of the THAT boards when using the Balanced-In connectors. Your module is the perfect solution. Do you have an extra PCB you can spare and the BOM?
Attachments

Hi Folks,
Jhofland built the prototype of the SE/balanced to balanced buffer and it works well. We are going to make a few mods for the final version for production. We are adding a SE output in parallel to the balanced output. We are also changing the gains to 0dB, 12dB, and 20dB.
So it’s a Bal/SE to Bal/SE converter. Should be really handy - the best thing since sliced bread... 🙂
That is exciting! One thing I just thought about. I don’t know if that make any sense on an electronic point of view but would it be possible to change a couple of resistors to adjust the input impedance to say 100k for 10k POT or 500k for 50k POT?
- Home
- Group Buys
- TPA3255 Reference Design Class D Amp GB