Sony DVD lasers: KHM-310BAA, KHM-270AAA, KHM-240AAA: how do we clean them?
I recently obtained a Sony DVP-NS775V DVD/CD/SACD player for $15 USD.
My interest in vintage Sony DVD players (such as DVP-NS775V) focuses on models which play the SACD format. Among them are DVP-NS500V, DVP-NS755V, DVP-NS775V, DVP-NS975V, & DVP-NS90V. The superb DVP-NS999ES is also among these models. But it’s nearly impossible to obtain a DVP-NS999ES for $15. In contrast these other SACD-compatible models can often be purchased for <$25 USD.
But this DVP-NS775V had a problem: Every interior surface was coated with a thick film of very fine white powdery dust. It looked and smelled like the residue from sanding & finishing drywall (gypsum board, plaster). This DVD player was clean on the outside, probably because someone had thoroughly wiped it down externally.
Unfortunately this white powdery dust thoroughly coated the laser lens. This disabled the machine. Discs would spin at various speeds for 1-2 minutes followed by a “cannot play” error message.
With isopropyl alcohol & a fine-haired brush I succeeded at cleaning the lens. This permitted the machine to play standard CD discs.
But plenty of this white dust was also present inside the optical pickup. Using considerably more alcohol and compressed air I removed most of the dust from inside the laser pickup. But not all of it. At this point the machine would play both CD & DVD, but still refused to play “hybrid” SACD/CD discs. There was still too much dust inside the optical pickup.
So I began disassembling the optical pickup. The thin metal cover underneath snapped off easily. This exposed the internal glass mirrors which direct & split the laser beam. The plastic cover on top of the pickup was also easy to remove. This exposed the focus/tracking mechanism which positions the upper lens.
However there is another lens directly underneath the focus/tracking mechanism. This lower lens could not be cleaned except by temporarily removing the focus/tracking mechanism. This is where I got into trouble I think. It was easy enough to remove the focus/tracking mechanism, just 2 tiny machine screws. This allowed me to clean the lower lens, which was also heavily coated with the white dusty powder.
After cleaning the lower lens & reassembling however, my progress backtracked to where the machine would barely play a standard CD. I suspect I misaligned the optics by all of my disassembly/reassembly.
So, my question is this: Have any diyAudio members successfully disassembled/reassembled a Sony optical pickup?
-EB
Last edited:
FYI here is some background info about these Sony DVD laser pickup mechanisms.
From 2000-2008 many Sony DVD players contained one of these 3 optical mechanism part numbers:
KHM-240AAA, KHM-270AAA, KHM310-BAA.
All 3 contain 2 laser diodes: A visible red laser to play DVD discs (& SACD), and an IR laser diode to play CD discs. According to Sony, 2 lasers enabled these players to reliably play “burned” discs. Note: Burned discs produce lower RF signal amplitudes than factory-made discs.
The KHM-240AAA and KHM-270AAA came first. I have players that contain each of these two optical pickups. They are so similar to each other that I suspect they may be interchangeable with each other (but I haven’t actually tested this yet). The connecting cables on the ‘240 and ‘270 have precisely identical pinouts, operating voltages, and signal formats. Both pickups use a conventional DC spindle motor with a commutator & brushes. In both the ‘240 and ‘270 pickup, this motor is the 12V version of the Mabuchi RF320 series CD spindle motor. Both pickups contain a tiny “stepper” motor to move the laser carriage (the “sled”). This stepper motor rotates a precision-machined steel drive screw of the “spiral thread type” (worm gear) to move the optical carriage back and forth.
The KHM-310BAAA appears to be a redesign to reduce the height so that the disc player could have a smaller and thinner chassis size. The spindle motor is smaller: it is now the Mabuchi RF300. Also the carriage drive has been redesigned to use several plastic gears and another RF300 motor. It looks much like the carriage drive for a boom box or “low-cost” CD player. There is no longer a high precision machined steel drive screw or stepper motor for the carriage drive. In spite of the “cheaper” construction this optical transport still functions quite well.
Except when the optics are all coated with fine powdery dust, as in the case of my Sony DVP-NS775V
-EB
Well, I discovered I already have an identical DVD transport mechanism on hand, including the KHM-310BAA laser pickup, disc tray, and motors. My other disc transport mechanism is in a Sony DVP-NS975V which has a faulty main logic PC board. The only difference between these 2 Sony models is that the DVP-NS975V has HDMI, whilst the DVP-NS775V does not. But I’m using these players for CD/SACD playback. Their video connections aren’t important to me.
My only issue with this other disc transport mechanism is its spindle motor often makes a sufficiently loud (and annoying) whirring noise to be heard across a quiet room. In contrast the spindle motor in the “dusty” DVP-NS775V is dead silent. Even when it “took off” and spun at several thousand RPM while the “dusty” DVP-NS775V was attempting (but failing) to initialize a disc it still made almost no audible mechanical noise.
After looking closely at these 2 disc transport mechanisms side-by-side I realized it would only take 10 minutes to exchange the “optical” laser pickup subassemblies between these two disc transport mechanisms.
So I did that.
The result: A Sony DVP-NS775V which works perfectly and has no audible mechanical noise while a disc is playing.
At some point in the future when I feel like “digging in deep” I will make an attempt to realign the optics inside the faulty (and previously dusty) KHM-310BAA optical pickup. I suspect I accidentally bent one of the spring-steel flexible wires which hold the tracking/focus coils and the objective lens assembly. However it doesn’t look misaligned.
But because the laser beam passes through the focus/tracking objective lens system in both directions, it seems to me that even the tiniest misalignment could prevent the return beam from falling squarely on the photodetector array. The tracking and focus servos aren’t capable of correcting a random optical misalignment. The focus servo can only move the objective lens up/down to focus the beam on the data layer of the disc. The tracking servo can only move the beam axially, to/from the center of the disc. Optical misalignment in any other direction cannot be corrected by the servo system.
I wonder how Sony aligns them at the factory?
I also wonder how many laser pickups get damaged during attempts to clean the lens? I’ve always been very gentle and cautious when cleaning the objective lens, which is the lens which is seen at the top of a laser pickup. I think I damaged this laser pickup when I dismounted the objective lens (along with its focus and tracking coils) while “deep-cleaning” the interior of the optical assembly. At one point one of the thin spring-steel wires got stuck to one of the stationary magnets which form the other portion of the focus/tracking system. This might have bent the spring just enough to misalign the objective lens.
-EB
Photos of the Sony DVP-NS775V DVD/CD/SACD player which I'm discussing in this thread:
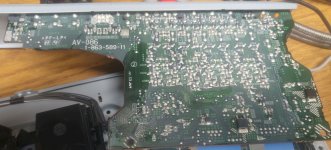
This photo of the audio PC board shows the white dust which covered every surface inside the player. The "clean" area at the left side of the PC board shows where I wiped off the white dust with a paper towel. This dust was somewhat adhesive: Compressed air alone wouldn't remove it. It actually needed to be wiped or brushed off. At least it wasn't like spray paint.
Even the front surface of the VFD display glass was coated with white dust. This display is deeply embedded behind a PC board located inside the front panel assembly. I cannot explain how so much dust was able to penetrate this deeply into the player.
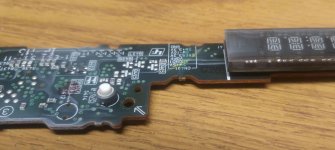

This same dust was everywhere including deep inside the interior of the laser pickup assembly. The optical surfaces inside the laser pickup looked about the same as this VFD glass.
This is the transport mechanism:
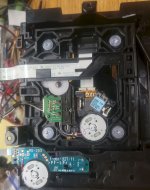
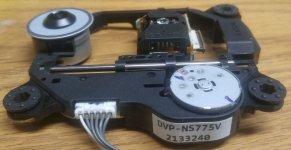
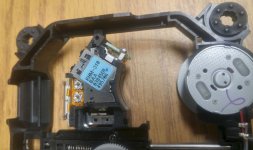
By the time I took these 3 photos of the transport I had cleaned them (externally). That's why these items look "clean" compared to the first 3 images.
-EB
This photo of the audio PC board shows the white dust which covered every surface inside the player. The "clean" area at the left side of the PC board shows where I wiped off the white dust with a paper towel. This dust was somewhat adhesive: Compressed air alone wouldn't remove it. It actually needed to be wiped or brushed off. At least it wasn't like spray paint.

Even the front surface of the VFD display glass was coated with white dust. This display is deeply embedded behind a PC board located inside the front panel assembly. I cannot explain how so much dust was able to penetrate this deeply into the player.


This same dust was everywhere including deep inside the interior of the laser pickup assembly. The optical surfaces inside the laser pickup looked about the same as this VFD glass.
This is the transport mechanism:


By the time I took these 3 photos of the transport I had cleaned them (externally). That's why these items look "clean" compared to the first 3 images.
-EB
Last edited:
This DVP-NS775V model represents the continuing evolution of Sony disc player design during the mid-2000's.
The servo system in this model is quite sophisticated.
It automatically "fine tunes" the servo parameters each time a disc is played.
This occurs during the "initialization" phase just after the disc tray closes. The disc rotates at various speeds for 5 to 20 seconds after the tray closes. During this time the firmware executes several processes which identify whether the disc is a DVD, CD, or SACD. These processes also measure & adjust servo parameters such as tracking/focus gain & offset. Finally the firmware evaluates the "jitter" & "RF signal level" for each disc.
The measured parameters can be observed via the "service menu." Their values differ for each disc. In fact they change slightly each time the same disc is put into the tray. This is a dynamic process rather than a semi-permanent setting retained in EEPROM (more on this subject later).
Here are examples of these servo parameters:
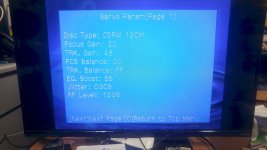
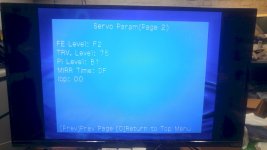
Manual adjustment is required for only one item: "Mirror time"
"Mirror time" controls how the player identifies whether a disc is a DVD or a CD. It does this by measuring the elapsed time of the "focus search."
Brief explanation: The CD data layer is embedded more deeply into the disc than the DVD data layer. As the lens gradually moves upward during the focus search it focuses on the DVD layer sooner than the CD layer. Although an uncalibrated machine will still play most discs, disc initialization becomes noticeably faster after performing this "mirror time" adjustment. The Sony service manual states "mirror time must be adjusted after changing the optical pickup."
Another interesting item: This player has an internal "elapsed time meter" which logs the total "playing hours" for both CD & DVD discs. This appears near the top of this screen in the "service menu"
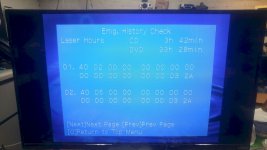
This player was not used very much even though it is now nearly 20 years old.
The items in the middle of the above screen are "errors" which occurred previously. The disc player logs the most recent 10 errors where (for one reason or another) the machine wasn't able to play a given disc. The service manual doesn't provide very much detail about what these items mean. My assumption is these items were mostly of interest to the engineers who debugged the firmware.
More to come.
-EB
The servo system in this model is quite sophisticated.
It automatically "fine tunes" the servo parameters each time a disc is played.
This occurs during the "initialization" phase just after the disc tray closes. The disc rotates at various speeds for 5 to 20 seconds after the tray closes. During this time the firmware executes several processes which identify whether the disc is a DVD, CD, or SACD. These processes also measure & adjust servo parameters such as tracking/focus gain & offset. Finally the firmware evaluates the "jitter" & "RF signal level" for each disc.
The measured parameters can be observed via the "service menu." Their values differ for each disc. In fact they change slightly each time the same disc is put into the tray. This is a dynamic process rather than a semi-permanent setting retained in EEPROM (more on this subject later).
Here are examples of these servo parameters:


Manual adjustment is required for only one item: "Mirror time"
"Mirror time" controls how the player identifies whether a disc is a DVD or a CD. It does this by measuring the elapsed time of the "focus search."
Brief explanation: The CD data layer is embedded more deeply into the disc than the DVD data layer. As the lens gradually moves upward during the focus search it focuses on the DVD layer sooner than the CD layer. Although an uncalibrated machine will still play most discs, disc initialization becomes noticeably faster after performing this "mirror time" adjustment. The Sony service manual states "mirror time must be adjusted after changing the optical pickup."
Another interesting item: This player has an internal "elapsed time meter" which logs the total "playing hours" for both CD & DVD discs. This appears near the top of this screen in the "service menu"

This player was not used very much even though it is now nearly 20 years old.
The items in the middle of the above screen are "errors" which occurred previously. The disc player logs the most recent 10 errors where (for one reason or another) the machine wasn't able to play a given disc. The service manual doesn't provide very much detail about what these items mean. My assumption is these items were mostly of interest to the engineers who debugged the firmware.
More to come.
-EB
Sony DVD player "service menus" are accessed by a specific sequence of button presses on the remote control.
The following instructions are specifically for the Sony DVP-NS775V, but they also work with similar models such as the DVP-NS975V & DVP-NS90V.
1) Have a TV connected to the DVD player to view the service menu screens.
2) Have a remote control which works with this DVD player. I'm using the Sony RMT-D172A. It originally came with a DVP-NS975V, but it works 100% perfectly with the DVP-NS775V DVD player.

3) Start out with the DVD player switched on.
5) Next, press & release each of the following 3 remote control buttons one after the other: [TOP MENU] [CLEAR] [I/O]
6) After about 5 seconds the following screen should appear on the TV:
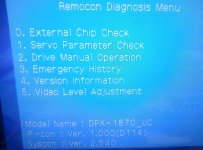
From this screen all service menu functions are accessible.
To exit the service menu press I/O button (green) on the remote or press the power button on the DVD player itself.
The next time the machine is switched on it will revert to the "normal operation" mode.
I usually take a look at the "Emergency History" screen next. This is done by pressing the [3] button on the remote.
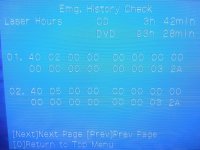
The total elapsed playing time in hours and minutes is displayed for both CD and DVD.
There are 4 additional "pages" associated with this "Emergency History" section. Each may be viewed one after the other by pressing the [NEXT] button several times. Press [PREV] button to reverse.
The DVD player logs the most recent 10 "error codes" from instances where the player was unable to initialize or play a disc. The most recent error is #1. Each page displays 2 error codes: 1-2, 3-4, 5-6, 7-8, 9-10.
The Sony service manual provides some information about the meaning of these "error codes." I'm still studying this. I don't yet know how helpful these error codes will be in terms of diagnosing faults.
I'll continue adding to this thread as I compile more data.
-EB
Fortunately most Sony DVD players made during the 2000's have similar remote controls.
You won't need the exact "original" remote.
But you do need a remote which is able to operate all of the normal functions of the DVD player.
A "universal" or "3rd party" remote may (or may not) work.
You won't need the exact "original" remote.
But you do need a remote which is able to operate all of the normal functions of the DVD player.
A "universal" or "3rd party" remote may (or may not) work.
The following instructions are specifically for the Sony DVP-NS775V, but they also work with similar models such as the DVP-NS975V & DVP-NS90V.
1) Have a TV connected to the DVD player to view the service menu screens.
2) Have a remote control which works with this DVD player. I'm using the Sony RMT-D172A. It originally came with a DVP-NS975V, but it works 100% perfectly with the DVP-NS775V DVD player.

3) Start out with the DVD player switched on.
Note: Some models have a "hard-wired" press-in press-out mains power switch on the DVD player itself. If so, this switch must remain in the "power-on" state.
4) Press & release I/O button (green) on the remote to place the DVD player into "standby" mode. 5) Next, press & release each of the following 3 remote control buttons one after the other: [TOP MENU] [CLEAR] [I/O]
6) After about 5 seconds the following screen should appear on the TV:

From this screen all service menu functions are accessible.
To exit the service menu press I/O button (green) on the remote or press the power button on the DVD player itself.
The next time the machine is switched on it will revert to the "normal operation" mode.
I usually take a look at the "Emergency History" screen next. This is done by pressing the [3] button on the remote.

The total elapsed playing time in hours and minutes is displayed for both CD and DVD.
There are 4 additional "pages" associated with this "Emergency History" section. Each may be viewed one after the other by pressing the [NEXT] button several times. Press [PREV] button to reverse.
The DVD player logs the most recent 10 "error codes" from instances where the player was unable to initialize or play a disc. The most recent error is #1. Each page displays 2 error codes: 1-2, 3-4, 5-6, 7-8, 9-10.
The Sony service manual provides some information about the meaning of these "error codes." I'm still studying this. I don't yet know how helpful these error codes will be in terms of diagnosing faults.
I'll continue adding to this thread as I compile more data.
-EB
The KHM-240AAA and KHM-270AAA came first. I have players that contain each of these two optical pickups. They are so similar to each other that I suspect they may be interchangeable with each other (but I haven’t actually tested this yet).
Just as a quick followup:I did test this. When my NS900V couldn't read many discs anymore, I tried swapping in a KHM-270AAA from a working player. It assembled and plugged in without issue; as you noted, it seems physically identical to the KHM-240AAA. Same mounting points, same cables, everything plugs into the same places. I had every expectation of it working. But when I powered the 900 up it made a godawful jackhammer noise. Just guessing, it might have been the sled worm gear forcing its way past the end of travel switch, might have been the focus and/or tracking coils oscillating hard and throwing the laser pickup around in its housing. I didn't leave it powered up long enough to try to observe this closer, just undid the transplant and tried the KHM-270AAA again its original donor player. No joy there either. No bad noises anymore, but it wouldn't read anything. Guess I busted it!
No big deal though. Within a few days I had a new donor player from the 'bay (NS700P), this time with the correct KHM-240AAA part. The emergency log screen of that one showed a little under 200 hours on DVD and zero(!) on CD. Easy swap, $25 outlay. My NS900V is happy again and so am I. (The experiment with the KHM-270AAA pickup was similarly inexpensive.)
Could be I did something wrong when trying the 270 pickup where a 240 belonged, but it's hard to guess what that could have been. It should be impossible, or nearly so, to install it incorrectly.
Anyway thanks for all the good information in this thread.
- Home
- Source & Line
- Digital Source
- Sony DVD lasers: KHM-310BAA, KHM-270AAA, KHM-240AA: how do we clean them?