I came across some 3/4 furniture grade plywood, which I need to extend the length of 4 pieces, by butt-joint glueing a 3/4" square hardwood stick to the edges at either end. I have a large bottle of Elmer's yellow -
I'm planning on staining and finishing the top surface and I know some glue will squeeze out of the joint. Obviously I dont want that to interfere with the stain. Do I just wipe off the excess? With a water soaked rag? Do I just let it dry and no problem after sanding? Scrape it off partially dried?
Stain before gluing?
How should I handle this? BTW, I've got one shot to get it right - and not have it look like crap for all my effort when done. Thanks!
Joe typically stain will be blotchy where the glue was even if cleaned well with a damp rag, it takes some heavy sanding to make it work which isn’t a option on most plywood (you’ll burn through) the other problem is if you stain first the glue doesn’t typically stick well to a stained surface (especially oil based stains) best case would be if you could stain everything first except where the glue joint will be then assemble carefully cleaning off excess glue with damp rag before the glue dries. You may need to tape it off before staining for best results.
The clear finish usually isn’t as critical over glue as the stain is.
The clear finish usually isn’t as critical over glue as the stain is.
Last edited:
Place blue masking tape very carefully up to the edges of the boards you intend to join and press it down by rubbing with a soft block of wood. Don't overdo the glue and let the squeeze out (should be small beads and not massive globs) set up a bit. When it's rubbery all the way through slice off the glue with a sharp chisel, then remove the tape. Sand lightly. Use stain conditioner before the stain, some woods are naturally blotchy.
Another tip: insert some tiny brads in the edge of the plywood and snip them off as close as you can, the small protruding spike will keep the boards from sliding while you clamp.
Another tip: insert some tiny brads in the edge of the plywood and snip them off as close as you can, the small protruding spike will keep the boards from sliding while you clamp.
The tiny brad suggestion to stop board slipping is good. You can also use the old trick of a bit of salt - it will provide some initial bite, and then dissolve.
Blue masking tape is also a good idea, and removing the excess glue when rubbery, then wipe with a damp cloth. Note that this will raise the grain and require a light, but careful sanding.
Any of the white/yellow PVA glues will stain if allowed to dry. You might consider a hide or fish glue. The strength is on par with the PVA glues and the protein base will usually accept stain, or finish, without an issue and they clean up much easier with water. (Test first)
What I have done in similar circumstances is to run a slight chamfer along the hardwood edge forming a slight channel with the plywood. That will tend to 'trap' any excess glue and allow you to chisel out any excess without marring the plywood. It will show as a feature line and won't detract from the panels.
Thanks guys. I'm doing a test first on a couple of scraps to make a shorter version of the same 3/4 ply edge to hardwood strip glued connection.
I'd really like to use my Elmer's carpenter's glue, as I have a half gallon on hand. I'd really like to glue first, shape and fit 2nd, assemble (final glue) 3rd, sand and finish 4th...
The directions say to coat both edges, clamp for 30 minutes, let dry overnight for best results. So after being careful with the initial application amount, I scraped off the excess with a dull chisel at the 30 minute mark. Directions also said wipe off any excess with a warm damp cloth, so I did that in addition - heating it in the uWave.
Tomorrow, after a reasonable after-glue sanding, I'll apply a little stain and we'll see how it looks. Hopefully it wont be blotchy due to the excess glue, which was a bit worse on the bottom side (as obtained) than the top (lightly sanded before gluing), for my test strip.
It appears the 1/2 hour dry, then scrape, then wipe with a warm wet rag works!
But I have other problems. I'll need to fabricate a plastic chisel, for my 8th grade wood shop hand tool skills. I'll need to spend a bit more time on sanding...
The hardwood edge strip sucks the stain in differently than the ply finish wood too, so I'll have to find a trick to get it to appear more even between the different pieces.
1st - Top, 2nd - Bottom
Attachments
There’s a few ways you can try to combat that color mismatch. Often times gel stains are the way to go instead of penetrating stains. Since they are thicker they do not penetrate really at all into the wood, instead the pigments stay on or near the surface. This leaves a much more uniform finish color compared to a penetrating stain. Another option is to condition or seal the wood before finishing using either an off the shelf conditioner, glue sizing, very dilute poly, or even shellac. These are traditionally methods to control blotch, but they all (attempt) to do the same thing which is to fill in some of the pores of the wood and even the absorption of subsequent finishes. Essentially you are dealing with uneven absorption so those methods may work to combat the color difference. Finally, you can play with different stain dilutions and numbers of applications to the different wood types until they come out pretty similar. In any case it’s sort of a trial and error situation until you find the method/application that works the best.
The above is definitely an option too that I’ve done myself, embrace and possibly even highlight the difference. Really the color doesn’t look all that different between the hardwood banding and the ply. I think it jumps out a bit more because of the grain directions running perpendicular, but I do know color mismatches can look much different in pictures than in person.
The above is definitely an option too that I’ve done myself, embrace and possibly even highlight the difference. Really the color doesn’t look all that different between the hardwood banding and the ply. I think it jumps out a bit more because of the grain directions running perpendicular, but I do know color mismatches can look much different in pictures than in person.
The brads are a good idea but you'll find them a bit fussy to get aligned. Be sure and do some rehearsals w/o glue.
Only two ways to ensure no glue blotching:
1. cut the edge pieces 1/16 proud and plane off the excess which you can't do because of the thin plywood veneer adjacent
2. wipe a thin coat of shellac, Bulls Eye Seal Coat is perfect sold everywhere, on the plywood and the exposed edge pieces prior to glue up. The spray can one is good too with the gluing surface masked. You can top coat or even stain with anything over the shellac but staining is best done first.
Tape helps but imperfect. Never wipe off glue with a wet rag it just spreads the glue and helps it soak into the wood.
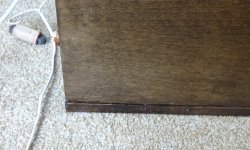
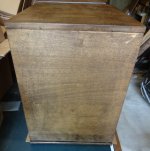
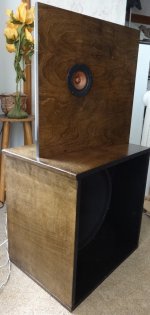
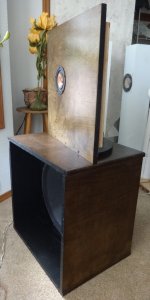
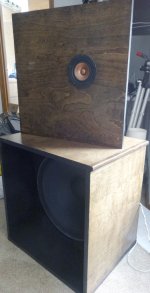
Well "master craftsman" I am not. I could have done a better job with better tools, or being more careful with the tools I have on hand. I picked up a large unfinished cabinet by the side of the road with a free sign on it. 20" deep 3/4" panels with enough material to make a pair of MJK's "Jordan JX92S Open Baffle and Goldwood GW-1858 H Frame".
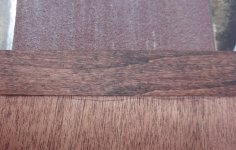
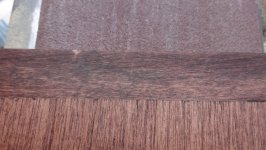
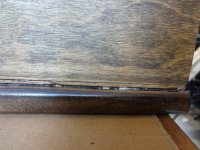
1st two picks shows the difference between what the OEM can achieve for "glued seams" vs me.
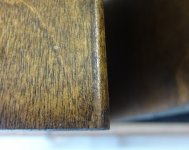
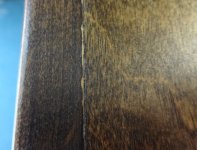
Using a carpenter's saw with a homemade fence cutting 16" lengths, the tolerances soon added up to where I could no longer use the Elmer's and had to go to the polymer construction adhesive to fill the gaps. When that stuff touches the finish surface, forget the stain. Next two pics shows my accident and fortunately I was able to touch it up some.
I mis-applied my powered hand planer, busting off the hardwood edges the oem had put in place on all 4 side panels I had bundled together, trying to plane them all the same length. They no longer fit the height of the baffle, which was already glued in place. So I had to create shims to extend them. Uggh. Still couldnt get it accurate enough to take the Elmer's, so the construction adhesive had to be used.
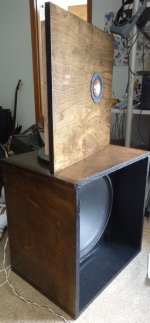
Despite all this, the completed cabinets look OK touched up and finished with satin polyurethane from my listening position.
1st two picks shows the difference between what the OEM can achieve for "glued seams" vs me.
Using a carpenter's saw with a homemade fence cutting 16" lengths, the tolerances soon added up to where I could no longer use the Elmer's and had to go to the polymer construction adhesive to fill the gaps. When that stuff touches the finish surface, forget the stain. Next two pics shows my accident and fortunately I was able to touch it up some.
I mis-applied my powered hand planer, busting off the hardwood edges the oem had put in place on all 4 side panels I had bundled together, trying to plane them all the same length. They no longer fit the height of the baffle, which was already glued in place. So I had to create shims to extend them. Uggh. Still couldnt get it accurate enough to take the Elmer's, so the construction adhesive had to be used.
Despite all this, the completed cabinets look OK touched up and finished with satin polyurethane from my listening position.
Attachments
- Home
- Design & Build
- Construction Tips
- Woodworking question; Glue and Stain