I am seeking advice on achieving a smooth finish on a rounded speaker enclosure.
The speakers will be 3 way. The enclosure for each driver will be shaped similar to a jet engine cowling/ tear drop with the 3 driver enclosures will sit one on top of the other. A similar shape would be the B&W nautilus from the font view (minus the shell shape).
My initial plan was to create cut a snowman shape template from MDF for the main body of the speakers and glue layers together to achieve depth. The 3 end cones for each driver enclosure would be constructed separately and attached to the main body. The enclosure would then be bogged and sanded. The main issue with this construction method will be achieving a smooth divot free surface sanding by hand.
The next plan was to construct each driver enclosure separately by cutting out MDF templates (essentially circles of varying diameter, gluing together to achieve depth and then using a lathe to create the desired shape and smooth lines. Finishing with bog/putty ect. I would then join the 3 housings together. The issue I have found is a) the lack of people willing to endanger their health by working MDF on a lathe and b) finding a lathe large enough to shape the 16” diameter of the woofer enclosure.
My current idea is again to construct each driver housing separately but rather than finish on a lathe I would create a spinning wheel similar to that of a potter’s wheel to evenly apply the bog and to sand evenly. I am thinking that I may have bitten on more than I can chew, however, I am committed to the design ands would appreciate advice.
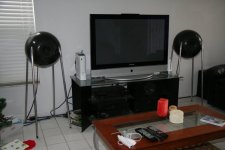
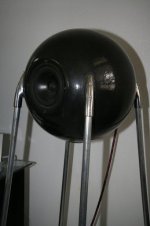
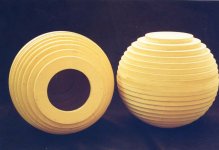
I suppose now more than 15 years later the story can be told. My Sputniks were made exactly how you describe: Rings of MDF glued and stapled together with an end cap speaker mount baffle cut in a lathe; then filled in with Durham's Rock Hard water putty, mounted in a lathe with an 8 inch bed (can hold a 16 inch diameter work piece), and spun by hand while rasping and sanding away until they were pretty smooth by eye; and then primed with sandable spray primer; and finally a thick coat of hammered finish paint. Before we got the lathe I started to make a horizontal axis potters wheel-like mount for spinning them...
Attachments
Hi Andersonix,
Thank you for taking the time to reply.
What happened to the potters wheel idea, did you test it out or change your mind before completion?
Did you sand the MDF to a near spherical shape before apply the bog or did you apply the bog thickly and acheive the spherical shape by sanding away at the bog? My preference would be to work the bog rather than the MDF (more from a safety perspective).
Do you have any advice on sanding techniques? e.g. did you use a machine to sand, a soft sanding block or your hand?
The potter's wheel was going to be made from an old sewing machine stand, but I didn't finish it. It would have been fairly handy, as putty dust made a mess of that lathe.
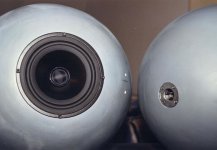
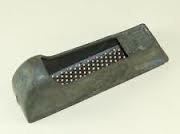
I didn't use the lathe's motor to spin that large heavy sphere, but instead spun it by hand while I shaved off the extra putty. The MDF edges were at the sphere's OD, so I used a 'surform' shaver (see pic) mostly, and course sand paper by hand, which worked well on that Durham putty. I was impressed with the ease of use of that Durham Rock Hard stuff: just mix with water until desired thickness, and smear on with a flexible plastic trowel, one section at a time (so it wouldn't fall of while wet), and then let dry overnight. Shave that bit, and repeat...
I originally wanted to cut the rings at an angle, so there would be less to fill in, but ended up using a router with a circle jig and just cut the rings straight, making a lot of MDF dust, so I used a mask. Still, probably not that healthy...
Attachments
Happy to help, Simon!
First I tried cutting an arc with a jigsaw set at 45º, but that proved impossible to control as the blade flexed an wandered off course. Perhaps I should have thought more about a proper jigsaw circle guide and just sawing perpendicularly, as there would be much less waste sawing than routering, but the router and circle jig was already sitting there ready to go...
Although it left more to fill in, it was probably better for wet putty adhesion to leave the ring edges straight. Cutting straight also made it more straightforward to lay out the rings so that an 'inside' cut line on a larger ring would also double as an 'outside' cut line for a smaller ring. I played around a lot with laying out all the rings in CAD to make the best use of the MDF sheet and also cut as few times as possible.
Yes, that all makes sense.
Perhaps the way to go is to cut at a 90º angle and then use a router to knock off the edges.
Having said that, it may just be quicker and less messy to apply more bog (becomes more of a sculpting exercise) and as Andersonix points out, the angle provides more of an adhesive surface for the bog. I do not have much experience working with bog, however, I do have a friend who is renovating a steel fishing trawler and has spent hundreds of hours bogging and sanding the hull, so I should be able to call on him for some assistance with the bogging side of things.
Simon
I wonder if you could "just" cut a couple of rails from scrap MDF that matches the desired profile, but a couple inches larger. Then, position the enclosure on a spindle, and make passes with the router on the rails, turning the enclosure slightly between each pass. You'd need to make a router base that would follow the curve without rocking.
After I was satisfied that the rings could be cut in an economical way (time/simplicity) it became just a repetitive mindless but noisy and dusty slog. Similar with smoothing them out: Once you figure out exactly how you are going to >firmly< hold the rotating shape as you fill and smooth it, it's just another mindless slog. The sharp edges of the rings at the intended OD of the finished sphere served as a visible guide when shaving it down, so I just had to maintain the curvature really.
The key is figuring out how to hold on to 'it' and still access the working surface. I suggest finding a solution for every step until the end before cutting any material -- because then the mindless slogs become rewarding therapeutic handiwork!
Do you have any sketches of your design? My Sputniks had very low WAF...
Do you have any sketches of your design? My Sputniks had very low WAF...
Hi Andersonix,
Yes, I do have sketches + a model. I can forward in the week when I am back in the office.
I agree that I will need to plan every stage prior to proceeding with the cutting. Aside from acheiving the smooth finish, this will be the other main design hurdle, particularly given the relative complexity of the enclosures. CAD software would be extremely useful to this end.
I am also looking into the potential of fabricating in ceramic. The main downside is that I would need to have someone carry out the fabrication for me which to a large degree defeats the purpose of the exercise, i.e. knowing that your own hands and effort have created the end result. Also, I am not sure of the acoustic qualities of cermamic. I have heard that it may over emphasise the top end frequencies. I may post this question in a seperate area to see if anyone has experience with ceramic speakers. The speakers will be 3 way and sealed, so I am thinking that with enough acoustic dampening material, this may not be an issue.
For the design, each driver section is made up of 3 parts. The slightly tapered but short front section which also incorporates a narrow baffle (approx. 1 inch), the middle section where the diameter of each ring is the same and the end section (nose cone section). (jet engine cowling shape).
To keep each section firmly in place while applying bog and sanding on the 'potters wheel', I am thinking that I would have to not cut out the circular cavity from the last circle of each section and use this last in tact circle to bolt onto the 'potter's wheel'. The inner circle of the final mdf circle of each section can be cut out when sanding ect has been completed. - sorry for the poor wording, too many coffees and not enough time!
This still leaves the issue of joining the 3 sections together which comprise each driver enclosure and ensuring a smooth finish for the 3 joins. I think that I would need to leave the end piece (the final piece of MDF into which the driver would sit) in tact, i.e. do not cut out the hole for the driver and bolt this onto the potter's wheel
Now, if you can make any sense of the above without a diagram...
- Status
- This old topic is closed. If you want to reopen this topic, contact a moderator using the "Report Post" button.
- Home
- Design & Build
- Construction Tips
- How to achieve a smooth finish on a round enclosure?