At that point, the volume level surely extrapolates to way beyond 120dBSPL - many phones can actually go that high, and hearing damage is certainly possible.
I'd say hearing damage is guaranteed or pretty darn close to guaranteed. Thanks, but no thanks.
I've had the idea of driving headphones through a power amplifier and a low-value resistive divider (say, 8 ohms and 0.5 ohms) to limit the power so that worst case the max SPL is something "reasonable."
There are reasons for including a small resistor in series with the output of a power amp when driving headphones. The cable capacitance is the main one. But if you want a lower power limit, I prefer to just design a dedicated headphone amp. One option would be to run the MOD86 from a ±15 V regulated power supply. Just saying ... 🙂
Tom
As far as directly driving headphones from a power amplifier, I find that a scary idea, not just because of the phones catching fire (there's a story about that allegedly happening to a drummer in "The Mixerman Chronicles,"). At that point, the volume level surely extrapolates to way beyond 120dBSPL - many phones can actually go that high, and hearing damage is certainly possible. I've had the idea of driving headphones through a power amplifier and a low-value resistive divider (say, 8 ohms and 0.5 ohms) to limit the power so that worst case the max SPL is something "reasonable."
I use a transformer - protects the cans from any DC offset, allows multiple taps to suit different impedances and gives excellent subjective SQ. Oh and very cheap when DIY'd - what's not to love? Some examples are up on my blog if anyone's interested.
That's the great thing about DIY... Don't need insane power levels for headphones? Run lower rails and get amazing performance!
I hope to add an Audeze headphone to the stable one of these days. I hear tell they go great with speaker amps, so should be a perfect fit for the Mod86. 😀
That's the great thing about DIY... Don't need insane power levels for headphones? Run lower rails and get amazing performance!
Yep. Just make sure you don't brown out the onboard regulators. If you want to operate below ±20 V, you need to change a couple of resistors. It's all in the design doc.
Tom
Today's numbers:
PAR86 with LM4780: 3 left
PAR86 bare board: About two left (I've ordered 12 boards but usually get 1-2 extra from the manufacturer).
MOD86 R2.0: 6 left
Tom
PAR86 with LM4780: 3 left
PAR86 bare board: About two left (I've ordered 12 boards but usually get 1-2 extra from the manufacturer).
MOD86 R2.0: 6 left
Tom
The LME49710NA (8-pin DIP) is back in stock at Mouser. They have 350 left. I've switched the Modulus-86 Rev. 2.0 project back to the NA version. It'll remain this way to avoid further confusion. Rev. 2.1 will use the still-in-production TO-99 version.
Tom
Tom
Well. That was quick! I'm down to one (1) unclaimed LM4780 now. I'll have at least two boards without the LM4780, though. Once I actually have the boards in hand (probably early in the week of the 11th), I'll see what I can do about dusting up some more LM4780s.
Thanks again to all who supported the project.
Tom
Thanks again to all who supported the project.
Tom
**Kid in sweetshop mode** I finally got both channels up and working today (only got the replacement speaker posts on Thursday). At the moment, all I can say is it sounds great from a nearby room - I spent all today painting our spare bedroom and needed some music. Cranked it up to about 80% full volume, and it delivered brilliantly.
However I need to do some in room listening, although my Raspberry Pi noise issue is still there, even with a better powered USB hub. I have some testing planned to try and determine the source of the problem. Full feedback will happen, however it's a big thumbs up so far.
Question: What's the trade off if you increase gain on the amp? There's no such thing as a free lunch, so increasing gain must have a downside, no?
Question: What's the trade off if you increase gain on the amp? There's no such thing as a free lunch, so increasing gain must have a downside, no?
Higher noise mostly. In theory the THD will be a bit higher as well, but right now the THD is dominated by the THAT1200, so you won't see much THD degradation. With the default gain of 20 dB, the composite section of the amp and the THAT1200 contribute about equal amounts of noise. If you crank up the gain, the noise of the THAT1200 will be the dominant contributor.
Both of these are mostly of academic interest and of little practical relevance for the listening experience. They are measurable changes, though.
Tom
Thanks Tom, and I've impressed myself. Whilst painting the spare room I mulled this over in my head, and my conclusion was that it would probably be increase in noise. Sadly this was not based on electronic knowledge, but my experience of digital photography and "blowing" a picture up big. If you go too big on a picture, you'll start to see pixelation; my thought pattern was that this must be true of cranking up gain in an audio signal - go too far and you're forcing it to do something that the original processing didn't intend it to do.
And early feedback on the amp is, "boy can this thing drive a Bass punch".
And early feedback on the amp is, "boy can this thing drive a Bass punch".
Last edited:
This was not based on electronic knowledge, but my experience of digital photography and "blowing" a picture up big. If you go too big on a picture, you'll start to see pixelation; my thought pattern was that this must be true of cranking up gain in an audio signal - go too far and you're forcing it to do something that the original processing didn't intend it to do.
It's more like turning up the ISO, actually. If you go from, say, ISO 3200 to 6400 you'll get a visible increase in noise. Thankfully, the change in the noise floor of the MOD86 when you increase the gain is more like going from ISO 100 to ISO 200. The change is measurable but not perceptible.
Stock update:
PAR86 + LM4780: 1 set left
PAR86 board: 2-4 left. Once I have the boards in hand, I'll see about getting some more LM4780s to go with them.
MOD86 R2.0: Sold out. All orders from this point forward will be filled with R2.1 boards when they arrive.
The boards are expected to be in stock by April 11th, hopefully sooner.
Thanks,
Tom
Tom at Neurochrome
I just received two Modulus86 V 2.0s and a Power-86, from Tom, completely assembled. His soldering is fantastic and the completed boards look perfect.
I'm a newbie at this and have had to ask him many questions, via email, and his responses are incredibly quick and clear. It's been a pleasure communicating with Tom.
I’ll be ordering the case and rest of the parts in the next few days. I’ll post some pics as I move forward.
henrylrjr
I just received two Modulus86 V 2.0s and a Power-86, from Tom, completely assembled. His soldering is fantastic and the completed boards look perfect.
I'm a newbie at this and have had to ask him many questions, via email, and his responses are incredibly quick and clear. It's been a pleasure communicating with Tom.
I’ll be ordering the case and rest of the parts in the next few days. I’ll post some pics as I move forward.
Thank you for your kind words. I really appreciate it. I'm glad you're happy with my products and service so far. I'm looking forward to seeing your chassis and build pictures as you progress.
Tom
Ladies and Gentlemen: Please welcome the newest member of the Modulus-86 family, the Modulus-86 Rev. 2.1.
Here's a quick reminder of the revision history:
Rev. 2.1: Changed the LME49710 footprint to TO-99 to address the obsolescence of the DIP version.
Rev. 2.0: Improved performance as the output swings near the supply rails (resulting in slightly higher output power), and much improved DC servo with much faster settling time, 10 dB reduction in mains hum (layout improvement).
Rev. 1.0: First version.
I will be measuring the performance of the Modulus-86 Rev. 2.1 over the weekend. I expect its performance to be line-on-line with Rev. 2.0 of the circuit as there is no electrical difference between the circuits.
The MOD86 Rev. 2.1 boards arrived this morning and are in stock.
Parallel-86 stock update: One PAR86 with LM4780 in stock. Two unpopulated PAR86 boards without the LM4780 in stock. I'll see about scavenging up another couple of LM4780es.
Tom
Attachments
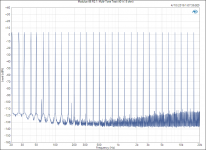
The leanest and meanest IMD test in town
I played around with the multi-tone test on the APx525. The Modulus-86 Rev. 2.1 is a stellar performer. The IMD products resulting from the 32-tone input (16 Hz - 20 kHz; log spaced) are a good 110-112 dB below the fundamental tones.
The full specs are available here: Modulus-86 - Rev. 2.1.
I've expanded and added specs for 4 Ω load as I was receiving quite a few questions about the drive capability of the Modulus-86.
Tom
Attachments
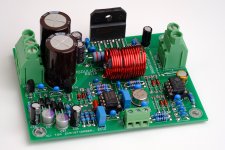
Just finished assembling my Parallel86 amplifier!
I also have a My_Ref Fremen Edition amplifier so I was able to do a direct comparison. Now, I'm not as perceptive as some of the people on here when it comes to subtle audible differences, but my first impressions are that the Parallel86 amp has a stronger low end. I am able to drive it harder while still remaining clean. This may not be a fair comparison though, since the Parallel86 is in fact a more powerful amplifier, but this is just my observation. I will also be building a Modulus86 amplifier next, so that should be a more fair comparison.
Both amplifiers sound very similar, which to me is a good sign. I always say that if you can tell the difference between two amplifiers, then either one or both of them suck! Luckily, that's not the case here. They both sound basically the same to me (guess I'm not a true audiophile). However, I think I prefer the Modulus/Parallel simply because of the documentation and thorough analysis/test results. This amplifier is professionally engineered. No snake oil here.
Some other observations: This amp has stellar DC offset characteristics. One channel measures ~20 microvolts while the other measures ~40 microvolts. I was able to measure ~2.7 millivolts of AC on each channel, which seems negligible. I'm not sure of the frequency of the AC. NOTE: All these measurements were with the inputs OPEN! It would probably be even better with them sorted. There is also no audible "pop" when powering it on either.
Glad to see there's a new revision of the Modulus to address the TO-99 package. I was actually going to send an e-mail asking if you were going to make a revised board!
Suggestions: I know people have told you this already, but I would really love if you made a speaker protection board as well. I have some from China that seem to be quality parts, but I would rather buy them from you.
Now, for the pictures. For the chassis, I used a Dissapante 3U from HiFi2000 (great company by the way). I had them drill the real panel in a way similar to the DIYAudio Deluxe 4U. The front button is an E-Switch PV8. The only thing I wish I would have done better is the way that I have the boards mounted. I tried to minimize the stress on the LM4780 in such a way that tightening down the bracket on the bottom wouldn't add any force, but it was hard to line everything up perfectly. I also went a little overboard with the hot glue. Oh well.


Has anyone used the chassis that are available through the store here on this site? If so, anyone care to share their files for cutouts for the back panel?
However, I think I prefer the Modulus/Parallel simply because of the documentation and thorough analysis/test results. This amplifier is professionally engineered. No snake oil here.
Awesome. Thank you. Yeah, I put a lot of work into the documentation and measurements. I'm glad they're providing the value I intended them to.
I was able to measure ~2.7 millivolts of AC on each channel, which seems negligible. I'm not sure of the frequency of the AC. NOTE: All these measurements were with the inputs OPEN!
You're probably seeing the "high" level of AC voltage because the input is floating. It'll pick up some hum. If you short the input, you should see much lower AC voltages on the output. I measure 42 uV (unweighted, 20 Hz - 20 kHz) with the inputs shorted.
Glad to see there's a new revision of the Modulus to address the TO-99 package. I was actually going to send an e-mail asking if you were going to make a revised board!
Yep. The Rev. 2.1 boards arrived on my doorstep on Friday and I wrapped up the documentation and website last night.
Suggestions: I know people have told you this already, but I would really love if you made a speaker protection board as well. I have some from China that seem to be quality parts, but I would rather buy them from you.
Thank you for your suggestion. I also appreciate your vote of confidence. I do agree that I need to offer a high-end protection board.
For the chassis, I used a Dissapante 3U from HiFi2000 (great company by the way). I had them drill the real panel in a way similar to the DIYAudio Deluxe 4U. The front button is an E-Switch PV8.
I like it! I've been directing people towards ModuShop/HiFi2000 as well. I haven't seen their products in person, but they seem to be well designed. The cost including shipping to North America is $30 less than the eBay options and I bet their quality is better too.
I tried to minimize the stress on the LM4780 in such a way that tightening down the bracket on the bottom wouldn't add any force, but it was hard to line everything up perfectly.
The LM4780 is not the easiest IC to work with. The best solution I've found is a clamping bar across the top of the IC.
I also went a little overboard with the hot glue. Oh well.
Good job on that, actually. You do need to prevent those wires from wiggling so they don't shred as the insulation rubs against the holes. Grommets or hot glue is your friend here.
Tom
Has anyone used the chassis that are available through the store here on this site?
I thought DIY Audio sold the chassis from ModuShop/HiFi2000. No?
Tom
- Home
- Amplifiers
- Chip Amps
- Modulus-86 build thread