My DIY tonearm project continues.
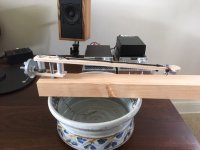
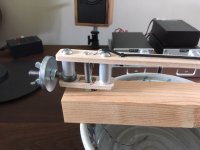
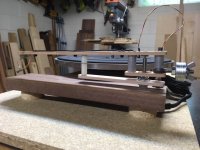
I got my parts from McMaster. Right now I'm using the aluminum spacers (instead of the stainless I also ordered) because they're light. The overall height of the arm is 1-3/8" but you need some clearance at the bottom for pivoting action. I'm trying to keep the height down because my platter/motor won't be too terribly high (they are pulls from an old Technics SL-6, if you recall).
I'll likely replace the screws with flat-heads to reduce the overall height and compensate for the tonearm wiring having to clear that front screw on top. My tonearm material is just 3/16" thick, so I might end up needing to order undercut screws (should have thought of that). I'll try countersinking carefully.
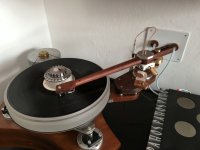
The wire I'm using is from a travel mouse, it is very fine, probably nearly 32 AWG. You can't tell from the pic but the section of wire with the insulation still in place has the shield wire running into the same hole as the rest of the wires, and then it wraps around the top part of my pivot component. So ground will be carried down through the pivot. I don't know at this point whether I'll even need a ground, but this is my pending/untested solution if I do.
The counterweight idea worked out extremely well. I can adjust weight and azimuth (because the counterweight can be shifted left/right). Right now I'm using washers and a nut/wingnut as my actual counterweight. Once I get further along, I can come up with a properly-sized more elegant solution.
The entire thing is very light, and extremely responsive without being wobbly. I think I could further lift the "headshell" area to do an even better job of aligning the stylus with the pivot, due to my low center of gravity counterweight method, without making for a wobbly unit.
The steel nut you see where the cartridge should go is my attempt at approximating the weight of a cartridge. It is just 2-sided taped in position.
I need to find a very inexpensive cartridge and screws to mount it to my tonearm for initial testing. Also the proper clips to go on the end of my wire (the ones there were from a shell for the mouse connection, and I can't make them work for a cartridge for reasons I won't bore you with).
I'll keep watching eBay for a crap cartridge and screws and cartridge clips. The little things start to add-up, as the shipping starts to eat into the cost on this stuff.
I got my parts from McMaster. Right now I'm using the aluminum spacers (instead of the stainless I also ordered) because they're light. The overall height of the arm is 1-3/8" but you need some clearance at the bottom for pivoting action. I'm trying to keep the height down because my platter/motor won't be too terribly high (they are pulls from an old Technics SL-6, if you recall).
I'll likely replace the screws with flat-heads to reduce the overall height and compensate for the tonearm wiring having to clear that front screw on top. My tonearm material is just 3/16" thick, so I might end up needing to order undercut screws (should have thought of that). I'll try countersinking carefully.
The wire I'm using is from a travel mouse, it is very fine, probably nearly 32 AWG. You can't tell from the pic but the section of wire with the insulation still in place has the shield wire running into the same hole as the rest of the wires, and then it wraps around the top part of my pivot component. So ground will be carried down through the pivot. I don't know at this point whether I'll even need a ground, but this is my pending/untested solution if I do.
The counterweight idea worked out extremely well. I can adjust weight and azimuth (because the counterweight can be shifted left/right). Right now I'm using washers and a nut/wingnut as my actual counterweight. Once I get further along, I can come up with a properly-sized more elegant solution.
The entire thing is very light, and extremely responsive without being wobbly. I think I could further lift the "headshell" area to do an even better job of aligning the stylus with the pivot, due to my low center of gravity counterweight method, without making for a wobbly unit.
The steel nut you see where the cartridge should go is my attempt at approximating the weight of a cartridge. It is just 2-sided taped in position.
I need to find a very inexpensive cartridge and screws to mount it to my tonearm for initial testing. Also the proper clips to go on the end of my wire (the ones there were from a shell for the mouse connection, and I can't make them work for a cartridge for reasons I won't bore you with).
I'll keep watching eBay for a crap cartridge and screws and cartridge clips. The little things start to add-up, as the shipping starts to eat into the cost on this stuff.
Attachments
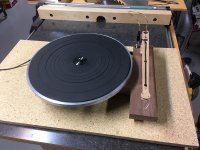
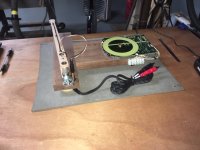
Received my 3.5mm TRRS coupler today, I'm using it as a means to easily disconnect/remove my tonearm. So the coupler is mounted through the plinth, and below the plinth I then connect a 3.5mm to RCA adapter cable (you can see a black connector currently plugged in below).
I also received the clips to attach to the cartridge, I have not wired that up yet. Still waiting for my P-Mount to 1/2 adapter.
Also found a nice DPDT rocker switch yesterday that is on/off/on, so that will be my 33/off/45 switch.
Also cut off one side of the motor wiring harness and wired a Euro style terminal block. The switch will connect to this block.
I still need to figure out an arm rest, a cueing mechanism, and some isolation feet. Also anti-skating in some form.
Just a reminder that this is a prototype. IF the turntable works and has promise, I will then remake the plinth with incorporating everything I've learned, adding radiused corners and rounded edges.
The larger piece of particle board underneath is just something to move the thing around with, the table itself is actually quite small overall.
Attachments
Figured out a way to make an arm rest (those white/natural-colored spacers). There is a socket-head cap screw through those spacers, the arm has a hole that fits over that screw's head.
I don't need anything more secure than that, because if I need to move the unit, the arm has to come off (the thing you learn quickly when it comes to unipivot arms is that there is nothing holding them in place but gravity, so if you're going to transport the table, best to remove the arm).
Still pondering ideas to make a DIY cueing lifter.
At this point I really need to get a cartridge mounted and perform some testing, before going much further.
Waiting on Amazon to deliver my T4P to 1/2" adapter. I have a sort of "beater" T4P cartridge that might work well for testing this thing, and the adapter was only $10.
Attachments
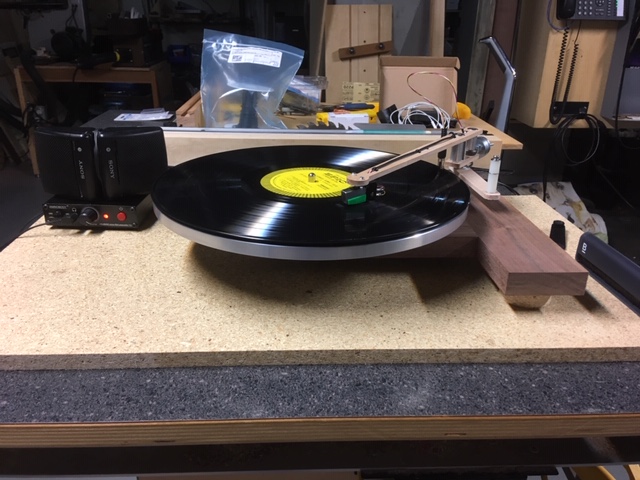
The T4P adapter arrived. After getting my cartridge mounted, I found I had to raise the arm about .25".
That tiny digital scale I got on Amazon sure is nice for setting tracking force, very sensitive. Got that dialed in at 1.25-grams.
When I set the stylus in a groove, it leaned over a tiny little bit. So I had to adjust the azimuth using my left/right counterweight method. It just took a tiny shift, maybe less than 2 degrees. I went too far the first time. Right now it is set by eye, I don't have a cartridge setup kit, just the scale.
But it works! My test album is an old Ahmad Jamal Trio album, which is approx. 65-YO (I'm 55). I got it on eBay for $3.50 shipped because I wanted a test album and I like Ahmad Jamal. If you're going to HAVE to listen to something while testing, might as well like it.
I've listened a while with headphones, it sounds "fine." It is tracking fine. I need to figure out the isolation feet, it needs some isolation.
Also really need to figure out a cueing device. I don't even have a finger lift yet ($2, ordered from China). My hands aren't as steady as they once were. Yowsa.
I think I'll drag it upstairs and connect it to the hifi to get a better sense of how it sounds.
Here is a pic of it playing:
And here is a movie proving it works:
http://www.jpthien.com/temp/IMG_5158.MOV
Nice - have you thought about adding some damping to the pivot point to reduce any side-to-side wobble, I though maybe aluiminium/copper plate and neodymium magnet damping.
I would have kept the cable short enough to allow a dust-cover to fit - dust cover is essential IMO.
Due to the dropped counterweight and the low center of gravity, I'm not getting any wobble.
Dust cover is likely going to be a custom aluminum disc that goes over platter (or album if I leave one on the platter). The rest will likely not be covered. We shall see if I live to regret that.
Been working on isolation, trying different materials.
Specific problem was, setting coffee cup on table while playing something, resulted in pickup of too much noise. My reference is the Technics SL-J33, which still captures the coffee cup "tap," but not to the same degree. The SL-J33 has four spring feet (one in each corner).
After trying a bunch of different materials, I found that my wife's Ikea cork pot trivets did the best job of providing some isolation without destroying the sound quality. She had three, now she has two.
I CNC cut a few feet "caps" from the cork, including shallow pockets to capture the current BB (Baltic birch) feet and voila, about as perfect as I could hope. I can now listen and drink coffee.
I'm waiting on the power switch so I can finish wiring my prototype (need to make the ground wires look neat, too). Also need to figure out a wall mounting shelf (do I want vinyl storage? how will I route wires? will the phono preamp go on the shelf with the table?). While I'm thinking about the wall shelf, I'm sure some things will occur to me about how to improve the design of the final table.
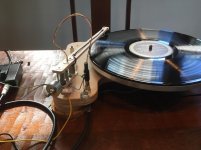
I ordered an Ortofon 2M Red cartridge for the thing. Amazing how the surface noise dropped (from the old and near dead Technics T4P in a 1/2" adapter). We (wife and I) only have a couple of hours on the Ortofon, waiting for it to break-in some more.
Probably going to order a Grado Black or Blue next, just because I'm having a blast and want to try some different cartridges. I've got very little $ into this table, so easy for me to justify ordering some different cartridges to try.
Shot of current table with 2M Red cartridge playing red vinyl (more like orange, but supposed to be red) Roland Hanna Perugia.
Specific problem was, setting coffee cup on table while playing something, resulted in pickup of too much noise. My reference is the Technics SL-J33, which still captures the coffee cup "tap," but not to the same degree. The SL-J33 has four spring feet (one in each corner).
After trying a bunch of different materials, I found that my wife's Ikea cork pot trivets did the best job of providing some isolation without destroying the sound quality. She had three, now she has two.
I CNC cut a few feet "caps" from the cork, including shallow pockets to capture the current BB (Baltic birch) feet and voila, about as perfect as I could hope. I can now listen and drink coffee.
I'm waiting on the power switch so I can finish wiring my prototype (need to make the ground wires look neat, too). Also need to figure out a wall mounting shelf (do I want vinyl storage? how will I route wires? will the phono preamp go on the shelf with the table?). While I'm thinking about the wall shelf, I'm sure some things will occur to me about how to improve the design of the final table.
I ordered an Ortofon 2M Red cartridge for the thing. Amazing how the surface noise dropped (from the old and near dead Technics T4P in a 1/2" adapter). We (wife and I) only have a couple of hours on the Ortofon, waiting for it to break-in some more.
Probably going to order a Grado Black or Blue next, just because I'm having a blast and want to try some different cartridges. I've got very little $ into this table, so easy for me to justify ordering some different cartridges to try.
Shot of current table with 2M Red cartridge playing red vinyl (more like orange, but supposed to be red) Roland Hanna Perugia.
Attachments

You would have done better to order the OM10 which is considerably cheaper, as I previously advised. The Red & OM10 have the same insides, just a different outer casing. For cartridge trials don't buy new, buy S/H. Also before you go buying cartridges you need to establish the Effective mass of your arm so that you do not get an arm/cartridge mismatch.
Cheers
Ortofon 2M Red Vs Ortofon Super OM Cartridges | Steve Hoffman Music Forums
They're substantially different is sound quality, and I decided to go with the Red because the reviews of it were encouraging, especially when it comes to surface noise (ticks/pops). I have indeed found it to be a very quiet (surface noise) cartridge, and love that.
The effective mass of my arm is approx. 12 grams, so a good match for a wide variety of cartridges.
Lots of stuff has been going on. First, the Ortofon 2M Red failed to impress. It was dull and lifeless, and struggled with piano tracking in the final 1/2 or 1/3 of some albums. I was experimenting with anti-skating methods to see if my problem was a lack of any, I couldn't get it to sound right. Increasing the tracking to 2g (from the recommended 1.8g) helped, but it was still very edgy on those same albums.
So I got an Audio Technica AT-VM95E, and all my distortion problems went away. Googling "Ortofon 2M Red distortion" brings up several threads at different sites where people were experiencing the same issues I was having. I even found a thread of red plastic inside the stylus housing that was getting stuck between the shaft and the coils. I think I just got a bum one.
Anyway, since I was working on anti-skating, I figured I should get that aspect finished.
Last night I bent-up some pieces of wire. This is .045" galvanized wire left behind by a commercial contractor installing a dropped ceiling.
I'd prefer stainless, but the hardware store doesn't have any. So I'll just add it to my eventual McMaster order. I've avoided placing lots of small orders, as the shipping adds up quickly. So I've got a wish list of sorts, I add and remove things as I find my way forward.
While I was bending my anti-skate "bracket," I figured, "hey, why not make the weight, too?" Pretty easy to measure-off 2g and then bend it into shape. I found it is also pretty easy to cut the weight once bent, so I could make a 3g and then reduce it to anything I want by cutting pieces off the bottom. I'm going to try a square cross-section next, that way I'll be able to know that cutting off one edge is approx. .x grams. Each piece of .045" stainless that is 12" long is approx. eleven cents, so this is an economical way to make weights.
Next time my wife goes to the craft store, I'm going to tag along and find a better string. For now, this stuff is working great, but thinner would probably be better.
Unfortunately, the DPDT on-off-on rocker switches arrived from Amazon, and they're incorrectly packaged. They're on-on, no middle off. So now I have to go back and find an on-off-on DPDT switch. I might just order a toggle from McMaster. At least I know the quality will be good.
Attachments
It has been a while since I've added anything here.
My arm and table have gone through a few transformations since I started this project.
The plinth was redesigned and uses three Sorbothane-like feet, instead of the springs.
The arm was modified to use elastic bands (actually hair bands) to provide stabilization (no unipivot wobble!) and configurable of damping.
Also, recently modified the counterweight design to replace the stainless weight and stub with Sorbothane (yes, another foot!). I had read fairly extensively on coupled/decoupled counterweights, methods to decouple, etc.
But how about a counterweight that is also a sink for vibration? Now, instead of any vibrations passed to the wand via the cartridge hitting the counterweight and reflecting back, they can be absorbed and converted to heat by the counterweight.
I was pretty sure this would have a rather significant effect on sound, but wasn't prepared for just how much. I thought the arm as it previously existed was rather uncolored compared to commercial arms I've heard, and yet it seems that much better now.
Interestingly, it also tracks a little better. I can track my M97HE (a great tracker to start) about .1g lower VTF without distortion, compared to the steel counterweight.
One thing I wasn't prepared for, was the drop in surface noise with this change. I'm familiar with how pops and ticks can be accentuated by some preamps, but they can apparently also be accentuated by vibration in the arm, as well.
Lots of other changes here and there, but those are the major bullet points.
Attachments
![sorbo_counterweight[1].jpg](/community/data/attachments/869/869465-f7337b7a2707c9a0aa34b5626816bb16.jpg)
Hi Cgallery,
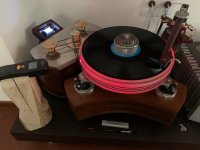
Just to share my experience in making a DIY TA unipivot.
I used two piece of aged Mohagany solid wood ( easy to get, easy to work and not expensive ) but sonically really not too bad .
I grooved in both of half part in the centre the space to put an aluminium pipe where the TA s wires runs. Bonded the two parts with high press and shaped the TA as per picture.
CLD concept with two aluminium part. The upper one is holding the needle that have a special contruction: I used a textile needle ( used for faller bars in the drawing frames ) round tipe, it is made with special steel, you can bend it up to 40 degree and do not break. It is fitted in a threaded aluminium screw, and the bottom have a round brass part that goes in the bottom cup where you may inlet the antidumping oil.
Counter weight by brass and with a not too low the center of gravity, almost inline with the needle diamond. I added side balancers made of brass. The TA has high mass and I use with Denon DL 103 cart only.
Sound wise is good as I packed the Jelco 750 L 12 inch TA.
I would not use it with DD TT or Idler wheel TT as it is too sensitive to any vibration.
I think this TA, beside the good matching with the cart, the combination of the different materials and thickness gave a good result.
Inner TA wires are by 3 strands silver silk covered from UK. Happy with these wires, good money for value. Pity is hard to get them now, I cannot find anymore the same.
Of course there is much better made in the DIYer scenario..... but overall I am satisfied with it.
Besides the Jelco I also have a Rega RB 250 modded, but I was not so happy with the Denon DL 103, though it is a good TA if changed the inner wires with better ones.
Adelmo
Attachments
Hi Adelmo, very nice work!
My design actually uses a DD motor/platter from a Technics. It is very quiet and I don't pickup any motor noise.
The wands I'm using now (very old growth spruce) are all very low mass, suitable for higher compliance cartridges from Shure and others. But I have used wands made from denser woods like rosewoods, in which case lower compliance cartridges can also be used.
All the damping on this arm is mechanical (the elastic bands and the counterweight). They do a pretty good job at squashing/widening the amplitude of the resonance peaks, so I can now enjoy using a tube phono stage that has no subsonic filtering with minimal pumping as the stylus rides any warps.
Also, recently modified the counterweight design to replace the stainless weight and stub
with Sorbothane (yes, another foot!). I had read fairly extensively on coupled/decoupled
counterweights, methods to decouple, etc.
Where did you get the feet?
Not sure on the weight. If I remember next time I am adjusting the arm, I can check.
Not too much, I'd guess around 28-40 grams, though. It is actually shifted quite a ways out from the pivot, which I wanted to do anyhow to lower the resonance of the arm/cartridge for testing the ability of the bands and the counterweight to somewhat control LF noise (reduce woofer pumping, etc.).
Not too much, I'd guess around 28-40 grams, though. It is actually shifted quite a ways out from the pivot, which I wanted to do anyhow to lower the resonance of the arm/cartridge for testing the ability of the bands and the counterweight to somewhat control LF noise (reduce woofer pumping, etc.).
Still having fun with this. Back to a steel counterweight, I like the bass.
I had been playing with shielded tonearm wire all the way back to the coupler. I was able to reverse the anti-skating weight system so I could measure the anti-skating equivalency of the shielded tonearm wiring, turns out that the wire presents about .143g of anti-skating force (that really isn't much, maybe about the amount of residual force some magnetic systems apply even when set all the way off). I basically just subtract the .143g from anti-skating weight total applied via weights.
Oh and I've designed a system that applies the constraint/damping with elastic cord instead of hair bands. I found a source for very high-quality 1/16" shock cord which is really four tiny rubber cords covered with nylon. If NASA wanted to make mini bungee cords, this is the stuff they'd use.
It is a very unique arm, sounds I don't think there has ever been anything quite like it.
- Home
- Source & Line
- Analogue Source
- My DIY tonearm continues