Hi!
Aluminium is rather straight-forward and easy to work, but patience/focus is required to get good results.
I don't want to spend a lot (yet) for finishing my chassis (that is, save the money). I want the front-plates with knobs and everything rotating recessed, and some lettering on it...
It is ok not to get the very same results as an order at modushop would yield, and I'm fine with tedious manual work, or working with handheld carpenter-machines. is it feasible?
Are specialized tools needed?
How could I get some text/icons on it, having it looking quite good and "resilient"?
I'm hoping somebody could tell me a easy/money-saving method?
Thank you for tips!
Years ago there were labels called Letreset. Self adhesive transfers.
A quick look shows; Alphanumeric Lettering Labels | RS Components
After labelling, spray with clear varnish for a professional look.
Hope that helps.
A quick look shows; Alphanumeric Lettering Labels | RS Components
After labelling, spray with clear varnish for a professional look.
Hope that helps.
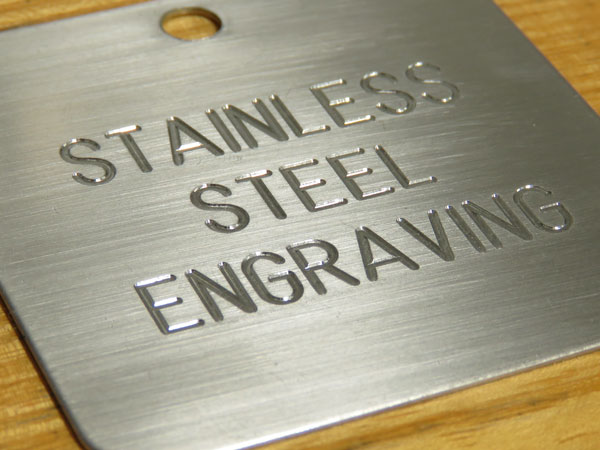
Your local trophy engraving shop can work the lettering into your front panel - they have machines that do this.
If you have someone engrave it also have them do the centering dots where you will want to drill it.
For larger holes punching is a good option. Most of the internet vendors of panels use CNC milling machines as they cost much less than CNC punch presses.
Of course anything that can be done with a CNC machine at some time was done by a careful craftsman by hand. I expect good hand work to be accurate to .005"! However to do that you will require an engraved rule, a divider and a square. About $200 worth of tools new, at an estate or garage sale under $25. If you have such options.
My normal process is to engrave the panel and then have it anodized. The engraved letters are then filled in with a special engravers crayon. It is possible to hand engrave, but I have nowhere near that level of skill. First you pencil or grease pencil what you want and then follow with a sharp V curved cutter. Others will use a vibrating tip handheld electric engraver. Extraordinarily difficult!!!
Then there is the technique of laser printing the reversed image on a plastic sheet. This can then with care be painted behind the lettering and be used as the panel front!
Some will use treated paper and then use heat and a clothes iron to transfer the lettering to the panel.
There is also what is called laser engraving. A clear coating is applied to the metal and the laser turns bits of it black. A more powerful laser engraver can turn black anodized aluminum clear.
The final technique is to uniformly coat the panel with yellow wood glue. When dry this is slightly photo sensitive. A positive (negative) may be placed over the sensitized panel and exposed to strong UV or sunlight until the unmasked glue changes color. This can take 15 minutes with a strong UV source or hours with sunlight The masked glue can be removed with a spray of hot water. An etchant such as ferric chloride can be used to etch the uncovered portions of aluminum. The panel is then cleaned with hot water and chlorine bleach.
Laser printed negatives do not offer enough masking! Although doubling them up might work.
Last edited:
If you have someone engrave it also have them do the centering dots where you will want to drill it.
For larger holes punching is a good option. Most of the internet vendors of panels use CNC milling machines as they cost much less than CNC punch presses.
Of course anything that can be done with a CNC machine at some time was done by a careful craftsman by hand. I expect good hand work to be accurate to .005"! However to do that you will require an engraved rule, a divider and a square. About $200 worth of tools new, at an estate or garage sale under $25. If you have such options.
My normal process is to engrave the panel and then have it anodized. The engraved letters are then filled in with a special engravers crayon. It is possible to hand engrave, but I have nowhere near that level of skill. First you pencil or grease pencil what you want and then follow with a sharp V curved cutter. Others will use a vibrating tip handheld electric engraver. Extraordinarily difficult!!!
Woah, Simon7K, .005“, that’s a tenth mm!
I once tried it (engrave my logo with my name, in ca. 18pt font-size...) on a piece of pear-wood, and it didn‘t came out quite as I had wished—but not worse either 🙂
I‘ll try it on a backside or a scrap-piece.
As for the recessed knobs, I shall see.
And thanks to the other hints too! (Letraset, that’s pretty 70ies, like it!)
You just punch through the panel and the back that up with a second panel spaced back a bit if needed.
I'm also in the chassis process and will attempt using a router and carbide mills this weekend, I will not attempt lettering, but cut, smoothen and chamfering edges.
Aluminium is 3 and 8 mm, will also smoothen ends on heatsinks with router using a wooden contraption.
Cross my fingers.
Aluminium is 3 and 8 mm, will also smoothen ends on heatsinks with router using a wooden contraption.
Cross my fingers.
Attachments
You just punch through the panel and the back that up with a second panel spaced back a bit if needed.
Oh, wow. Of course!
This is it for a non-cnc!
I'm also in the chassis process and will attempt using a router and carbide mills this weekend, I will not attempt lettering, but cut, smoothen and chamfering edges.
Aluminium is 3 and 8 mm, will also smoothen ends on heatsinks with router using a wooden contraption.
Cross my fingers.
Be sure to wear protective gloves! Eye protection is only needed if you don't want to visit the emergency room! Ear protection when using a router can be avoided to allow you to save by no longer requiring tweeters after your hearing is damaged!!
Old clothes allow water based cutting fluid which is also nice to keep the aluminum from sticking to the bit.
Use at least two clamps to keep the work in place. It can be interesting to explain why there is a piece of metal sticking out of your body!
Don't ask how I learned all these tips. 😉
Last edited:
As simon7000 said be careful and take small bites, don’t climb cut. That said aluminum cuts fine with carbide tools. Forster bits will also work for flat bottomed spot faces.
Don't ask how I learned all these tips. 😉
Yes, iknowiknow (learned it all the hard way, except for the metal-peace out of my limb, but a chip in the eye (didn't need a doctor), tinnitus, parts flying around, you don't want to know what I learned, or how 😱 but I got cautious while growing up)
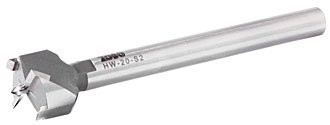
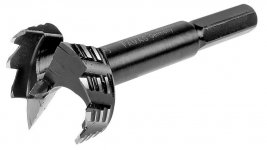
What forstner-bit are you using? The average one, available through amaz., or rather pro-qualities with hard metal blades? (this or this)... aren't the blades wearing out quite quickly?Forster bits will also work for flat bottomed spot faces.
thank you, and have a good day!
d.
Attachments
Last edited:
Actually the safety mention is really for the lurkers. I suspect they are shy because they don't have much experience. Besides it is a good tale!
One rule on advice is that you should heed advice from someone who has fewer fingers than you!
The best rule for safety I use is the "Three silly mistake rule." When you are working and make two silly but easily correctable mistakes, it is time to quit. The third silly mistake all too often includes blood and emergency room visits.
Last edited:
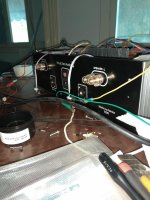
My good friend Dimitry have a laser engraving machine and always help me!
Attachments

Last edited:
One rule on advice is that you should heed advice from someone who has fewer fingers than you!
"Three silly mistake rule."
These are two very good advices, which I will follow, but unfortunately Dimitry is too far away—and I don’t even know him 😊😊😊My good friend Dimitry have a laser engraving machine and always help me!
I want just to show the laser engraving methode.
Chose your own.
Sorry. I didn’t realize you added pictures! (Answered out of the mail-notification, and tried to make a little fun out of it.) no bad intentions!
Actually the safety mention is really for the lurkers. I suspect they are shy because they don't have much experience.
Don’t assume anything, as you should already know...
More likely that they are wincing in angst.
I guess the implied idea is: "laser engraving works, here´s an example, get a friend/shop to do it"These are two very good advices, which I will follow, but unfortunately Dimitry is too far away—and I don’t even know him
Which expands and confirms the earlier suggestion of using a Trophy engraving shop, which are relatively easy to find.
FWIW in the old days (think 40/50 years ago) I also used trophy shops, also jewellers, who had pantographic engraving machines.
Either straight engravings on metal, or deeper ones, in plastic, filled with coloured wax or paint:
An externally hosted image should be here but it was not working when we last tested it.
CNC makes that mechanical engraving even easier.
You just punch through the panel and the back that up with a second panel spaced back a bit if needed.
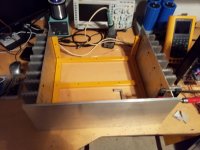
Ok, I'm there.
I went with the absolutely most simple version of step-drilling through the 10mm face-plate and mounting a second plate behind.
I'll never ever do this again.
I began with a "leading hole, 2mm, and widened it step by step. The drill press I first used was really bad (imprecise), it drew the drill-bit off some 1 mm! and I somehow had to come by with it. Ended up with one recess off axis ~0.5mm 🙂
After the pain of step-drilling 4 times a 30mm hole by hand (swore to never ever touch that drill-press again), and having the back-plate fitting, I had to realize that the "center"-holes again were off some 2 mm although I prepared them screwed onto the front-plate. Argh. One more time (ever tried to find the precise center of a badly made 30mm hole?). Another (3rd) attempt, this time with my technical drawing tools and skills, also missed the center like 0.5mm.
So how do I do it? It's so easy...
- Take a scrap-piece of something you can easily cut and file to a precise shape. (Oak, Aluminium, or similar. Don't use too soft a material)
- With a circle, draw the inner diameter. Be precise.
- Mark the center point for later reference
- Draw a square into the circle. Every corner must be 90° and precisely touch the circle.
- Cut this
- test wether it fits the badly made cut-outs. If too small, start over. if too big, work on 2 adjacent sides, work as even as possible (make sure that the center stays in the center)—decreasing one side 1 mm moves the center 0.5mm...
(This means that with this method, my inaccuracy is halved 🙂 - When it's snuggly fitting, drill the center-hole. D=2 mm
- I don't know how vertical I held the driller, but know the starting point was pretty good, I turned the template around.
- Very nicely centered holes. Now I can enlarge them step by step and mount the pots and knobs!
- Home
- Design & Build
- Construction Tips
- Working the front-plate myself