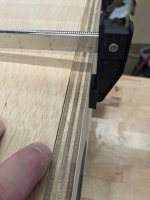
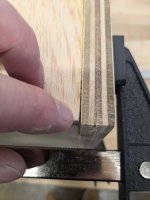
What has everyone come up with for filling the tiny spaces you see in these pictures?
I have been just filling it with putty but the issue is that sometimes the stain doesn't quite take right in that area.
I am considering mixing the putty with some of the stain to hopefully blend it buuutttt, that might just double stain that particular area and make it way worse.
I have been just filling it with putty but the issue is that sometimes the stain doesn't quite take right in that area.
I am considering mixing the putty with some of the stain to hopefully blend it buuutttt, that might just double stain that particular area and make it way worse.
Attachments

In the past I've used sawdust from cutting or sanding the wood mixed with enough PVA to bond. I guess you could mix some stain withe the dust and PVA???
Sorry, missed that part. Obviously it won't.Bondo will take stain?
Why not have a go at veneer?
jeff
My issue with veneer is purely in my head
I know its totally fake. I know plywood is basically veneered plys of wood but, in my mind I find it acceptable
I know that no one else will know its a veneer but I will always know
I know its totally fake. I know plywood is basically veneered plys of wood but, in my mind I find it acceptable
I know that no one else will know its a veneer but I will always know
I have showing plywood end grain. It's ugly. Doesn't take stain right. Doesn't last. I plan my builds to minimize it. How much more expensive is solid wood? If it's just too much, consider a cap of matching real wood, maybe 1/4"-1/8" thick, glued to the edge. They make tape for this too, with matching grain, but it's not very durable. Depends on your usage.
Oh you're talking about those tiny gaps. Heh.
Get some sawdust, mix it with your wood glue and shove it into those gaps, jam it in with your fingertips, rub til smooth. Wipe with a damp cloth before the glue dries so it won't show under your stain.
Oh you're talking about those tiny gaps. Heh.
Get some sawdust, mix it with your wood glue and shove it into those gaps, jam it in with your fingertips, rub til smooth. Wipe with a damp cloth before the glue dries so it won't show under your stain.
Fine sawdust/wood flour works well but imo is best when used in conjunction with dark stains as the adhesive geneally darkens the mixture. This is just my experience and perhaps binders/adheisives I haven't tried work differently. It cost nothing and takes very little time to make up several test samples, varying adhesives and sawdust if you're so inclined. Sawdust from a lighter colored wood may make a better match.
Veneer? Well, I modified this 23/32nd 11 ply to a 12 ply @a full 3/4". Spiffy eh?
Another tact is to look into the history of veneering. Furniture made during the Renaissance often had beautiful veneer work and a great deal of it is still around today. Pretty impressive.
I've made a bit of veneer with nothing more than a cheap-ish 14"bandsaw (w/6" riser block), a 13" planer and a nice flat sanding block. If you have access to the machines, it's not very difficult and may avoid the feeling of fakery. Going thinner than ~1/8" with this method can be a little trickier but I've done it successfully by using a sled with grip tape to support the piece during planing. I like using the thicker cuts where it works but
I've recently gained access to a couple much more capable resaws and wide drum sanders so I'll be trying to make some thinner veneers to reduce waste and stretch out some valued stock. You'd almost think some of this wood doesn't grow on trees...
In any case, good luck and happy finishing.
Here I'd use hardwood strapping to cover that, but I hate to spend that amount of money so only for my "better" builds
You could maybe avoid gaps alltogether by sanding the "open box" perfectly straight?
Alexander Gresler shows his method here:
https://www.donhighend.de/?p=9281
It's just three pieces of a sanding belt glued to a flat mdf piece.
Alexander Gresler shows his method here:
https://www.donhighend.de/?p=9281
It's just three pieces of a sanding belt glued to a flat mdf piece.
This is interesting because I actually like the look of the chamfered plywood end grain. I like how it adds stripes to the sides.I have showing plywood end grain. It's ugly. Doesn't take stain right. Doesn't last. I plan my builds to minimize it. How much more expensive is solid wood? If it's just too much, consider a cap of matching real wood, maybe 1/4"-1/8" thick, glued to the edge. They make tape for this too, with matching grain, but it's not very durable. Depends on your usage.
Oh you're talking about those tiny gaps. Heh.
Get some sawdust, mix it with your wood glue and shove it into those gaps, jam it in with your fingertips, rub til smooth. Wipe with a damp cloth before the glue dries so it won't show under your stain.
I have heard that real hardwood sounds terrible as an enclosure material. I have not tested this myself.
Water based wood filler. Takes stain well, cleans up with a damp cloth to minimize sanding. All the same, avoid getting any on the plywood edge grain (mask it off with tape) as it will show no matter what. Water based filler can shrink and crack if you don't apply it in layers when the gaps are too large, also if the joint moves. Integrity will improve when the finish is applied.
https://www.homedepot.ca/product/el...V2jIIBR1PdArREAQYBCABEgL2FvD_BwE&gclsrc=aw.ds
https://www.homedepot.ca/product/el...V2jIIBR1PdArREAQYBCABEgL2FvD_BwE&gclsrc=aw.ds
If I cant add more glue and clamp it down, I have been either:
1) filling with 5 min epoxy for deeper holes, leaving a bit of a gap at the top to sand and add #2 below
2) making a paste of Titebond Red or good ole PVA wood glue and saw dust to fill in cosmetic gaps. This should be stainable.
1) filling with 5 min epoxy for deeper holes, leaving a bit of a gap at the top to sand and add #2 below
2) making a paste of Titebond Red or good ole PVA wood glue and saw dust to fill in cosmetic gaps. This should be stainable.
With 5 min epoxy tho....dont mix with sawdust before applying. I tried that. Got real hot real fast and fluffed up like pancake mix.
- Home
- Design & Build
- Construction Tips
- What's your method for filling the tiny cracks between plywood sides?