Let me present you another TriTrix MTM TL build. Many have been made and described in the past and this one is not much different from what you have seen, audited or built. But it is unique, as all DIY projects are.
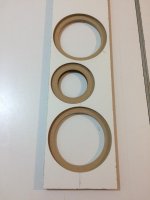
The construction was not too difficult, even for me, using just a router with an improvised jig for circular cuts, handheld circular saw transformed into a table saw and whatever hand tool was needed.
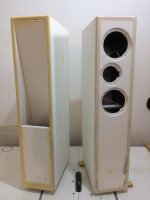
The biggest challenge was painting the enclosures. For other projects I had always used veneer as a finish on top on MDF or chipboard and since I rounded every possible edge on the TriTrix, the veneer was not an option. Could be done but not by me. So, the enclosures ended up with (too) many layers of oil paint, mainly because I used rolls and any type I used did leave a little trace or a speck or thread. (Ok, must put a paint sprayer on the shopping list.) I did not like those small blemishes and then the entire side had to be repainted. Last layer was done by water based clear varnish. I also sanded moderately between the layers.
Surprisingly enough, the final result was cool, with some kind of water/wet and transparent/mirror effect. Not sure if that can be seen on the photos here.
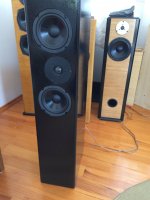
I purchased the drivers and components from PartsExpress. I did not like the terminals they sent so I installed terminal cups I had in stock. The coils came fastened with just one or two plastic ties so I added one or two more, just to be safe. I wired and soldered high pass and low pass (no PCB, no wood board) separately from each other and hid them behind the reflectors. I know, they cannot be easily accessed now, except using an invasive procedure, but I do not expect anything will fail before… the end of time. I did hide them inside that small space behind the reflectors because the idea was to let the air inside the enclosures flow freely. If millimeters are that important. Sometimes they are, indeed. Of course, there are other options for placing the crossover, it is up to the builder.
The wiring inside was done before the last side panel was glued. The tweeter side and midbass side wires were placed as far from each other as possible. I believe that separate wiring and keeping the inductors far from each other contributed to a more clear and detailed sound and stable imaging.
Some reviewers described the sound of TriTrix as lacking bass. That was not my impression with this build and I even recorded strong 40 Hz at the terminus. Enough for me and my favorite music. This is achieved by putting inside the first part of the TL only half of the bag of Acousta Stuf from the kit per box (as advised somewhere by Curt Campbell, the designer). That’s not everything I put inside but that other stuff (lined walls on the first half of the TL with 3 mm rubber sheets, a sheet of PE wool…) did not have significant effect, or did it? Anyway, adding more stuffing will attenuate bass too much but then the mids will be fantastic. Did try it but I wanted that bass and not needing a sub.
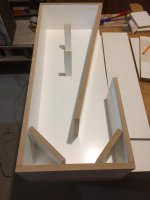
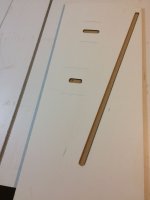
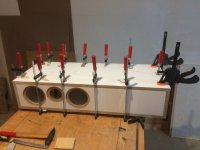
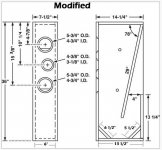
What else? Material for the enclosure was 18 mm MDF, lots of glue and wooden dowel pins used, clamps, t-nuts… I always let the glue dry for an entire day before the next step of assembling. I use D3 standard glue, resistant to moist and vapor. Also let the paint dry for 24 hrs after every layer. Yeah, it takes time. The back of the midbass cutouts are scalloped. Put a piece of mosquito net to keep the wool in place, just in case. Oh, and the dimensions are somewhere between the original plans and the modification I found somewhere (attached).
Overall, TriTrix was a fun project to build and it continues to give me a lot of joy while listening to the music on them.
Thank you, Curt Campbell, for the design, thanks to the unknown modifier, and thank you people whose experiences with TriTrix I read before deciding to build one myself.
Some build details shown on the photos were changed in the meantime. Perhaps in the future I will keep a more accurate photo records of building stages.
WAF? Well, a colleague said she liked it better than the veneered counterparts.
Ok, she was the only one so far who said something like that.
The construction was not too difficult, even for me, using just a router with an improvised jig for circular cuts, handheld circular saw transformed into a table saw and whatever hand tool was needed.
The biggest challenge was painting the enclosures. For other projects I had always used veneer as a finish on top on MDF or chipboard and since I rounded every possible edge on the TriTrix, the veneer was not an option. Could be done but not by me. So, the enclosures ended up with (too) many layers of oil paint, mainly because I used rolls and any type I used did leave a little trace or a speck or thread. (Ok, must put a paint sprayer on the shopping list.) I did not like those small blemishes and then the entire side had to be repainted. Last layer was done by water based clear varnish. I also sanded moderately between the layers.
Surprisingly enough, the final result was cool, with some kind of water/wet and transparent/mirror effect. Not sure if that can be seen on the photos here.
I purchased the drivers and components from PartsExpress. I did not like the terminals they sent so I installed terminal cups I had in stock. The coils came fastened with just one or two plastic ties so I added one or two more, just to be safe. I wired and soldered high pass and low pass (no PCB, no wood board) separately from each other and hid them behind the reflectors. I know, they cannot be easily accessed now, except using an invasive procedure, but I do not expect anything will fail before… the end of time. I did hide them inside that small space behind the reflectors because the idea was to let the air inside the enclosures flow freely. If millimeters are that important. Sometimes they are, indeed. Of course, there are other options for placing the crossover, it is up to the builder.
The wiring inside was done before the last side panel was glued. The tweeter side and midbass side wires were placed as far from each other as possible. I believe that separate wiring and keeping the inductors far from each other contributed to a more clear and detailed sound and stable imaging.
Some reviewers described the sound of TriTrix as lacking bass. That was not my impression with this build and I even recorded strong 40 Hz at the terminus. Enough for me and my favorite music. This is achieved by putting inside the first part of the TL only half of the bag of Acousta Stuf from the kit per box (as advised somewhere by Curt Campbell, the designer). That’s not everything I put inside but that other stuff (lined walls on the first half of the TL with 3 mm rubber sheets, a sheet of PE wool…) did not have significant effect, or did it? Anyway, adding more stuffing will attenuate bass too much but then the mids will be fantastic. Did try it but I wanted that bass and not needing a sub.
What else? Material for the enclosure was 18 mm MDF, lots of glue and wooden dowel pins used, clamps, t-nuts… I always let the glue dry for an entire day before the next step of assembling. I use D3 standard glue, resistant to moist and vapor. Also let the paint dry for 24 hrs after every layer. Yeah, it takes time. The back of the midbass cutouts are scalloped. Put a piece of mosquito net to keep the wool in place, just in case. Oh, and the dimensions are somewhere between the original plans and the modification I found somewhere (attached).
Overall, TriTrix was a fun project to build and it continues to give me a lot of joy while listening to the music on them.
Thank you, Curt Campbell, for the design, thanks to the unknown modifier, and thank you people whose experiences with TriTrix I read before deciding to build one myself.
Some build details shown on the photos were changed in the meantime. Perhaps in the future I will keep a more accurate photo records of building stages.
WAF? Well, a colleague said she liked it better than the veneered counterparts.
Ok, she was the only one so far who said something like that.
Attachments
-
 Tritrix pieces.JPG259 KB · Views: 610
 -
 Tritrix side panel.JPG256.2 KB · Views: 429
 -
 Tritrix rebate.JPG256.4 KB · Views: 421
 -
 Tritrix t-nuts and scallop.JPG262.8 KB · Views: 440
 -
 Tritrix clamped.JPG264.3 KB · Views: 425
 -
 Tritrix.JPG263.4 KB · Views: 382
 -
 IMG_0963.JPG259.6 KB · Views: 334
 -
 IMG_0917.JPG261.3 KB · Views: 581
 -
 IMG_1024.JPG260.1 KB · Views: 469
 -
 Tritrix mod.jpg202.9 KB · Views: 491
Nice looking speakers!
Curt worked real magic with these drivers and TL cabinet; I've only built the vented version, which doesn't have the bass of the TL but it still sounds great for the price. The crossover is brilliantly simple, only five parts, so even an idiot like me can put it together.
I find they're excellent for jazz and classics.
Geoff
Thank you.
Indeed, they are very musical, you can enjoy various types of music on them.
Yes, it has a simple crossover but even more complex ones can be made without too many problems. I usually put high-pass, low-pass, band-pass... networks on separate boards, that makes everything much easier. Added benefit is that electronic elements can be placed far enough from each other to prevent undesired interaction.