I'm considering a new subwoofer build for my daughter's car which we're planning to spiff up a bit for a car show coming up in June. As a first step in building a subwoofer for any car, I first measure the car's transfer function, to get an idea of what to expect when a subwoofer is mounted in the car, and also to use the transfer function as a "guide" to choose the best subwoofer design for the car. I thought I'd document the process here, just in case anyone's interested.
First, tools required:
1. REW (Room EQ Wizard)
2. PC with a decent soundcard and a mic (doesn't even have to be a GOOD mic)
3. Subwoofer driver mounted in a sealed enclosure
4. External amp to power the subwoofer
Step 1:
Use REW to obtain the close-miked response of the subwoofer driver in the sealed enclosure. Call this measurement B.
Step 2:
Place the subwoofer in the car, in the location where you're planning to place any subwoofer that you're going to build for the car. Place the mic at the listening position (e.g. just in front of the driver's seat headrest). Use REW to measure the response. Call this Measurement A.
Step 3:
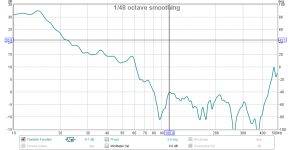
In REW, in the "All SPL" window, use the "Controls" feature to adjust the level of measurement B until it crosses measurement A at or above 100 Hz (car audio cabin gain typically starts below that). Make select the "add offset to data" option when you've finished making the adjustment.
Step 4:
Using REW's "Controls" feature, generate the transfer function by selecting measurement A for option A and measurement B for option B under the "Trace Arithmetic" section, selecting "A/B", and then clicking on the "Generate" button. A new measurement will be generated, called "A/B". This should be the car's transfer function.
Note: The generated transfer function will likely not show up under the "All SPL" window, because its dB range is going to be substantially lower. You'll need to select the "SPL & Phase" window in order to see it.
Do this right, and you'll end up with something looking like the second picture that I've attached 🙂.
First, tools required:
1. REW (Room EQ Wizard)
2. PC with a decent soundcard and a mic (doesn't even have to be a GOOD mic)
3. Subwoofer driver mounted in a sealed enclosure
4. External amp to power the subwoofer
Step 1:
Use REW to obtain the close-miked response of the subwoofer driver in the sealed enclosure. Call this measurement B.
Step 2:
Place the subwoofer in the car, in the location where you're planning to place any subwoofer that you're going to build for the car. Place the mic at the listening position (e.g. just in front of the driver's seat headrest). Use REW to measure the response. Call this Measurement A.
Step 3:
In REW, in the "All SPL" window, use the "Controls" feature to adjust the level of measurement B until it crosses measurement A at or above 100 Hz (car audio cabin gain typically starts below that). Make select the "add offset to data" option when you've finished making the adjustment.
Step 4:
Using REW's "Controls" feature, generate the transfer function by selecting measurement A for option A and measurement B for option B under the "Trace Arithmetic" section, selecting "A/B", and then clicking on the "Generate" button. A new measurement will be generated, called "A/B". This should be the car's transfer function.
Note: The generated transfer function will likely not show up under the "All SPL" window, because its dB range is going to be substantially lower. You'll need to select the "SPL & Phase" window in order to see it.
Do this right, and you'll end up with something looking like the second picture that I've attached 🙂.
Attachments


Using a transfer function measurement...
Once a transfer function measurement has been generated, it's pretty easy to use it to determine how the response of a subwoofer is likely to be altered when it's placed in the car. To do so, the only tool you need is REW.
Step 1:
Export the predicted (or measured) frequency response of your subwoofer as an FRD file
Step 2:
Import the FRD file generated in step 1 into REW
Step 3:
Import the transfer function into REW
Step 4:
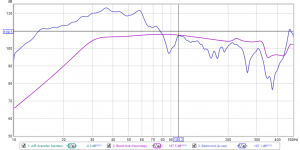
Under the "All SPL" window, select "Controls" and under "Trace Arithmetic", select the "A*B" option and select "Generate".
If done correctly, you'll end up with a predicted response curve for the subwoofer in the car that should end up being pretty close to what you actually measure.
The image below shows the predicted response of my "Boom Unit" subwoofer in the car, based on the car's measured transfer function.
Once a transfer function measurement has been generated, it's pretty easy to use it to determine how the response of a subwoofer is likely to be altered when it's placed in the car. To do so, the only tool you need is REW.
Step 1:
Export the predicted (or measured) frequency response of your subwoofer as an FRD file
Step 2:
Import the FRD file generated in step 1 into REW
Step 3:
Import the transfer function into REW
Step 4:
Under the "All SPL" window, select "Controls" and under "Trace Arithmetic", select the "A*B" option and select "Generate".
If done correctly, you'll end up with a predicted response curve for the subwoofer in the car that should end up being pretty close to what you actually measure.
The image below shows the predicted response of my "Boom Unit" subwoofer in the car, based on the car's measured transfer function.
Attachments
Using a transfer function measurement in Hornresp
Hornresp does allow you to use a transfer function to get a better idea of what a sim's response would be when used where the transfer function was measured. Hornresp refers to it as "Room Gain".
To use the previously generated transfer function in Hornresp:
Step 1:
In REW, export the generated transfer function as a space-delimited FRD file
Step 2:
Open the FRD file in Notepad, and remove all lines that start with an asterix. What should be left should be the actual measurement data.
Step 3:
Save the modified FRD file under Hornresp's "Import" folder, giving it a file name that is 16 or less characters long.
Step 4:
Open Hornresp and select "File..Import.. Room Gain Profile", and select the FRD file.
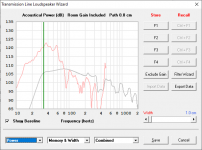
Step 5:
When using "Loudspeaker Wizard" for a sim that you're currently editing, select "Memory & Width", and then select the "Include Gain" button on the right hand side.
The sim's "Power" response curve should now show the impact of the transfer function that you imported.
Selecting the "Exclude Gain" option will remove the impact of the transfer function from the sim'd response curve.
Hornresp does allow you to use a transfer function to get a better idea of what a sim's response would be when used where the transfer function was measured. Hornresp refers to it as "Room Gain".
To use the previously generated transfer function in Hornresp:
Step 1:
In REW, export the generated transfer function as a space-delimited FRD file
Step 2:
Open the FRD file in Notepad, and remove all lines that start with an asterix. What should be left should be the actual measurement data.
Step 3:
Save the modified FRD file under Hornresp's "Import" folder, giving it a file name that is 16 or less characters long.
Step 4:
Open Hornresp and select "File..Import.. Room Gain Profile", and select the FRD file.
Step 5:
When using "Loudspeaker Wizard" for a sim that you're currently editing, select "Memory & Width", and then select the "Include Gain" button on the right hand side.
The sim's "Power" response curve should now show the impact of the transfer function that you imported.
Selecting the "Exclude Gain" option will remove the impact of the transfer function from the sim'd response curve.