
Out of two chassis.Did you make the mirrored chassies yourself ? Nice work!
The one on the left was built from the Marlboro Man Mark III. I used this amp for the most part untouched for 3 years in my workshop on a 2 ohm double 15 cab until it blew one of its GE 6550's. It had been used in what a suspect a very small room by a very heavy smoker for a very long time, but it worked, came with a cage (a hacked one) and had NOS tubes. I made an attempt at cleaning it and even went as far to clean up the transformers and paint the bells- but it was just too nasty- the underside was coated in nicotine tar as well as "Dynagoo"- leaking C354 choke. All I saved from it was the iron. Since it served me well and perhaps for sentimental reasons, I made it a point to keep its iron together so it could live on in a slightly less atmosphere that constitutes 19% oxygen instead of 19% nicotine.

Last edited:
These are lights made for the Fender amps.Smokin'! The red jewel is a nice touch.
For the mirrored Mark III, I built it from a collection of amps from an "estate sale." It really was one too. Two Mark III's and a Mark II in various states of assembly and butchery. I did not consider the modifications done to the Mk III chassis's to be desirable by any means. I ended up selling off some of the Mk II parts off and kept the best iron for building the mirror. It also came with some new boards as well.
I did save a number of components and sockets as these are of value in the event I find a really nice old Dynaco that just needs a little help.


I did save a number of components and sockets as these are of value in the event I find a really nice old Dynaco that just needs a little help.
Last edited:
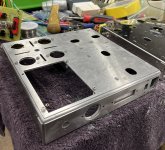
For the mirror, I used two Dynakit Stainless steel chassis's. I cut the top out of one chassis, flipped it upside down and then matched them up with hole saws and lots of Dremil work. Additionally the mirror has a .125" thick aluminum plate underneath that anchors the transformers to the top plate, as there was nothing to mount them to. Epoxy also helped.
Additionally there are .125" thick alumium plates behind the front of the chassis and behind the back of the chassis. The back was made from cutting out the back from one chassis, flipping it around and cutting out what was necessary to match it up.


Additionally there are .125" thick alumium plates behind the front of the chassis and behind the back of the chassis. The back was made from cutting out the back from one chassis, flipping it around and cutting out what was necessary to match it up.
Attachments
Last edited:
So they matched craftsmanship wise, I also used two Dynakit stainless chassis for the non mirrored one. I cut the top plate and the back out of one and overlayed it onto another chassis. The non mirrored chassis also has .125" aluminum plates behind the back and the front of the chassis to stiffen it up some.. I also epoxy filled both chassis's in the corners where the bends have gaps in them.
Additionally since I was going to use some boutique banana connectors I had from another project, I cut out some of the left over stainless and plugged the cutout where the terminal boards mount. I set this in place using epoxy, bonded to the aluminum plates on the backside, then I drilled them out for the banana connectors. I also cut out the chassis for use with IEC power connectors, drilled them to take fuse holders and to take a D-mount Neutrik type 1/4" input.
I tapped the holes in the top of the chassis for 6-32 and 8-32 fasteners. The fasteners for the boards, tube sockets and terminal boards will mount from the underside and I will flush cut them to the chassis. The backs are also tapped.
I spent some time sanding these with 320-400 grit wet and with some help from a red scotchbrite for more of a brushed look.
Last edited:
While working on this, I farmed out the transformer bells for powdercoating. These are original bells, with the original stampings. I had enough of them that I picked out the best ones that weren't dented and had them powdercoated.
All these transformers required me to to add or repair leads to. Obviously in the case of the mirror amp, shorter leads needed to be lengthened. All these leads were faded really bad and in the case of the Marlboro Mark III were discolored so bad from tar. Since the bells were removed it was easy to identify the colors, so I wiremarked each one of them. Many of the cloth wires were also brittle- a heat gun helps in softening these up.
I kept the Marlboro Man Mark III transformers together. For the mirror, I picked out the best ones from the estate collection and bench tested them. Cleaned them up and painted them with Krylon Fusion matte black.
Cut down 8-32 stainless socket heads, washers, new nylon inserts (painted black) and stainless cap nuts hold them together.
Last edited:
Started some assembly at this point.
1. I had some leftover sockets from a pair of Triode Electronics Mk III kits which I didn't use. These have kinda a cool vintage tan look, and also don't require the holes to be enlarged like the Belton sockets require. Stainless fasteners mount the sockets from the underside and I flush cut the fasteners using a template from scraps.
2. I bought Dual Bias Kit's from Kevin at Dynakit. These add a balance pot that fits through the rear octal socket. I also bought two new bias pots from Dynakit. These have a pretty cool knurled nut that attaches to the pots and they are quality potentiometers.
3. The red switches are made for Fender amp replacements. They mount in perfectly. The Hammond version of the Mark III's (AO-159?) used these red switches.
4. Fuse holders are from Dynakit.
5. The IEC plugs were from leftovers that I didn't use from a previous build using the Triode Electronics Mark III kits.
6. Switchcraft version of the Neutrik D-mount 1/4" input jacks. The modern Neutrik connectors are crap and I can't find NOS. Even with the Switchcraft version, I had to dissassemble them and epoxy fill them so that the plugs fit tight and unlock like were designed to do - like how I remembered them doing a long time ago.
7. The Kryo banana plugs are from VH Audio. I had bought them for a boutique SET build that I didn't follow on with.
8. Drilled the front of the chassis to take a Fender amp light socket. This also made dealing with those old cloth heater leads real easy. All I had to do was get to the light socket as the Fender lights are powered by the heaters. I could then just wire the heater circuit from that point using PTFE. There are all kinds of different types of jewel lights and bulbs that can be used with these Fender light sockets, in incandescent or LED.
I really wanted to use Poseidon boards, but these are long gone. Joe Curcio wasn't responding either, but I did get a reply from him in a Dynaco forum on Facebook and he is building boards.. however by then I had already chose to use these Vintage Electronics boards. I had already built a pair of VTA Dynaco Mk III's and while I love them, I wanted something more original- "the VTA's strip a lot of the Dynaco out of the Dynaco."
Vintage Electronics sells only boards and it's probably as close of a clone copy of the original MkII/III boards. They sell no kits- you have to source all the components. However they do make this easy as they print the component values on the boards for you. For OCD people like me this is absolutely spectacular as you can source exactly what you want to put into them. In keeping with the look of the original boards that were stuffed with those big Pyramids, I did it with Jupiter's and carbon films- KOA/Kiwame's and AMRG's from Part's Connexion. Both amps are entirely built this way top and bottom.
New miniature tube sockets for the boards are from Dynakit, in keeping with the old vintage light tan look of the octal sockets.
The cans are the 80/40/30/20uf version of the Authenticap's.


I
Vintage Electronics sells only boards and it's probably as close of a clone copy of the original MkII/III boards. They sell no kits- you have to source all the components. However they do make this easy as they print the component values on the boards for you. For OCD people like me this is absolutely spectacular as you can source exactly what you want to put into them. In keeping with the look of the original boards that were stuffed with those big Pyramids, I did it with Jupiter's and carbon films- KOA/Kiwame's and AMRG's from Part's Connexion. Both amps are entirely built this way top and bottom.
New miniature tube sockets for the boards are from Dynakit, in keeping with the old vintage light tan look of the octal sockets.
The cans are the 80/40/30/20uf version of the Authenticap's.
I
Last edited:
Another modification was to use a 1N4007 diode instead of the selenium rectifier. The Dynakit Dual Bias replaces the single 11.2 ohm resistor with a 10 ohm resistor on each output tube. To get the amps to bias correctly and have the bias pot have adequate adjustment range (.5-.7v per tube), I used two 10k ohm resistors in parallel on the terminal boards from the diode (5K ohms). The 18k ohm schematic correct resistor is still retained from the bias pot to ground.

- Home
- Amplifiers
- Tubes / Valves
- The Marlboro Reds- twin mirrored Dynaco Mk IIIs