Hi all
After many years of hoping to build ribbons I've finally managed it.
The greatest stumbling block I faced was how to pleat the ribbons.
Much talk has been on geared type gizmos etc and this all seemed a bit hard to arrange.
I am not sure if my method has been done before or arranged so if someone else has already explained this method - my sincerest apologies.
If not then this method is simple quick and cheap.
how ?
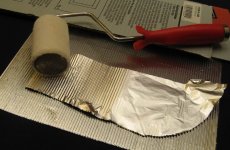
a) Cut ribbon to desired width, in my case it was 10mm and cut from cheapest (thinnest) kitechen foil i could find.
b) Find some corrugated cardboard and tape one end of ribbon onto cardboard across (perpendicular to ) the corrugations.
c) firmly press down onto the ribbon at the taped end with a small soft paint roller- moving along the length of the ribbon. It will shorten as you proceed
d) that's it ....corrugated ribbon formed.
Note the corrugations are not sharp edge as if made by gears but the cross section seems to be that of a curve continually changing direction- like a corrugated iron roof sheet.
see photos attached.
I have drawn much inspiration from the diyaudio site , and hopefully this info may repay some of the debt I owe to many....
note: I haven't any precut ribbons around for the photo -so i just grabbed some alum scrap to demonstrate the procedure - final ribbons when produced with care look pretty cool and unwrinkled - but this gives the idea.
Enjoy
George a
After many years of hoping to build ribbons I've finally managed it.
The greatest stumbling block I faced was how to pleat the ribbons.
Much talk has been on geared type gizmos etc and this all seemed a bit hard to arrange.
I am not sure if my method has been done before or arranged so if someone else has already explained this method - my sincerest apologies.
If not then this method is simple quick and cheap.
how ?
a) Cut ribbon to desired width, in my case it was 10mm and cut from cheapest (thinnest) kitechen foil i could find.
b) Find some corrugated cardboard and tape one end of ribbon onto cardboard across (perpendicular to ) the corrugations.
c) firmly press down onto the ribbon at the taped end with a small soft paint roller- moving along the length of the ribbon. It will shorten as you proceed
d) that's it ....corrugated ribbon formed.
Note the corrugations are not sharp edge as if made by gears but the cross section seems to be that of a curve continually changing direction- like a corrugated iron roof sheet.
see photos attached.
I have drawn much inspiration from the diyaudio site , and hopefully this info may repay some of the debt I owe to many....
note: I haven't any precut ribbons around for the photo -so i just grabbed some alum scrap to demonstrate the procedure - final ribbons when produced with care look pretty cool and unwrinkled - but this gives the idea.
Enjoy
George a
Attachments
Another view of prototype ribbon
Details
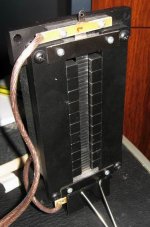
Magnets
10x10x10MM Neodymiums -12 per pole
10X25 pole pieces from 1014 steel
diy paint roller ribbons 10mm wide -cheap kitchen foil
10.5mm gap
transformer- ebay sourced Howard Dawson see :
http://hd-audio.orpheusweb.co.uk/kelly.html
Xover 48dB/oct at 1Khz via DCX2496 behringer
Sound-- absolutely marvellous -
Details
Magnets
10x10x10MM Neodymiums -12 per pole
10X25 pole pieces from 1014 steel
diy paint roller ribbons 10mm wide -cheap kitchen foil
10.5mm gap
transformer- ebay sourced Howard Dawson see :
http://hd-audio.orpheusweb.co.uk/kelly.html
Xover 48dB/oct at 1Khz via DCX2496 behringer
Sound-- absolutely marvellous -
Attachments
Looks good  hope to get on with my own very soon...very similar, but with additional smaller one fore super tweet
hope to get on with my own very soon...very similar, but with additional smaller one fore super tweet Most excellent George. You have added another one to the "tip toolbox"  .
.
I haven't seen that before, and I'm sure it works great for the shorter ribbons.
Casey
. I haven't seen that before, and I'm sure it works great for the shorter ribbons.
Casey
@georgea
just a remark - I/we built ribbons some years ago and also used corrugated cardboard ... we put the ribbon between two cardsboards and then "rolled" the upper cardboard from one end to the other ... don't know if it works better though.
regards,
Jesper
just a remark - I/we built ribbons some years ago and also used corrugated cardboard ... we put the ribbon between two cardsboards and then "rolled" the upper cardboard from one end to the other ... don't know if it works better though.
regards,
Jesper
- Status
- Not open for further replies.