I've completed three portables, and have another in progress, around the bass output of the Dayton SD215-88 8" driver. It seems to pair up well with the tpa3116d2 based amps I have been using.
Portable #1 was posted to subwoofers in this thread: https://www.diyaudio.com/community/threads/i-built-a-portable-with-a-12-passive-radiator.382796/ Edit: I forgot it didn't actually use a sd215a; it was just designed to use one if the proprietary/unknown driver ever failed.
The subwoofer portion of these is still all I am really designing. Three of them have even used self-enclosed mid/tweet 'pods' with their own crossovers inside, so I have been doing literally nothing besides deciding whether to turn on the 150hz highpass on the dayton 2.1 amp, when it gets used. However, these are full range systems and I felt silly continuing to post them under subwoofers (Mods, please move this there if that does seem more fitting?)

Photos and measurements in link.
Portable #2 I gave to a friend as a present. It is very similar to the first. Same form factor, same side drivers.
Differences:


Features:
Anecdotal reported run time after a camping trip: five days of multiple hours per day at various volumes including 'loud' - two generic batteries drained and one real one not quite dead. Generics were labelled 6ah and cost 50 bucks for both. I build a resister bank and drained them through a meter at around 1 amp, and they tested out nearly identically to three different old & tired but authentic 5ah XRs, for whatever that's worth.
Some downsides:
Portable #3 Was a commission based on hearing #2, and is extremely similar to it.
Differences:


Portable #4 (in progress). Second commission based on #2.

Guts, showing pockets


It's a box


Roundover'd. I'm not very good at this step.


Filled and block sanded


Primer
This one is going to be pretty unwieldy, more of a lug-around-the-house than a portable (regardless of the lack of a battery). I plan to get back to the smaller form factor and use smaller drivers with smaller pockets (I'm out of sealed-back car speakers) for the next one, assuming there is one.
Portable #1 was posted to subwoofers in this thread: https://www.diyaudio.com/community/threads/i-built-a-portable-with-a-12-passive-radiator.382796/ Edit: I forgot it didn't actually use a sd215a; it was just designed to use one if the proprietary/unknown driver ever failed.
The subwoofer portion of these is still all I am really designing. Three of them have even used self-enclosed mid/tweet 'pods' with their own crossovers inside, so I have been doing literally nothing besides deciding whether to turn on the 150hz highpass on the dayton 2.1 amp, when it gets used. However, these are full range systems and I felt silly continuing to post them under subwoofers (Mods, please move this there if that does seem more fitting?)
Photos and measurements in link.
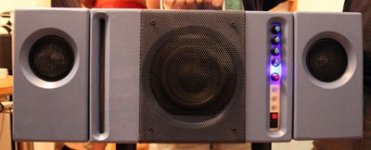
Portable #2 I gave to a friend as a present. It is very similar to the first. Same form factor, same side drivers.
Differences:
- Powered by Dewalt tool battery (I included two generics as an excuse to test them out along the way), or wall plug via laptop charger
- Ported instead of passive radiator (2x 2" pvc)
- Uses two amps: a dayton KAB as bluetooth source, with its mono line out sent into a cheap tpa3116d2 sub amp with adjustable crossover
- Bedliner instead of natural look
- No fancy rotating handle. Found a samsonite luggage handle which is super comfortable, seems rugged enough, fits well, and stows flat. Wish I had more like it
Features:
- Baltic Birch, fastenerless construction
- (Relatively) beefy bass. Surprises most people I've showed it to. I tuned this one a little low (~32hz) for excursion protection even on oddball songs.
- Battery protection. Dewalt builds it into the tools (not the battery), so without adding a low-voltage cutoff the amps would happily run the battery down below 15v, damaging it.
- Run time is limited only by one's tool battery supply. It can use the big flex volt batteries (not at 60v, but it will accept them and use them at 20v).
Anecdotal reported run time after a camping trip: five days of multiple hours per day at various volumes including 'loud' - two generic batteries drained and one real one not quite dead. Generics were labelled 6ah and cost 50 bucks for both. I build a resister bank and drained them through a meter at around 1 amp, and they tested out nearly identically to three different old & tired but authentic 5ah XRs, for whatever that's worth.
Some downsides:
- It's heavy. I should weight one of these things, one of these days.
- The battery protection itself will very slowly run down a battery, even after cutting power to the amps, as it has a small constant drain to run itself. I tell the users to pull the battery when they are done with it, but also I purposely put the low voltage cutoff after the switch that selects between the battery and the wall plug charger input. This has the downsides of limiting the wall plug input to the same lower limit as the battery, e.g. 15.3v or higher, instead of allowing e.g. 12v from a car, as well as limiting the current to whatever the cutoff board can handle, but the upside is it disconnects the battery from the low voltage cutoff entirely, so one can carry it around with a battery on the chuck without draining it, as long as you use the switch.
- Battery chuck is not also a battery charger. That would be cool but is out of scope, haha. A switch keeps the wall plug input from trying to 'dumb-charge' the battery.
- For some reason I expected the mono line out of the KAB amp to be level controlled, but it is not. So the bass amps level control isn't relative to the mid/tweet level, it is completely independant. Not a big deal just a little odd to use at first, and not what I was hoping for.
Portable #3 Was a commission based on hearing #2, and is extremely similar to it.
Differences:
- Back to the dayton 2.1 amp from portable #1 (used in the Executive and Blast box kits.)
- Different mid/tweets, though still Ford Premium car speakers. These ones were made by JBL.
- Tuned a tiny bit higher (~35hz) than the previous for better bass on most music
- Yet another handle. Vintage white plastic luggage handle. Reasonably comfortable, but it can rattle if it's flipped over on top of the ports (woops!).
Portable #4 (in progress). Second commission based on #2.
- This one was requested to use an existing pair of 6x9 car speakers, so I made the whole thing wider and built pockets on each side to make a sealed enclosure for each 6x9.
- I didn't calculate the adjusted volume very closely; if the tuning is too high I can extend the ports. Fingers crossed it's not too low already as I won't be able to shorten them more than a tiny bit.
- No battery socket; wall plug only (by request)
- No handle solution yet.
Guts, showing pockets
It's a box
Roundover'd. I'm not very good at this step.
Filled and block sanded
Primer
This one is going to be pretty unwieldy, more of a lug-around-the-house than a portable (regardless of the lack of a battery). I plan to get back to the smaller form factor and use smaller drivers with smaller pockets (I'm out of sealed-back car speakers) for the next one, assuming there is one.
Last edited:

great projects @Chompy !
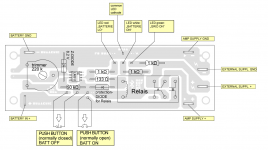
i made a very similar box for my nephews and included a small, very simple circuit that disconnects the battery if the voltage drops below a defined level (can be regulated).
see attached scheme.

basically the circuit just switches between external supply (if there is any) and the battery.
you activate the battery by pressing the "battery" push button, the comparator activates the relay if the voltage is high enough. relay turns on the output and continuously supplies the comparator.
if the voltage drops below threshold the complete circuit deactivates itself and switches to external supply (or "off"), thus it does not drain the battery when off. the "LO BATT" LED lights up when pressing "battery on" and the battery is too weak.
you turn off the battery supply with the "battery off" push button.
until now this worked just fine!
i made a very similar box for my nephews and included a small, very simple circuit that disconnects the battery if the voltage drops below a defined level (can be regulated).
see attached scheme.
basically the circuit just switches between external supply (if there is any) and the battery.
you activate the battery by pressing the "battery" push button, the comparator activates the relay if the voltage is high enough. relay turns on the output and continuously supplies the comparator.
if the voltage drops below threshold the complete circuit deactivates itself and switches to external supply (or "off"), thus it does not drain the battery when off. the "LO BATT" LED lights up when pressing "battery on" and the battery is too weak.
you turn off the battery supply with the "battery off" push button.
until now this worked just fine!
Attachments
Awesome builds Chomp, beats my boombox build on portability I need a sack truck to carry mine 😆 😉
You really should isolate the Ford speakers completely so they don't resonate when the woofer hits.
@stv Thank you, and that circuit is perfect! I might try adding a relay and a momentary switch to the ones I've been using; seems like I could relay it's own input off its output, and use the momentary switch to start it up.
@Harry72 Thank you. And yeah, I am learning how fast they get heavy! A big vertical box with a little recess on the bottom to nestle onto a sack truck could be cool.
@wolf_teeth Thanks. Haven't noticed any issues with that but it wouldn't hurt, other than volume and weight.

Sanded, more filler

Sanded the filler, more primer
@Harry72 Thank you. And yeah, I am learning how fast they get heavy! A big vertical box with a little recess on the bottom to nestle onto a sack truck could be cool.
@wolf_teeth Thanks. Haven't noticed any issues with that but it wouldn't hurt, other than volume and weight.
Sanded, more filler
Sanded the filler, more primer
@Harry72 I love it! Beautiful work. I bet you have been enjoying that. Is there a thread for it? Nvm, found it: https://www.diyaudio.com/community/threads/harrys-dayton-im-a-sumo-sized-soundbar.348443/


Number 4 is 99% done. Found another samsonite luggage handle 🙂

Trying out 60mm fan grilles as port covers.
Two things left:
#1 Label the knobs. I left them unlabelled on the last one, but included some instructions which described what each one does, in multiple different ways. Need to decide whether to do the same again, or label them. I haven't come up with a good one-word label for each though. Accurate descriptions are something like: Bass Level, Bass X-Over, Mid/Tweet Level, Treble EQ, (and Master Level (Main volume)). For a nontechnical person it might be more useful to call them e.g. Bass, Midbass, Mids, Treble - even though it's not really accurate - or going even further, something like Rumble, Punch, Shout, Sparkle. I will ask the owners of the previous ones if they have an opinion on what they should say, if anything.
#2 Bring the bluetooth status light to the outside. I've done this two ways so far: drill a hole in the faceplate, build up clear glue between the faceplate and the onboard LED to build up a 'light pipe' (some reflective mylar on top seems to help) to bring the light out. Works great, just a little tricky to get right. Or, on one of them, I added an standalone LED to the provided through-holes on the amp, and punched it through the faceplate. Also worked great, but also somewhat tricky, for different reasons (relatively fine soldering is the main one, not being sure if Im using the right LEDs is the other).
- Home
- Loudspeakers
- Multi-Way
- SD215A-88 Portable Boomboxes - 3x complete, another in progress