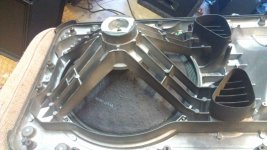
Unfortunately somebody "simplified manufacturing" by making the speaker non removable, in fact part of front baffle.
You need to send the whole assembly , in fact I´d send the entire speaker cabinet.
But you are privileged, you live close to the greatest Sis on Earth (mine 😉 ) and the most important Speaker Servicing center in all of USA: Orange County Speaker.
FWIW Pros send their speakers there all the way from NY, go figure.
And no, JBL does not sell to end users.
Thanks JM - Yes, I am spoiled having OC speaker in my back yard! And yes, although JBL does not make recone kits available to end users, they are still available for around $100. So rather than spend maybe more than the entire cabinet is worth at OCSpkr, I may attempt it myself. Saw a utube on a guy who had the magnet misaligned inside the driver coil, causing a brand new cone to fail after only a few months, so I will check mine for prober concentricity.... And in regards to the "simplified manufacturing", I think it's a brilliant design, which allows much better sound conduction to the cabinet, and better bass response.... Oh, and your Sis has very good taste on location LOL! Wish me luck, and will not be out much cash if I end up taking it in, if it doesn't work out. Thanks!
I re-coned one of these myself last year. It was for a friend who owns a bar.
Easy as pie! He had a re-cone kit that the dealer had supplied when he originally bought the speakers.
Something about "your gonna need this eventually..." 😀
Easy as pie! He had a re-cone kit that the dealer had supplied when he originally bought the speakers.
Something about "your gonna need this eventually..." 😀
mctavish - thanks! So you've done one of these.... how tricky is it to set up the supplied shims to center the voice coil? And do you inspect and/or clean out the gap between the inner & outer magnets?
Cleaning out the gap was very nessacery due to dust and ciggy smoke🙁
The shims were actually missing from the kit. The gap is so small that I ended up using some paper for printing pictures on and simply made a tube out of it that fit snugly around the pole piece.
It worked great, the speaker is still being used every day.
The shims were actually missing from the kit. The gap is so small that I ended up using some paper for printing pictures on and simply made a tube out of it that fit snugly around the pole piece.
It worked great, the speaker is still being used every day.
Choose the shim (paper) thickness such that you have a slight interference fit of the voice coil around the pole piece.
Once you are satisfied that all is perfectly concentric and aligned, raise the cone/vc assembly enough so that you can apply glue to the front baffle.
Then, slide the VC down to its central travel position and stick the roll surround to the baffle, ensuring that there are no sideways forces on the cone/vc assembly, and that the roll is sitting correctly.
Leave over night for surround glue to set.
Next step is to glue the spider to the frame, same again, ensure no sideways forces.
Leave overnight for glue to set.
You can then remove the shim material and check correct operation, before fitting the central dome.
It's as easy as that !.
Dan.
Dan - Thanks! It's tips like yours that give me more confidence I can do this..... It's for a buddy, said I'd pay for the recone kit if it didn't work!. Instructions I've seen (from the aftermarket mfr) have both the front cone and spider being glued together. I do see the advantage of doing them one-at-a-time. (P.S. I picked my avatar not knowing your username....mine is a reference to my tube amp building passion!)
No worries about the avatar..the more the better !.
The trick with the reconing is to fit the shim and slide the cone/VC assembly up and down multiple times to be sure that the VC is nicely concentric and aligned before parking it in position to do the surround glueing.
Withe the cone/VC assy at rest position you might need to keep gently pushing the surround down while the glue sets.....ditto the spider.
Once set (24 hours), you then raise the cone/VC assembly so that you can apply glue to the frame where the spider is fixed.
Once the glue is applied slide the cone/VC assembly down to central travel position and set the spider correctly...again NO side forces.
24 hours later you should be able to remove the shims and confirm that the cone can go full travel plus and minus without any rubbing.
Big point...be sure that the rotation position of the cone/VC assy is such that the flex wires can be terminated correctly to their respective terminals before you do any glueing !.
Dan.
PS - the shim should be a single rectangular sheet of suitable thickness material, length such that the ends almost meet when fitted inside the VC.
Last edited:
I suggest you glue both edge and spider at the same time.
Otherwise it will be quite problematic to raise the already glued and dry cone/spider to properly apply spider to frame glue.
Worst case, I'd glue spider first, but even so .....
It's best not to mess with speaker position, nor apply sideways pressure while the glue is still hardening .... which on next day it still will be.
Agree with all other suggestions, including stacking as many printing paper sheets (although X-Ray film or mylar Laser transparency is better) as needed so VC fits somewhat snugly (don't overdo it, of course).
Out of interest, what type of glue are we talking about here? A colleague of mine uses high-viscocity cyanoaclylate (superglue). Its seems a non-intuative choice due to its hardness, but always seems to work.
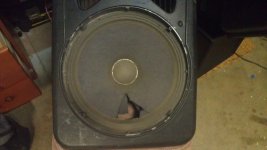
Well, the recone kit came in, I got the courage to install it, and it went well. Glued both cone and spider together, and the included plastic sheet gave a good interference fit around the voice coil. Powered it up (with apprehension), and it actually sounded great! Then I found out why my buddy asked me to look at it.... 2nd time I powered it up the AMP showed it's true colors.... distorting, little volume, and a "pop" when I shut it off.... (DC??). That's what destroyed the original speaker cone.... well at least it worked long enough to show me I successfully reconed it.... now to troubleshoot that amp (thru a dummy load, not my brand new speaker!).....
- Status
- Not open for further replies.
- Home
- Live Sound
- PA Systems
- Reconeing JBL EON