Hi all,
This is a continuation of a previous thread where I was asking for info on my first speaker build and it can be found here.
First Build-selecting drivers.
I have settled on building the ZX Spectrum by Paul Carmody (not Carmondy :/ sorry)
Woofer HiVi M6a
Tweeted Neo3-PDRW

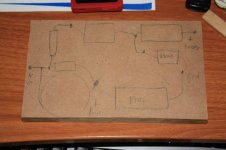
Here are my cutout diagrams by using a 3/4" thick 48"x96" peace of MDF


Here are all the cutouts I had to make.
http://i.imgur.com/lmwWwh.jpg[/IMG
Rounded edge braces. I didnt take too much care here. I used the jigsaw and than rounded the hard edges.
Glued together cabinets so far.
[IMG]https://i.imgur.com/xeHIth.jpg


Just finished flush trim for the back and top of the cabinets.


Removable bottom feature for access to the crossover. I will use 8x screws to secure the bottom plate and than flush trim it. I used small grooves so I can remove the plate if need be.

I plan on gluing the front baffle and that's why i have the removable bottom 🙂

I got SoniCaps for the series caps, Mills Resistors, Jentzen Inductors, and a Dayton polypropalyne for the shunt cap 🙂


This is what I have so far..... and it has taken forever!!!!
Album
I have all the parts but i am yet to build the crossover and test the speakers. No I do not have microphone test equipment :/
I do have a couple of questions tho.....
There were small gaps on my braces with the walls :/ so I decided to use Polyurethane adhesive Loctite PL Premium. It actually expands as it dries and I figured that I would do good in flling the gaps.
I mostly used so far Titebond II wood glue.
I am thinking of using the Polyurethane for the baffles as well since the edges are not exactly straight. They are maybe a degree or two off because i forgot to straighten them with the router :/
there are also two gaps that will happen on the braces of one of the speakers :/ so I either need to fill that now with something or use a glob of polyurethane and let it do it's magic.... what do you think?
I am not sure how much it matters but I have a couple of chouses for wiring. I have some Belden Video cable that i got on sale with some real heavy insulation and looks pretty damn pro and I am thinking of stripping the cable and using the conductors inside (which are also shielded) for the wiring. I also have VampireWire speaker cable that has I believe teflon coating and a braided shield. Both wires are low gauge maybe around 12-16, which one should I use?
This is a continuation of a previous thread where I was asking for info on my first speaker build and it can be found here.
First Build-selecting drivers.
I have settled on building the ZX Spectrum by Paul Carmody (not Carmondy :/ sorry)
Woofer HiVi M6a
Tweeted Neo3-PDRW
Here are my cutout diagrams by using a 3/4" thick 48"x96" peace of MDF
Here are all the cutouts I had to make.
http://i.imgur.com/lmwWwh.jpg[/IMG
Rounded edge braces. I didnt take too much care here. I used the jigsaw and than rounded the hard edges.
Glued together cabinets so far.
[IMG]https://i.imgur.com/xeHIth.jpg
Just finished flush trim for the back and top of the cabinets.
Removable bottom feature for access to the crossover. I will use 8x screws to secure the bottom plate and than flush trim it. I used small grooves so I can remove the plate if need be.
I plan on gluing the front baffle and that's why i have the removable bottom 🙂
I got SoniCaps for the series caps, Mills Resistors, Jentzen Inductors, and a Dayton polypropalyne for the shunt cap 🙂
This is what I have so far..... and it has taken forever!!!!
Album
I have all the parts but i am yet to build the crossover and test the speakers. No I do not have microphone test equipment :/
I do have a couple of questions tho.....
There were small gaps on my braces with the walls :/ so I decided to use Polyurethane adhesive Loctite PL Premium. It actually expands as it dries and I figured that I would do good in flling the gaps.
I mostly used so far Titebond II wood glue.
I am thinking of using the Polyurethane for the baffles as well since the edges are not exactly straight. They are maybe a degree or two off because i forgot to straighten them with the router :/
there are also two gaps that will happen on the braces of one of the speakers :/ so I either need to fill that now with something or use a glob of polyurethane and let it do it's magic.... what do you think?
I am not sure how much it matters but I have a couple of chouses for wiring. I have some Belden Video cable that i got on sale with some real heavy insulation and looks pretty damn pro and I am thinking of stripping the cable and using the conductors inside (which are also shielded) for the wiring. I also have VampireWire speaker cable that has I believe teflon coating and a braided shield. Both wires are low gauge maybe around 12-16, which one should I use?
Last edited:
Hi Paul,
To get a nice finish it help to glue a thin MDF-plate(3mm) on the top and back to disguise the joints.
Because when it is sanded down to flat and than painted it will later show due the movement in wood. With a thin layer on top this problem can be solved. Success with your build looks nice.
To get a nice finish it help to glue a thin MDF-plate(3mm) on the top and back to disguise the joints.
Because when it is sanded down to flat and than painted it will later show due the movement in wood. With a thin layer on top this problem can be solved. Success with your build looks nice.
Hi Paul,
To get a nice finish it help to glue a thin MDF-plate(3mm) on the top and back to disguise the joints.
Because when it is sanded down to flat and than painted it will later show due the movement in wood. With a thin layer on top this problem can be solved. Success with your build looks nice.
Helmuth,
I'm Ivan, it is Paul Carmondi's design 🙂
That is a really good tip!
I will try and see if i can do it for the back and top of the speaker box, It can save me some major sanding and leveling time. Do you sand extensively and than seal/prime before you put on the 3mm MDF-plate?
Hopefully I can find it in the local store.
I did plan on doing a 15degree chanfer that will actually hide the butt to butt joints because of that particular swelling problem but it will help if i only have to do the chamfer only for the front baffle 🙂
It easy to sand MDF only it shows later though the paint, when covert with a thin plate the problem disappears. I would sand it to have a good and easy fit.Helmuth,
I'm Ivan, it is Paul Carmondi's design 🙂
That is a really good tip!
I will try and see if i can do it for the back and top of the speaker box, It can save me some major sanding and leveling time. Do you sand extensively and than seal/prime before you put on the 3mm MDF-plate?
Hopefully I can find it in the local store.
I did plan on doing a 15degree chanfer that will actually hide the butt to butt joints because of that particular swelling problem but it will help if i only have to do the chamfer only for the front baffle 🙂
It easy to sand MDF only it shows later though the paint, when covert with a thin plate the problem disappears. I would sand it to have a good and easy fit.
I did a quick search and I couldnt find a an MDF plate of 3mm... do you have a picture or can show me a link that I can see what you are talking about?
I did a quick search and I couldnt find a an MDF plate of 3mm... do you have a picture or can show me a link that I can see what you are talking about?
Here I just googled I can buy 1.8 -6mm MDF in the Netherlands.
Its Dutch but you can read it talks about mdf and the sizes (dun =thin and Dik=thick). So you have to search a bit in your region.
Houtdatabase
Here I just googled I can buy 1.8 -6mm MDF in the Netherlands.
Its Dutch but you can read it talks about mdf and the sizes (dun =thin and Dik=thick). So you have to search a bit in your region.
Houtdatabase
nope :/ looks like here in the US we don't have 2-6mm mdf plates or boards... all i get is UK and Australian sites lol. I'll keep on looking I guess
I'd probably just sand it smooth and use a good glue-on laminate, that seems to be the typical thing that most folks do.
Looking good so far!
Looking good so far!
I did a speaker set speakers in 2010 using baltic Brich and glued on a layer of triplex Birch as a kind of veneer. Work very good and it let sand it down fine to get a smooth fit.
In the picture the top layer and the back side are a triplex layer.

In the picture the top layer and the back side are a triplex layer.
Attachments

Last edited:
a piece of acrylic wont do the same job ?
- I guess but gluing acrylic to wood and painting acrylic is not something i want to do i guess :/
I'd probably just sand it smooth and use a good glue-on laminate, that seems to be the typical thing that most folks do.
Looking good so far!
Thanks!!! I can wait to get more time next week and work on them
I did a speaker set speakers in 2010 using baltic Brich and glued on a layer of triplex Birch as a kind of veneer. Work very good and it let sand it down fine to get a smooth fit.
In the picture the top layer and the back side are a triplex layer.
]
That looks really nice!
I will just chamfer the edges to something looking like this
An externally hosted image should be here but it was not working when we last tested it.
btw this thread is awesome
Zaph SR71 build thread - Techtalk Speaker Building, Audio, Video, and Electronics Customer Discussion Forum From Parts-Express.com
That is a nice job for texture paint "warnex" for a platter finish.
Warnecke & Bhm - Wood & MDF
Warnecke & Bhm - Wood & MDF
An externally hosted image should be here but it was not working when we last tested it.
That is a nice job for texture paint "warnex" for a platter finish.
Warnecke & Bhm - Wood & MDF
An externally hosted image should be here but it was not working when we last tested it.
I will try for the high gloss acrylyc lacquer paint and chamfered edges.
crossover update
I haven't had much time to work on the speakers around the holidays and because of another project but i got around this weekend to making the crossovers.
xpaaB.jpg
ZLMVl.jpg
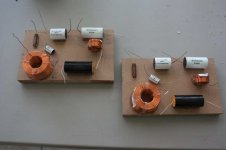
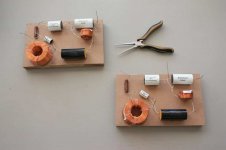
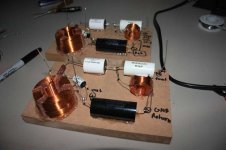
I used a piece of 3/4" MDF Woof leftovers and laid out the components in the best fashion that i can without using extra pieces of wire. I want to go directly from the binding posts to the crossovers and from the crossovers to the drivers.
O5LVt.
Here are the components glued on with a hot glue gun 🙂
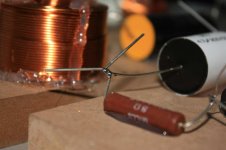
I decided to use SoniCaps for the signal path, Jentzen Inductors, Mills Reistor for the singal path and a Dayton Audio Cap for a parallel cap.
7YV91.jpg
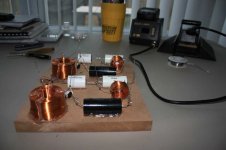
here I tied the leads by making small hooks with the pliers.
iQuel.jpg
Here I soldered everything using the Aoyue 937+ Digital Soldering Station using Cardas Quad Eucetic solder set to 410deg C.
Zxhu2.jpg
uo4Wr.jpg
Got some nice solder Joints. The Cardas takes a bit of heating to flow real nicely but I have also used Wonder Solder and I think it took more heating but it flowed nicer.
5Chjw.jpg
here are the complete crossovers with all of the excess wire clipped and the terminals labeled. The wire connections wont necessarily follow an order but i wont be using any additional pieces or wire and using only the leads from the components.
JZ4Dq.jpg
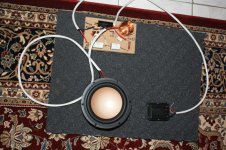
here is the dry run (no soldering) of the speakers and crossovers!!!! 😀
Both crossovers and all the speakers worked fine!!! 😀
They sounded pretty good, even though i only used low volume and one speaker hehe
I haven't had much time to work on the speakers around the holidays and because of another project but i got around this weekend to making the crossovers.
xpaaB.jpg
ZLMVl.jpg
I used a piece of 3/4" MDF Woof leftovers and laid out the components in the best fashion that i can without using extra pieces of wire. I want to go directly from the binding posts to the crossovers and from the crossovers to the drivers.
O5LVt.
Here are the components glued on with a hot glue gun 🙂
I decided to use SoniCaps for the signal path, Jentzen Inductors, Mills Reistor for the singal path and a Dayton Audio Cap for a parallel cap.
7YV91.jpg
here I tied the leads by making small hooks with the pliers.
iQuel.jpg
Here I soldered everything using the Aoyue 937+ Digital Soldering Station using Cardas Quad Eucetic solder set to 410deg C.
Zxhu2.jpg
uo4Wr.jpg
Got some nice solder Joints. The Cardas takes a bit of heating to flow real nicely but I have also used Wonder Solder and I think it took more heating but it flowed nicer.
5Chjw.jpg
here are the complete crossovers with all of the excess wire clipped and the terminals labeled. The wire connections wont necessarily follow an order but i wont be using any additional pieces or wire and using only the leads from the components.
JZ4Dq.jpg
here is the dry run (no soldering) of the speakers and crossovers!!!! 😀
Both crossovers and all the speakers worked fine!!! 😀
They sounded pretty good, even though i only used low volume and one speaker hehe
Attachments


Last edited by a moderator:
Those pictures are huge.
doesnt it automatically thumbnail them?!?
Just a couple FYI...
It's 'Paul Carmody'.
Something to consider if your amp does not like the load;
The 0.1uF cap across the woofer coil can have a 4 ohm resistor added to it in series so both units are across the coil. This will minimally affect the summation, and keep your amp happier.
I think you chose the right caps for the BG. The BG can sound kinda dark, and unlively. The sonicaps are a bit forward or bright to some people, and may help balance out this issue.
Good luck!
Wolf
It's 'Paul Carmody'.
Something to consider if your amp does not like the load;
The 0.1uF cap across.......
Wolf
Yeah sorry, by the time I realized I couldnt edit the title anymore :/
I can even edit the main post too :/
Maybe it's my inexperience but I am not quite understanding what u told me... affect the summation? Can u explan a little more?
You mean the 0.1uF cap would discharge/charge slower and wont be so demanding on the amp since the woofer is where most of the power is being drawn... make sense?
How would I know that the amp is not happy besides it blowing up? lol
Distortion, heat, some sound?
Before I selected the SoniCaps I went to Humble Homemade Hifi and there they reviewed pretty much all the existing caps (except Dayton lol) and I wanted to put something nicer in my speakers and the SoniCaps seemed to fit the sound and the wallet 🙂
"Compared to a standard Mundorf M-Cap they are more transparent and clearer with lots more depth."
It's good to hear that they will also compliment the Neo3's really well.
Thanks for the info!
 Photos fixed. 4.7Meg of inline photos is not a good idea. Please see this thread:
http://www.diyaudio.com/forums/everything-else/183084-pictures-why-not-attach-them.html
Thanks!
- Status
- Not open for further replies.
- Home
- Loudspeakers
- Multi-Way
- Paul Carmondi's ZX Spectrum - First Build (pics)