My first "real" DIY speaker project, actually, one of my first "real" woodworking projects besides a simple sealed subwoofer.
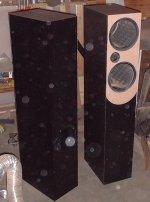
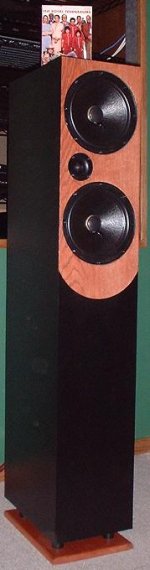
They are basically Adire audio's KIT281. I still need to clean up the edges, stain them, and put on some small pillar/bases I designed (yeah, I know, mounting the speakers/hardware too!)
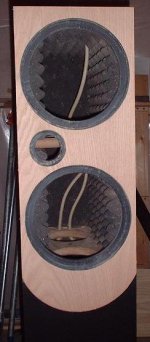
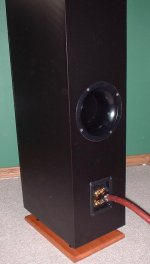
I decided to vent them out the back. I also ordered the wrong sized port (4"), so hopefully, a 90 degree bend in the port tube won't effect the sound too much (needed to fit 15.57" in a 14" deep box!).
I used plastic laminate (formica) all around, with red oak veneer.
I also entered the world of biscuit joining, for the first time ever (I've heard they are better for cabinets than screws). Besides to mount the port, it's all biscuits and glue. If I had to do it over again, I wouldn't have used so many freakin' biscuits, since gluing up even 2 sides is a frantic experience. The biscuits expand really quick, making your work setup really fast. Good thing I bought about 12 clamps, otherwise, I'd have ALOT of scrap 3/4 MDF...
If you work with formica, watch the edges! I've got 2 nice cuts from running my hand down them, even after cleaning them up with some steel wool.
I'll post again when I have the completed pics. I don't know what the heck those spots are in the image, but, I'll be sure to get better ones when they're complete.
Cheers.
😀
They are basically Adire audio's KIT281. I still need to clean up the edges, stain them, and put on some small pillar/bases I designed (yeah, I know, mounting the speakers/hardware too!)
I decided to vent them out the back. I also ordered the wrong sized port (4"), so hopefully, a 90 degree bend in the port tube won't effect the sound too much (needed to fit 15.57" in a 14" deep box!).
I used plastic laminate (formica) all around, with red oak veneer.
I also entered the world of biscuit joining, for the first time ever (I've heard they are better for cabinets than screws). Besides to mount the port, it's all biscuits and glue. If I had to do it over again, I wouldn't have used so many freakin' biscuits, since gluing up even 2 sides is a frantic experience. The biscuits expand really quick, making your work setup really fast. Good thing I bought about 12 clamps, otherwise, I'd have ALOT of scrap 3/4 MDF...
If you work with formica, watch the edges! I've got 2 nice cuts from running my hand down them, even after cleaning them up with some steel wool.
I'll post again when I have the completed pics. I don't know what the heck those spots are in the image, but, I'll be sure to get better ones when they're complete.
Cheers.
😀
Attachments
I tried to post some better pics, but the server keeps saying it exceeds the 100K maximum.
The file I am trying to attach is 44K. Maybe it adds up the total based on my userid?
The file I am trying to attach is 44K. Maybe it adds up the total based on my userid?

Very nice!
Where does one get this formica? And how is it to work with? Is it self adhesive or do you use glue?
Where does one get this formica? And how is it to work with? Is it self adhesive or do you use glue?
Kermit said:Where does one get this formica? And how is it to work with? Is it self adhesive or do you use glue?
Formica is actually a brand name... plastic laminate would be a generic name. Usually it is glued on with contact cement.
dave
Just go to any hardware superstore, and browse their countertops section. Usually, they will have various sizes of plastic laminate in stock colors. If you really want to go fancy, you can order just about any finish you could imagine.
I went with the plastic laminate because I'm new to this, and have never painted much of anything. I didn't think I could get a real professional finish, even if I prepped, primed and painted with 50 coats...
WIth plastic laminate, you get a deep, very scratch resistant, easy to apply finish.
Thanks for all the comments!
nope, I think they are audioquest ruby something. I can't exactly remember. There are actually 3 sets of wires in each cable, each one is a combination of mutliple twisted copper. Perfect for bi or tri wiring. Pretty sweet cables actually.
I got 15' pairs, with gold plated bananna plugs used, for something like $65.
I think I got a really, really good deal.
Anyone who sees them thinks I've got maroon garden hoses running to them!
I got 15' pairs, with gold plated bananna plugs used, for something like $65.
I think I got a really, really good deal.
Anyone who sees them thinks I've got maroon garden hoses running to them!
drfrink24 said:WIth plastic laminate, you get a deep, very scratch resistant, easy to apply finish.
It is also enuff to stiffen up the cabinet a bit...
dave
I entered the world of bi-wiring. Wow. It cleans up the treble, and make the soundstage much better.
Although, they are still breaking in, so, that could also account for the treble smoothing out.
Although, they are still breaking in, so, that could also account for the treble smoothing out.

- Status
- Not open for further replies.
- Home
- Loudspeakers
- Multi-Way
- My first "real" DIY speaker project