PEM style nuts are a great way to provide steel threads for machine screws in sheet metal. They are usually installed with a press. Lacking one, they can be pressed with a C-clamp, provided it has enough throat capacity. However it can be hard ensure that the nut is centered in the hole. If you're off you've ruined the hole. A simple installation method is to use a alloy steel cap screw, a hardened washer and an allen wrench. As you tighten, hold the nut with your finger so it doesn't turn before the teeth of the nut grab. Then tighten until the nut seats. Have extra screws on hand because after a few installations they stretch. On smaller sizes the screw sometimes breaks. This isn't a problem because the broken bit will thread out easily.
Everything necessary including PEM style nuts are available from McMaster Carr. (the mechanics Digi-Key) Make sure you get clinch and not broach broach style, Those are for soft materials.
Last edited:
If you oil the screws when drawing your pem nuts into place, the screws will last longer.
If you can get hardened screws, that will help more.
If you can get hardened screws, that will help more.
PEM made a hand-held "PEM-serter" but I've only ever seen one for sale. The automated PEMserters sell for several kilobucks. I believe that Krohn-Hite used these fixtures in their chassis.
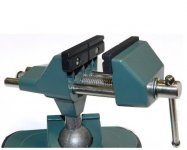
I have used a vice very similar to this one. (flat faced jaws though)
More than enough power for aluminum.
Just make sure the hole is a tight fit.
If the aluminum is not deformed under the lip by the teeth it will fall out when not held in by a screw.
More than enough power for aluminum.
Just make sure the hole is a tight fit.
If the aluminum is not deformed under the lip by the teeth it will fall out when not held in by a screw.
Attachments
Last edited:
If you oil the screws when drawing your pem nuts into place, the screws will last longer.
Duh, of course. Why didn't I think of that. Thanks. The #4's and #6's are the most troublesome. BTW, once they are started and firm, and you can fit the work onto a suitable anvil you can tap them home with a hammer. You want to pound the nut side.
That's a given for steel alloy socket head cap screws but good point. You don't want to use stainless steel or other metal screws, except perhaps titanium.If you can get hardened screws, that will help more.
Just make sure the hole is a tight fit.
Absolutely, you must use the recommended hole size. The proper sizes are listed with the screws on the McMaster Carr ordering tables or at the PEM website.
I often deburr holes with a deburring tool or a larger size drill bit. Do not do this on holes for PEM style nuts The hole must be square shouldered. A very small burr won't intefer with the nut teeth biting but a chamfer will. A sharp drill bit will help, better yet a punch. If possible drill from the nut side so a burr won't form where it matters most. If you must deburr use a file flat across the hole. If you slightly arc the metal and use a small file you can deburr without marring adjoining areas. A chamfer on the reverse side won't matter if the nut clinch depth is less than the metal thickness.
Which reminds me. PEM style nuts are made for different thicknesses of metal. They have different clinch depths. The deeper the clinch the stronger the nut will hold, but the clinch depth must be less than the metal thickness. However, it is fine to use nuts designed for very thin metal in thicker stock.
Another solution: A-T Inserts by AKV Industrial Products. The hand tool is inexpensive. Smallest sizes are #4-40 and 3mm. E
I have done a bodge in the past and it worked.
First I center punched the hole with a manual punch and a large hammer so that there was a bump on the other side and located this in a slightly over size hole in a bit of scrap fence post and bashed the punch through to a mark that was the correct tap size for the screw and ran a tap through.
It works with self tapping screws too.
+1 for PEM nuts. I installed a bunch of 3mm ones and found that they'd center quite well as long as I used the correct size drill for drilling the hole in the sheet metal.
~Tom
~Tom
Thanks for posting about this. The PEM products were not on my radar.
What is the typical use and advantage of this kind of "nut".
In the first pic it almost seems like the material is 1/8" thick and you could tap it, but I don't know the scale so maybe it's only 1/32" thick and we are looking at a #4 screw!
What is the typical use and advantage of this kind of "nut".
In the first pic it almost seems like the material is 1/8" thick and you could tap it, but I don't know the scale so maybe it's only 1/32" thick and we are looking at a #4 screw!
It's often a PITA to hold the work hold the nut and engage the screw and then how do you hold the nuts for the final panel. It looks professional.
The problem with bashing them is they bounce. Remember, If you don't get it right the first time...
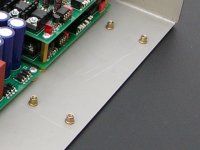
This was 1/16 stock with a #6 nut. I broke the screw and still had to tap it home. I realized later the little scrap I grabbed was tempered aluminum. Normal aluminum and mild steel are easier.
The problem with bashing them is they bounce. Remember, If you don't get it right the first time...
This was 1/16 stock with a #6 nut. I broke the screw and still had to tap it home. I realized later the little scrap I grabbed was tempered aluminum. Normal aluminum and mild steel are easier.
Yep, PEMs are great. You can get a lot more than just threaded holes too, there's studs, floating nuts, standoffs and captive screws.
Another type of thing that does this job is a nutsert (aka rivnut). They're rived in with a tool similar to a pop-riveter.
Another type of thing that does this job is a nutsert (aka rivnut). They're rived in with a tool similar to a pop-riveter.
Attachments
Agree.
I use this type, in aluminum because it's enough for my needs, but they are available in steel and even stainless steel for special purposes.
More than I want to pay though 😉
And yes, they are applied in a similar way to Pop rivets, although the steel one need a stronger machine.
There's even a pneumatic and an hydraulic version for Industrial use .
But for everyday use the pop hand riveter type is fine (and inexpensive).
I use this type, in aluminum because it's enough for my needs, but they are available in steel and even stainless steel for special purposes.
More than I want to pay though 😉
An externally hosted image should be here but it was not working when we last tested it.
And yes, they are applied in a similar way to Pop rivets, although the steel one need a stronger machine.
There's even a pneumatic and an hydraulic version for Industrial use .
But for everyday use the pop hand riveter type is fine (and inexpensive).

Using this will diversified the manual punch. Need to clearly place it on the stand.Sheet thread on metal can be put on using the structural engineering technique of placing with drilling the all four sides.
I prefer threaded inserts like JMfahey has pictured above.
You can get the crap one at
harbor freight for 20 bucks or buy a better models off amazon and other places.
You can get the crap one at
harbor freight for 20 bucks or buy a better models off amazon and other places.
- Status
- Not open for further replies.
- Home
- Design & Build
- Construction Tips
- Machine Threads in Sheet Metal