Hi All.
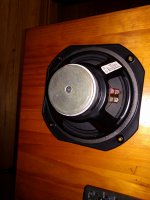
With lack of thought, I disassembled a number of Speaker drivers without noting their orientation to the Loudspeaker cabinets.
Is there a correct side up, or a convention when fitting Woofers?
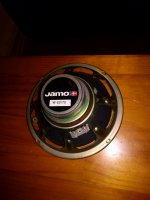
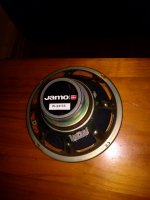
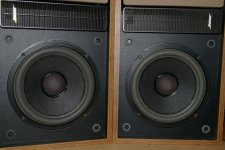
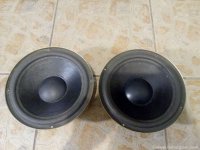
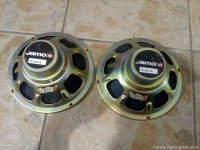
The Jamo drivers in two of the photos will shortly be refoamed.
I recall a particular tutorial on refoaming speakers.
After removing the dust caps the importance of using shims to centre the voice coil was stressed.
With vintage speakers, he also taught that wherever possible the original dust caps are kept.
These were marked with pencil to also ensure original orientation when later re glued.
He also taught the use of 2 shims at the 6 o'clock position to counter the effect of gravity on the cone assembly.
For this, and possibly other considerations, I thought I'd check with you guys before getting on with the refoam.
thanks
Cliff
With lack of thought, I disassembled a number of Speaker drivers without noting their orientation to the Loudspeaker cabinets.
Is there a correct side up, or a convention when fitting Woofers?
The Jamo drivers in two of the photos will shortly be refoamed.
I recall a particular tutorial on refoaming speakers.
After removing the dust caps the importance of using shims to centre the voice coil was stressed.
With vintage speakers, he also taught that wherever possible the original dust caps are kept.
These were marked with pencil to also ensure original orientation when later re glued.
He also taught the use of 2 shims at the 6 o'clock position to counter the effect of gravity on the cone assembly.
For this, and possibly other considerations, I thought I'd check with you guys before getting on with the refoam.
thanks
Cliff
Attachments

The suspension forces should dwarf gravity, I don't think you need to worry about this, though perhaps you might see a little sagging over time as the spider gets tired. Reversing the orientation occasionally would actually help if so. Unless the coil actually rubs in the gap I'd rest easy.
I presume the double shim trick endevours to pre-compenstate for sagging over time, but it might simply be superstition (to find out for sure would involve doing a fair few precise measurements on vintage drivers, or having a lot of experience.
I presume the double shim trick endevours to pre-compenstate for sagging over time, but it might simply be superstition (to find out for sure would involve doing a fair few precise measurements on vintage drivers, or having a lot of experience.
The suspension forces should dwarf gravity, I don't think you need to worry about this, though perhaps you might see a little sagging over time as the spider gets tired. Reversing the orientation occasionally would actually help if so. Unless the coil actually rubs in the gap I'd rest easy.
I presume the double shim trick endevours to pre-compenstate for sagging over time, but it might simply be superstition (to find out for sure would involve doing a fair few precise measurements on vintage drivers, or having a lot of experience.
Thanks Mark.
So, with your advice, I'll aim to orient the drivers with the electrical terminals upwards closer to the crossover location.
I'll mark them with a 12 o'clock position for future orientation and double shim at the 6 o'clock position (taught by a speaker guy with 40 years specialising in speaker repairs.
It's interesting to learn of differing techniques and practices in the industry.
Maybe a cross road of art vs science!?
Please forget the crude double shim trick, causes more harm than good, unless it´s a desperately rubbing speaker (not your case at all) and in that case it´s not automatically "6 o clock" either, but whatever´s needed to correct the rub.
As in: take Aspirin IF having (light) fever,but not "just in case".
Since there is very little information around, no books on the subject, etc., it´s common to have "experienced old hands" who learnt the trade on their own.
Fine and most can do a good job, but sadly a few develop funny pet ideas.
In this case, don´t overthink it, specially since besides the (normal) rotten foam edges, the rest seems to be fine.
Good luck with your refoaming 🙂
Please forget the crude double shim trick, causes more harm than good, unless it´s a desperately rubbing speaker (not your case at all) and in that case it´s not automatically "6 o clock" either, but whatever´s needed to correct the rub.
As in: take Aspirin IF having (light) fever,but not "just in case".
Since there is very little information around, no books on the subject, etc., it´s common to have "experienced old hands" who learnt the trade on their own.
Fine and most can do a good job, but sadly a few develop funny pet ideas.
In this case, don´t overthink it, specially since besides the (normal) rotten foam edges, the rest seems to be fine.
Good luck with your refoaming 🙂
Thanks.
I'll take your advice.
This way orientation isn't an issue.
C
I have sucessfully refoamed a pair of Bose 301 drivers without having to resort to using shims, and hence not having to remove the dust caps.After removing the dust caps the importance of using shims to centre the voice coil was stressed.
The rear suspensions (spiders) of the Bose drivers were particularly supportive of the cone and provided a self-centering action. I realise that this may not be the case with other drivers.
Attachments

I have sucessfully refoamed a pair of Bose 301 drivers without having to resort to using shims, and hence not having to remove the dust caps.
The rear suspensions (spiders) of the Bose drivers were particularly supportive of the cone and provided a self-centering action. I realise that this may not be the case with other drivers.
Thanks G.
I remember the Speaker guy saying he routinely removes the caps and shims as it gives him the opportunity to inspect the voice coil and clean the slot if necessary.
That speaker guy was obviously a perfectionist, Cliff! 😉
Sadly another roadblock.🙁
Had a go at gluing the new foam on the Jamo's.
The glue wasn't adhering to the edge of the cone.
Tried twice, but it appears an earlier owner has coated the paper cone.
The cone appears extra glossy along the edge, which had been covered by the deteriorated foam.
Too glossy for the glue to adhere.
I suspect I'll need to try sandpapering the edge.
Maybe start with a 180 grit and hope I don't make a mess????
Both are "right" depending on circumstance 🙂
A DIYer may cause more harm than good removing the dustcap and in many cases can get lucky and not need reshimming.
A Pro has better chances of replacing dust cap properly.
A DIYer may cause more harm than good removing the dustcap and in many cases can get lucky and not need reshimming.
A Pro has better chances of replacing dust cap properly.
Even if previous owner recoated cone, there should be none of the evil stuff where you removed the rotten foam edge 😕The glue wasn't adhering to the edge of the cone.
Tried twice, but it appears an earlier owner has coated the paper cone.
The cone appears extra glossy along the edge, which had been covered by the deteriorated foam.
Too glossy for the glue to adhere.
Kow did you remove it?
Sanding the remains? Carefully scratching them with a very sharp knife?
Soaking it in acetone and wiping the gooey paste away?
I suggest doing the soaking and wiping a couple times, least harmful tocone fibers and will remove both old adhesive, "coating", rotten foam and your last applied adhesive.
Just do it carefully, wet paper is weak.
As of adhesive, it must be thickish proffessional carpentry grade PVA; some home/school use type is more watered down than cheap tavern beer.
It may be too aggressive and remove too much paper.I suspect I'll need to try sandpapering the edge.
Maybe start with a 180 grit and hope I don't make a mess????
Are you using tacky PVA glue, Cliff?
I have 2 different glue preparations.
Tried both.
I had a pair of Marantz Speakers which I used for experience.
Re foamed them with the same glue with good results.
It's tacking on the foam, but not on the glossy cone.
I also squeezed some onto card and used this from which to dip an artists paint brush. The blob of glue was quite tacky and adhered well to the porous card.
I had to quickly remove the glue using a wet sponge once I realised.
Both are "right" depending on circumstance 🙂
Yes, JMF, after ensuring the voice coil was still moving freely in the magnet gap, I made the judgement to steam ahead and affix the replacement surounds.
I was going to play a low frequency tone (10Hz) through the woofer while the adhesive was still wet. This is said to be helpful in settling the new surround into a central position. I didn't though, and I got away with it! 😎
Even if previous owner recoated cone, there should be none of the evil stuff where you removed the rotten foam edge 😕
Kow did you remove it?
Sanding the remains? Carefully scratching them with a very sharp knife?
Soaking it in acetone and wiping the gooey paste away?
I suggest doing the soaking and wiping a couple times, least harmful tocone fibers and will remove both old adhesive, "coating", rotten foam and your last applied adhesive.
Just do it carefully, wet paper is weak.
As of adhesive, it must be thickish proffessional carpentry grade PVA; some home/school use type is more watered down than cheap tavern beer.
It may be too aggressive and remove too much paper.
The original foam was considerably perished and powdered very easily.
I used a stanley blade and mostly used the blunt edge to scrape any bits off the cone.
The cone appeared extra glossy where it had been covered by the old foam.
Very smooth & glossy, almost like a black painted finish.
Maybe 300 grit gently just to scuff the surface and remove the impervious gloss.
Can't you name them, Cliff?I have 2 different glue preparations.
Can't you name them, Cliff?
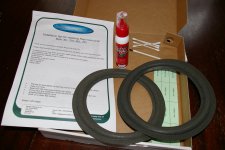
1. Crafterschoice Tacky Craft Glue (super tacky)
&
2. No Name preparation sold specifically as a loudspeaker foam glue.
Attachments

Not knowing what the composition of the cone is, I suggest you carefully use a fine grit simply to roughen the circumference of the cone then coat it with a thin layer of your tacky glue. Allow that layer to dry then repeat as necessary.
My hope is that will provide a stable, compatible base onto which to glue the foam surround.
My hope is that will provide a stable, compatible base onto which to glue the foam surround.
- Home
- Design & Build
- Parts
- Is there a correct orientation of Woofer Drivers?