I’m looking for an ir receiver (3 pin) that I can mount to a black anodised 10mm thick panel. I’ve googled like mad and found very little - what I have found that are available in the UK are large (32mm). Others are smaller at 16mm but I can’t see how to buy them or even how much they cost. I have been thinking about adapting a panel mount LED housing or a proximity sensor housing but I’d rather buy the right thing and not have the faff of trying to adapt something. I don’t know how easy it would be for an engineering company to make a suitable hole with a CNC machine and fit some dark smoked acrylic into the hole. Has anyone got any ideas or experience or good advice?
The only IR receivers I have ever seen look like small plastic body transistors - (TSOP58238).
Milling aluminium is easy with a milling machine: See if there is a model engineering group or makerspace near you.
I believe it is also possible with a router but never tried.
Test your acrylic first for passing IR - I have used red transparent acrylic.
It looks dark when fitted because no light behind.
I have often thought a panel mount or surface mount IR sensor with its own housing would be useful but never found one.
Thanks for your quick response. I have to get the front panel milled for a TFT display to be installed so getting another hole cut should be simple enough. I hadn’t considered that the acrylic might not pass the IR - I’ll get some samples and have a play.
Your Google must be broken.
https://www.mouser.be/c/optoelectronics/infrared-communications/infrared-receivers/?q=ir receiver
Jan
https://www.mouser.be/c/optoelectronics/infrared-communications/infrared-receivers/?q=ir receiver
Jan

Hi. There exist types that look like panel mount fuse holders with a lens instead of the fuse cap. These are used in luxury furniture to be able to operate devices with closed lids. A built in IR extender.
Recently I repaired a hinge of such a cabinet and saw it for the first time. Needless to say this was not understood as the power adapter was sleeping in the cabinet 🙂
Recently I repaired a hinge of such a cabinet and saw it for the first time. Needless to say this was not understood as the power adapter was sleeping in the cabinet 🙂
Last edited:
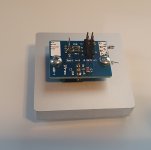
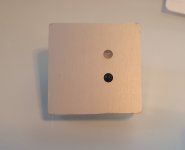
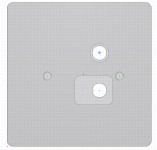
Fair enough. This is how I solved it, the proto for a larger front panel.
The IR receiver is mounted on a small PCB and rests in a cavity that ends in a 3mm hole so it peeks out.
The other thing is a 3-color LED for status indication.
Needs some metalwork though.
Jan
The IR receiver is mounted on a small PCB and rests in a cavity that ends in a 3mm hole so it peeks out.
The other thing is a 3-color LED for status indication.
Needs some metalwork though.
Jan
Attachments
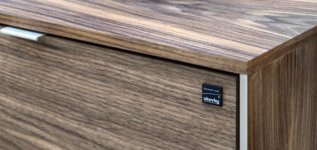
Will look that furniture brand up. Very simple and good looking but unobtrusive version. Mount in a wood cabinet door so likely 18 mm suitable. Just 1 hole needs to be drilled. Has cabling too.
Edit: found it. Skovby used 30..60 kHz round panel mount IR sensors until recently. Today they use a version which is both brand label and IR sensor it seems. So no picture of the round one, sorry.
Edit: found it. Skovby used 30..60 kHz round panel mount IR sensors until recently. Today they use a version which is both brand label and IR sensor it seems. So no picture of the round one, sorry.
Attachments
Last edited:
There are also several versions for some types that differ in sensitivity and in-build AGC.
For typical home use you can relax on the AGC and select for higher sensitivity.
It pays to look through some data sheets and look up terms - they are often unfamiliar for us audio guys.
Jan
For typical home use you can relax on the AGC and select for higher sensitivity.
It pays to look through some data sheets and look up terms - they are often unfamiliar for us audio guys.
Jan
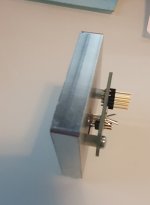
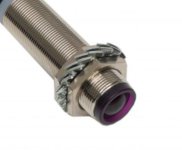
It is one of those 3-pin TO-92 - similar parts.
The body is bend 90 degrees to sit in the cavity with the pins in the small PCB.
Similar to this:
https://www.mouser.be/ProductDetail/Vishay-Semiconductors/TSMP93100?qs=mELouGlnn3cGT2QRGxJA2w==
I have the Front Panel Express design for the front panel if anyone wants it.
Jan
The body is bend 90 degrees to sit in the cavity with the pins in the small PCB.
Similar to this:
https://www.mouser.be/ProductDetail/Vishay-Semiconductors/TSMP93100?qs=mELouGlnn3cGT2QRGxJA2w==
I have the Front Panel Express design for the front panel if anyone wants it.
Jan
Attachments
Or this one:
https://www.infraredremote.com/wp/product/panel-mount-16mm-metal-infrared-receiver/
Similar but nicer looking:
https://www.infraredremote.com/wp/product/panel-mount-receiver/
In the UK so expensive:
https://k2audio.co.uk/products/keene-ir-panel-mount-receiver-black
In chrome:
https://www.keene.co.uk/keene-ir-panel-mount-receiver-chrome.html
DIYaudio.com. You ask for a nut and after a few pages people steer you to replacing the engine 😉
Last edited:
With 10 mm panel thickness you can easily drill the hole with the right drill for flush corners. Tape the surface. Then either glue the sensor at the back and in the hole with 2 component glue (after testing!) or mount it to a small thin metal plate that itself is mounted at the back of the front cover with 2 undeep M3 holes and some distance with short 10 mm standoffs M3. Never the second nut at the front side as that would be plain ugly.
Drill with the right drill and with a steady hand with the stuff clamped and a drill press. Last week I first tried out ultra sharp kobalt drills for a perfect flat hole. The less play there is between the sensor and front cover the better it is.
Probably thread taps exist for that particuliar thread too but that would make it expensive. If you know people that tap thread on metal pipes they will know how. A visit to a metal company can be rewarding too. Just make sure they understand you need a perfect surface without scratches/reworking. Tape the cover in tape beforehand and protect/transport it yourself the whole time.
Attachments
Last edited:
Spotted these. You would need little more than a hole in the front panel:
https://cpc.farnell.com/dfrobot/dfr0094/gravity-digital-ir-receiver-module/dp/SC15099?st=ir receiver

When I added full remote control to my amp I mounted the sensor behind the panel.

https://cpc.farnell.com/dfrobot/dfr0094/gravity-digital-ir-receiver-module/dp/SC15099?st=ir receiver
When I added full remote control to my amp I mounted the sensor behind the panel.
Not wanting to be always crticising but OP has a 10 mm front panel and IR sensors eh… want IR beams coming from various angles. Imagine having to point the remote control to exactly the middle of the hole. Error by design.
Besides godawful modular hardware designing (like it is software) also a very annoying thing in audio. The devices I have had that exhibited such behavior were quickly modified or even sold. The virtues of Bluetooth/RF remote control are big bonus despite aversion against RF 🙂 But then one needs a cutout in the metal which is even worse to DIY.
To be complete: blue stand-by LED searchlights lighting up the whole room at night in eerie blue light and devices that fart or plop at power on/off are shared number 3.
Attachments
Last edited:
10mm is thick but that also gives opportunity to mill it out at the back to let the little lens on the receiver get close to the front.
Just one other thing I will mention, IR receivers typically have a centre frequency they are tuned to to correspond to the carrier of the transmitter. From memory these were typically around 36kHz to 40kHz (38kHz was a common one) and best results are if the transmitter and receiver match.
Just one other thing I will mention, IR receivers typically have a centre frequency they are tuned to to correspond to the carrier of the transmitter. From memory these were typically around 36kHz to 40kHz (38kHz was a common one) and best results are if the transmitter and receiver match.
A famous person once said: "What is easier to the average usually metal phobic audio DIYer, milling or drilling?"
Maybe I read the first post not so well what OP exactly wishes, I am not a native speaker.
Maybe I read the first post not so well what OP exactly wishes, I am not a native speaker.
Last edited:
One way to do it is to design a small pcb to mount the IR sensor on with it being lead bent at 90• have the 3 holes to solder the wires. As said mill the back of the panel to a depth and size to just fit the pcb. On the front make the round hole big enough to have the IR lens stick out through it. Have to insulate so nothing shorts to the metal panel. Some glue to hold the pcb in place in the milled out cavity and secure the wires.
Last edited:
Could something like this be used?
https://www.lcsc.com/product-detail/Infrared-Remote-Receiver-IRM_TONYU-DY-PT333B-A0-HF_C7470721.html
https://www.lcsc.com/product-detail/Infrared-Remote-Receiver-IRM_TONYU-DY-PT204B-A5_C7470722.html
They are 2 pin and I don't know if they are suitable.
https://www.lcsc.com/product-detail/Infrared-Remote-Receiver-IRM_TONYU-DY-PT333B-A0-HF_C7470721.html
https://www.lcsc.com/product-detail/Infrared-Remote-Receiver-IRM_TONYU-DY-PT204B-A5_C7470722.html
They are 2 pin and I don't know if they are suitable.
- Home
- Design & Build
- Parts
- IR Receiver