Hey guys.
Well i decided to share my experience on building this lovely set of speakers. And turned out i was already registered on this forum anyway (can not
remember how or when this happened).
Anyway lets start.
So my friend suggested to build a HT on 5 Speedsters, and i said OK. As i don't know much about it. We ordered 8 Kits, 5 for me, and 3 for him. I
make mine from 0.5" (12mm) MDF with front port. Initial idea was to make back wall as an access panel, but had to scrap it because i did not want to
block the port and do extra work with sealing it properly. So we cut a sheet of MDF in the store, but not all bits, but only mayor sizes (lengthwise) and cut the rest with a hand saw. I used wood dowel plugs to secure the pieces together and glued everything with PVA. Leaving back panel for last. Picter are coming. Just uploading to google drive.
Ok here is the pictures. https://drive.google.com/folderview?id=0B8hH9_3TV9aBdDl3ZEtjenRERDQ&usp=sharing
Pre cut material

Getting the idea how to glue it

Didn't want to any thing to move, so i decided to use dowel pins

Next thing was to mark the centers for the pins

More explanation to fallow, need to run! 🙂
Well i decided to share my experience on building this lovely set of speakers. And turned out i was already registered on this forum anyway (can not
remember how or when this happened).
Anyway lets start.
So my friend suggested to build a HT on 5 Speedsters, and i said OK. As i don't know much about it. We ordered 8 Kits, 5 for me, and 3 for him. I
make mine from 0.5" (12mm) MDF with front port. Initial idea was to make back wall as an access panel, but had to scrap it because i did not want to
block the port and do extra work with sealing it properly. So we cut a sheet of MDF in the store, but not all bits, but only mayor sizes (lengthwise) and cut the rest with a hand saw. I used wood dowel plugs to secure the pieces together and glued everything with PVA. Leaving back panel for last. Picter are coming. Just uploading to google drive.
Ok here is the pictures. https://drive.google.com/folderview?id=0B8hH9_3TV9aBdDl3ZEtjenRERDQ&usp=sharing
Pre cut material
Getting the idea how to glue it
Didn't want to any thing to move, so i decided to use dowel pins
Next thing was to mark the centers for the pins

More explanation to fallow, need to run! 🙂
Last edited:
Pre cut material
Getting the idea how to glue it
An externally hosted image should be here but it was not working when we last tested it.
Getting the idea how to glue it
An externally hosted image should be here but it was not working when we last tested it.
18db crossover on the ribbon ?
and this is on the full range forum why ???????????
Excuse me. But it did not find where to post it. Could you direct me and let me know who to ask so we can get it moved to right place?
Thx 🙂
Hey, i am back. Got mu finger broken, and was a bit lazy to comment on not so many changes in the progress.
Drilling 4mm hole for the pins

Chopping it down with a hacksaw blade.

All glued and ready to go together.


All clamped down. With 3 ratchet straps and few clamps. Straps left the marks on the corners, but i got rid of it with some sanding and rounding down the edges.

Drilling 4mm hole for the pins

Chopping it down with a hacksaw blade.

All glued and ready to go together.


All clamped down. With 3 ratchet straps and few clamps. Straps left the marks on the corners, but i got rid of it with some sanding and rounding down the edges.

Last edited:
Don't clamp too hard or you end up like me 🙂
It cracked after few hours.

Broke the finger at work, so had to stop for a while

1st try. 1st speaker i decided to paint straight away. It didn't go that well.

Rest of them i was filling first

1st painted with spray cabinet. As you can see there is joints visible because i did nto use the filler. And the finish was not satisfying. I sprayed it outside, and wind messed it all up.

It cracked after few hours.

Broke the finger at work, so had to stop for a while

1st try. 1st speaker i decided to paint straight away. It didn't go that well.

Rest of them i was filling first

1st painted with spray cabinet. As you can see there is joints visible because i did nto use the filler. And the finish was not satisfying. I sprayed it outside, and wind messed it all up.

I decided to go with another paint, and i chose Dulux Quick Dry satinwood. Never buy this ****!!!! It does not dry! I had it for two weeks, and it was tacky plus everything tend to stick to it. And i heard other lady complaining about this paint in the shop.

It looks all right, but i can not work with it as it tacky and all dust sticks to it.
In the mean time i was working on PCB for the XO.
1st trial design.


This one is slightly improved 🙂

Result


It looks all right, but i can not work with it as it tacky and all dust sticks to it.
In the mean time i was working on PCB for the XO.
1st trial design.


This one is slightly improved 🙂

Result

Under coils i got double sided sticky tape. to hold them in place and to get rid of any vibrations, all other details are in the air, i put a bit of card board under it while soldering, so it is about a mill in the air.
After this crash with the paint, and some forums, i went with .... masonry paint! 🙂 Super fine outdoor masonry paint. And it did the job. Look nice matte color. Dont pay attention to the port color, it got fixed, pics will fallow later.

After this crash with the paint, and some forums, i went with .... masonry paint! 🙂 Super fine outdoor masonry paint. And it did the job. Look nice matte color. Dont pay attention to the port color, it got fixed, pics will fallow later.

So this is what i use for dumping.

Any ideas on why not to use it? 🙂. I did not wanted to go with fiberglass. And Poly what came with the kit was not enough as i thought. So i got the roll of this thing.
Cut two pieces size of the side, and they filled the cabinet perfectly. I even decided not to fix it anyhow to the internal walls.

What do you think guys?

Any ideas on why not to use it? 🙂. I did not wanted to go with fiberglass. And Poly what came with the kit was not enough as i thought. So i got the roll of this thing.
Cut two pieces size of the side, and they filled the cabinet perfectly. I even decided not to fix it anyhow to the internal walls.

What do you think guys?
Btw drivers will be fixed with torx screws and t-nuts. Had to shorten the nuts for the tweeter. But filing was quite easy. Cabinet does not have any access panels or walls.
Be sure to secure the T-Nuts with some epoxy. Nothing worse than pushing a T-nut out and having to use a lot of force or drill or whatever to dismount the driver.
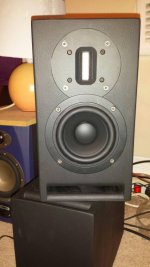
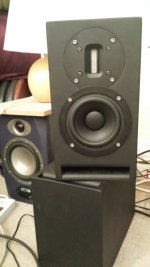
What do you mean? I got tge behond the drivers and it look solid. It shoukd not come out. I can use a lock tight on tfe bolts. But i think this is an overkill. It ment to be fixed with screws and i got m4 bolts. Here is the final look 🙂Be sure to secure the T-Nuts with some epoxy. Nothing worse than pushing a T-nut out and having to use a lot of force or drill or whatever to dismount the driver.


Last edited:
- Status
- Not open for further replies.
- Home
- Loudspeakers
- Multi-Way
- Home Theater build on Paul Carmody's Speedsters


 moved to multiway.