well, My 585 has finally reached its retirement ere..for now.
classic popping on power/on/off-...humming.. and I thought I had bad cables as I was never aware it was a common issue .. so I hooked up a test speaker .. polk audio .. ((first mistake)) yes, of course I blew it!! my heart sank, but I got that issue covered.. I disconnected my amp and have been since doing research to see what the problem could be... and found all this great info here.
Now , I am pretty fair with electronics.. or.. at least not afraid to dive in , but I think I should have someone with experience repair this , both channels are working. didn't have any fault lights, hadn't used the amp in a year, last time I used it it was fine,This just happened a couple days ago. so I am assuming the leakage has occurred and whatever damage that usually does is repairable.. the question is.. where to fix in D/FW (Dallas Fort worth area) .......
that won't break the bank, or if its something I can just attack myself.. with patience and a good guide I can do that too. but certainly not going to do anything without asking around first.
any takers on advice for repair shop here or guide to DIY for the eager!!
Thanks in advance- I had it running thru the ACE 515 conditioner,and GTP-500II if that pre-answers anything!
Thanks in advance
P
Last edited:
You have seen the reports of bad cap in the GFA-565 and GFA-585 throughout this form and on the internet. If it was just a matter of replace the caps it would be an easy task. The problem is the fluid that leaks from the caps can damage the traces and pads on the boards. Some clam they have been successful just cleaning the boards with alcohol. This type of cleaning is the least successful and may take several attempts before all traces are removing, depending on the severity. The best and most complete way to clean these boards is through ultrasonic bathing with a mixture of simple green and RO water or equivalent. Also the electrolytic fluid can damage pads and traces on the board that will need repair before they can perform property. Some parts will need to also be removed from the board before proper cleaning can take place. If the proper repair is not done the amplifier will be a never ending source of trouble experiencing noise and high DC offset at the speaker terminals. I cannot stress this enough, any part that has had contact with lytic fluid must be completely cleaned or replaced. I have seen a few “Technicians” advertise a “low cost” repair for this type of repair. They may or may not be doing a trough cleaning and replacing the associated parts with quality replacements. That’s an argument I do not want to enter into. I have found very few 565/585’s that are a “easy fix”. Most of these units if not all take hours if not days to restore to the glory. Here is a pic of a 565 board I got in a few weeks ago for restore. Notice the damage in the upper right of the board. Now the the board has been repaired and restored to working condition including pad and trace repair. The last step will be to install the board and spray the board to seal with acrylic conformal coating. This must be done as some of the mask had to be removed.
Attachments
Last edited:
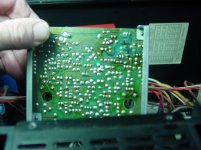
585 top view ,where to locate leak-what to remove.
And just to verify damage.. where should I be looking exactly.. for the board that gets leaked on? here is a view from the top.
I don't know when I will be able to even bring it in for repair, but it seems to me the important thing to do right now is stop the bleading and prevent further damage. Can anyone gibe me some tips as to whahat all needs to be seperated to accomplish this. at least the damage won't get any worse that way.
Attachments
Unfortunately any damage that’s been done it done and over with. My experience is that once they start leaking the fluid escapes and travels down the leads of the cap to the foil side of the board. Usually very little gets on the component side of the board but it still happens. I don’t know how many times I’ve heard “I never seen any fluid on the top of the board”. So trying to stop any further damage at this point may be mute. I would not advise unless you have good skills in rework to remove the lytic’s from the boards. Remember doing this without the proper equipment and skill can damage the pads and traces more than they already are. Pad and trace repair can start to add up unless it’s just hacked back together with jumper wire and paper clips, I have seen this more than once in customers units. You may be one of the lucky ones that caught it as it just started happening but even so the boards will need to be cleaned and reworked just to what level you will not know till you remove the input boards and inspect them. The 585 is not a beginner amp to work on and care must be taken when working with any high current amp. The input boards are the the two in the center rear.
Last edited:
Thanks alot- I take it you do this for a living!
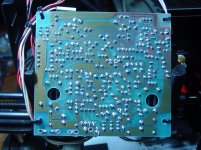
I did pull the input boards, and I would agree I may be one of the lucky ones. RIght channel board has one questionable spot, the left channel board has nothing. I am getting it under the magnifyer light and dental eye scope- I have an ultra sonic and plenty of tools - like I said I will not attempt to do any adjustments, but I am qualified to remove and replace any indiviual components that need to be replacesetc. the question is identifying IF ther actually is damage. I don't believe in fixing it if its not broke, but replacing parts that everyone knows are eventually going to go bad would be the right thing to do at this point. here is a pic of the left channel input board. let me know if it looks questionable to you. I need a new meter, I hadn't mess with electronics in 20 years, so all my meters are kinda banged up or not functional tat the moment- U used to build crossovers and design speakers and repair small electronics etc . but as things became throw away design, I quit doing it, , I hadn't run across much that even deserves my attention until now. now I agree, with one thing you say, about the damage, whats done is done.. however, if is leaking. then removing the leaking part will prevent the damage from continuing and getting worse. I am just trying to stop it while I
am in a position to. its kinda like rust, if you leve it alone it just gets wors over time, if you at least prep the area you prevent the spread- ( i don't do body work or anything, just common sense) agreed? Im just sayin! now I have it all apart - and time to change the situation, - if I break it - oh well- but here in dallas, I could pay someone to basically do the same thing and be out money for nothing- I have not found anyone that even works on stuff. I could also just mail the input boards to someone and they could do the right thing . that is the bigges problem. I cannot find anywhere local to help. I am not shipping a 50 LB monster- the shipping alone is too much not to mention risks involved with shipping. I thought this was the DIY forum where people did it yourself- Its really not so bad I cannot make a difference based on others experiences with this unit- it has all the usual symptoms that everyone complains about. I went years without a problem, so ther was no reason for me to even be aware of it. ( it is number 1350 BTW)it may be part of a batch that had the good batch of caps? who knows. I can only speculate until I get feedback. you are the only one that has offered feedback. I cannot spend 2 or 300 dollars repairing these days either. do you know any place in DFW, that was part of my original question. still I would rather take it to the experienced guy, but if not I have no choice but to get advice and do it myself. which I can do if I take it slow.
removed input boards- inspected, zero signs of leakage- boards do not have any corrosion like the pics above on other post- gonna give the amp away to first taker-it works- just pops when you turn on and hums when its cold. low voltage out of right output - enough to burn a speaker, but plenty of you guys can fix this easy.
can an experienced GFA 585 GUY verify this CAP
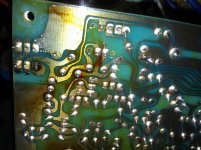
There are 2 blue ones and two brown ones on the input board- the two brown ones have gunk on the pinout side connected to the board, - looks like fairly newgoo and no damage to the board whatsoever. wouldn't you think it's possible I caught this in time to not have damage to the board. seems likely to me, but only someone that has seen the "leaky cap problem would know. if it is, it is a no brainer to replace them, and just have someone do some adjustments from there -That seems rather cost effective to me. the other input board does not have the goo on the same caps, and like I said in the beginning, it is the right channel that is blowing small speakers, my big speakers are fine. they were the ones hooked up when I noticed the poping at power up and power down.
can anyone verify this, and then tell me what is the best replacement cap if not the original or same one.
Seen in pic 1&2- the gooey stuff on top of brown cap the other two caps that look likey would be at the bottom right (in pic 3) look fine on both sides of the boards. really the boards look pretty remarkable- there is a little corrosion on one transistor pin, but nothing unusual. in my experience
can an experienced GFA-585 GUY verify this please- I was seriously considering giving the am away , but now that I see the boards are fine, I really think its going to be an easier fix than anticipated. (everyones assumption is the boards are leaked on- it hadn't made it that far. even the pins themselves do not have any goo on them but you can see it heading that direction.


Not as bad as it could be, still need to remove any trace of the lytic fluid top and bottom of the board. You can use the Panasonic FC capacitors from Mouser electronics. I would replace All the Lytics on each of the input boards. It still may take severial cleaning before any trace of the fluid is removed. When you smell anything like old fish while soldering you still have lytic fluid on the pads or traces. That fluid is just nasty and can realy cause problems as it's conductive and very hard to see. I also see severial solder connections that are also affected, they should have the solder removed from, cleaned and resoldered. Your solder connections should be smooth with no pin holes or corrorsion. Also any part that has been in contact with the fluid should be removed and cleaned. You can use a 000 steel wool to remove corrosion but you must be carfull not to leave any traces of the wool on the board or part. Make sure you check every part in that area very well, take your time and use a magnafiying glass or loop to inspect with ample light. Just leaving a little of the fluid behing can cause problems.
Last edited:
Thanks
funny what shows up in a picture as opposed to the naked eye- it looks much wors when taking a picture. I am in the process of cleaning, now. I am in no rush and think I can at lease get it cleaned properly. slow and steady!.
I hit it with the soldering iron removing 2 of the brown caps, and 2 blue- I'm not sure what they do yet , I just downloaded a schematic. but I 'm not going to go beyond what is necessary. the caps appear to have just started leaking, and no bulging on the tops. , I'll replace them just the same since they are out.
now is where the experience comes in. I cannot see your picture very clear of what damage looks like when the electrytic gets on the board. is appears I may have some on there, but it is hard to tell with the usual heat spot discoloration and protective spray used originally. in the picture it appears to have some bubbling in a couple areas, but under magnification and lights, that is not present. so its really looks like a toss up of deep to clean. because there is almost no sign of leakage on the board, but I'm sure theres a thin layer I am not aware of. so I clean anyway. all traces seem to be intact. what do I spray it with after its cleaned. I repair computer motherboards, the traces are much thinner and alot of time I use copper telephone wire to repair, no spray necessary! I am not going too do that here, and it is not necessary as all traces are intact.
Thanks for having a look. and commenting. I have a guy to do the adjustments and testing after I get it cleaned and replace the caps. anything else I should replace sine I'm at it, and for the record, I can't believe how easy it is to gt to everything on this, some of these guys complaining how difficult it is obviously never had to take a laptop apart and repair the motherboard- THAT is a mother-*&56ker! Id do this any day over that!
The board is pressed fiberglass and yes traces of the fluid will seap into the board at some point. You will not see bluging in these cap like the bad caps in computer mb's. Some times the board wil have to be cleaned down to the copper traces. After the board is compleated get some conofrmal coaating from Mouser, like 30+ a can do not use clear spray paint, it's not the same. Just make sure when you order the caps from mouser you look at the size of the caps to make sure they will fit. The only adjustments are the BIAS and unless your friend has done a lot of 565's it can easly be done wrong. Even the manual leaves out step's on this adjustment. The unit also should be qualified by distorshion test SIAND and DIST using a HP8903A and scope or equiv. There is no way I could advice you on parts replacement other then the lytic's without testing the unit myself. Goodluck.
Ed
Ed
Before cleaning, remove the bias pots and metal brackets. I use Simple Green cleaner diluted about 1 part to 10 parts RO water. Let the boards soak in a plastic tray for about 15 minutes and scrub with a soft nylon acid brush. Rinse well and repeat; the board has to be totally free of electrolyte contamination and it may take several cleaning cycles. I use a hair dryer on low to dry the boards and then let them air dry for at least a day. The capacitor electrolyte is colorless and very difficult to see without a magnifying lamp. The three 220uF electrolytics (per board) are the problem and the leaky cap issue applies to the GFA-585 and the GFA-565 monoblocks. Be sure to remove the DC servo IC and clean the chip itself, especially underneath and between the pins. While you are at it, replace the two 100uF bypass capacitors.
- Status
- Not open for further replies.
- Home
- Amplifiers
- Solid State
- GFA-585 LE ADVICE!