Just another bit of input...
I use the Jasper jigs too - great tool. I always use a spoilboard and I clamp the baffles and the SB to the bench together. I've gotten into the habit of using two 1-1/4" finishing nails to hold the center piece down. Just nail it (nails 180 degrees apart) to the spoil board and use a 1/8 pin punch to set the heads below the top of the baffles. I don't really have a use for the center plugs, so the nails don't bother me. They're easy to pull off the SB with a claw hammer when you're done. It's a lot easier than dealing with double back tape.
I use a 1/4" carbide bit (basically an end mill) like most people and do the 3/4" material in 3 cuts. You could could do it in 1 or two, but why stress out over it? Take your time and enjoy the sawdust. 🙂
Boris_The_Blade said:Next time i will make my own jig with a piece of scrap wood I think.
This is what I do. You get the exact radius needed and no slippage. Doesn't take much time to setup either and a single bit of wood will cut many holes - infact I've been using the same jig for around 3 years now and its done a lot of cutouts!
An externally hosted image should be here but it was not working when we last tested it.
MJL21193 said:
Hi Chris,
I had to make a template for that and use a follower bit. With that curved baffle, that's the only way (that I know of) to make the driver recess flat.
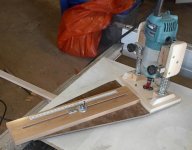
MJL21193 said:Here's mine - all DIY.
We might disagree on the plywood thing,
 but nice work - I especially like the calibration on your compass jig.
 Something like this'll take a while to fabricate, but will be far more flexible than either the Sears or Jasper jigs. It's also handy to have a plunge router dedicated just to the circle jig.
" Here's mine - all DIY."
Nice idea John. I keep forgetting that jigs can be made of wood. 🙂 I've got a new Freud plunge router that I've been wanting to use but the Jaspers don't have the hole pattern for the base. Your jig idea gives me some nice options.
Nice idea John. I keep forgetting that jigs can be made of wood. 🙂 I've got a new Freud plunge router that I've been wanting to use but the Jaspers don't have the hole pattern for the base. Your jig idea gives me some nice options.
I too have a simple jig made of wood and it works just fine.
My tip for avioding the problem of cutting right through so that the center piece of wood breaks free.
1. I place a largish piece of scrap mdf on my wooden work bench - only needs to be 5mm or whatever
2. Clamp the uncut baffle on top of it
3. Hammer 2 or 3 medium gauge nails through the centre piece, evenly spaced and well clear of where the cut will be happening
4. Make sure the nails are flush
5. Route away using light passes
6. Once I have routed through, I always make a final pass again - this will give a better finish - you wouldn't expect any more material to be cut off, but there is always a tiny bit - always did this when building galley cabinets and fitout for boats in a previous life
7. Unclamp the baffle and lift away leaving the circular piece of waste nailed to the workbench
Too easy!
ShinOBIWAN said:
Posh git! 😀
Thanks Ant. Jigs good for up to a 30cm radius. I have those 60cm drivers on order...

chrisb said:
We might disagree on the plywood thing,
Something like this'll take a while to fabricate, but will be far more flexible than either the Sears or Jasper jigs. It's also handy to have a plunge router dedicated just to the circle jig.
Thanks Chris,
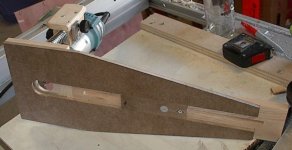
I love working with BB, and to be honest, I'm not going to be using MDF anymore. I will use BB and cover that with HDF if I want to paint.
Not that MDF sounds bad, I just don't like working with it anymore.
BTW, it took what amounts to a full working day for me to build the plunge base and the circle jig.
Attachments
MJL21193 said:
Thanks Ant. Jigs good for up to a 30cm radius. I have those 60cm drivers on order...
Thanks Chris,
I love working with BB, and to be honest, I'm not going to be using MDF anymore. I will use BB and cover that with HDF if I want to paint.
Not that MDF sounds bad, I just don't like working with it anymore.
nope, not taking the bait 😉
BTW, it took what amounts to a full working day for me to build the plunge base and the circle jig.
so at $5/hr that still costs less than the Jasper jig twin set required to cover the full range this one can cover

but seriously, a jig like this is infinitely adjustable to whatever calibration you choose, and barring accident should last forever
I Started a fire cutting a hole with a spiral down-cut 1/4" bit.
I changed to an 1/4' Up-cut bit and had no issues.
I was cutting the baffle with a backing board and double sided tape.
Down-cut blades are only appropriate if you are going to cut all the way through.
Doug
I changed to an 1/4' Up-cut bit and had no issues.
I was cutting the baffle with a backing board and double sided tape.
Down-cut blades are only appropriate if you are going to cut all the way through.
Doug
chrisb said:
...so at $5/hr that still costs less than the Jasper jig twin set
Gee Chris, is that all you make over there? You could come over here and make, oh at least $7.50/hr, a good apprentice like you! 🙂 😀
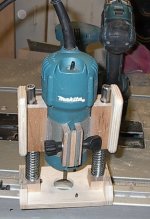
Remember now, the jig itself was a piece of cake - the plunge base for the laminate trimmer took most of that day.
See I used BB plywood.

Attachments
I removed the return springs from my Makita for use in a router table. I use it both in and out of the table, and find I like it better without the springs for both uses. It takes a little getting used to, but I will most likely never reinstall the springs.
The bit you use is very important.
I've tried using a good quality 1/4" diameter 2 flute straight bit and it sucked for cutting circles in mdf. If I needed a clean cut I had to make 4 passes through .75" mdf. If I try cutting deeper, the router vibrates badly.
I just bought a 1/8"diameter upcut spiral bit. Haven't used it yet, but I expect it will be great for cutting circles. Less diameter means less dust, and the shape of the bit should keep vibration down.
http://www.rockler.com/product.cfm?page=5298
Dan
owdi said:The bit you use is very important.
I've tried using a good quality 1/4" diameter 2 flute straight bit and it sucked for cutting circles in mdf. If I needed a clean cut I had to make 4 passes through .75" mdf. If I try cutting deeper, the router vibrates badly.
I just bought a 1/8"diameter upcut spiral bit. Haven't used it yet, but I expect it will be great for cutting circles. Less diameter means less dust, and the shape of the bit should keep vibration down.
http://www.rockler.com/product.cfm?page=5298
Dan
be aware that some jigs are calibrated for specific diameter of bits, and that smaller diameter bits are far more likely to snap when overloaded
- Status
- Not open for further replies.
- Home
- Loudspeakers
- Multi-Way
- First attemt to cut driver hole with router.... FAIL!!!