I'm sure a few of you have mixed feelings about the ugly front multi-piece gaskets on most pro audio woofers. They don't always look that inspiring compared to other higher end hifi drivers when mounted from the front, especially when the gaskets are mounted sloppy from the factory. As some of you guys already know, I really like the performance of Eminence Kappalite and Deltalite woofers, but the front gaskets leave alot to be desired in terms of looks.
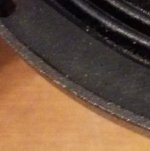
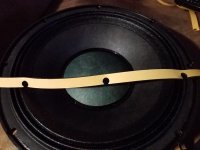
I came up with a simple, cheap method of improving the look of these drivers by removing the existing chip gaskets and using bulk foam neoprene strips instead. It takes a little skill to get the gasket material started, but otherwise its not that difficult. I used a 5/16 paper hole puncher with adjustable stop to make the holes evenly spaced.
I came up with a simple, cheap method of improving the look of these drivers by removing the existing chip gaskets and using bulk foam neoprene strips instead. It takes a little skill to get the gasket material started, but otherwise its not that difficult. I used a 5/16 paper hole puncher with adjustable stop to make the holes evenly spaced.
Attachments


BTW. Forgot to mention these drivers are the new Eminence Canna-bass CB3010N-8 10" woofers designed for bass guitar but excellent for LF in any speaker, especially studio monitors and high sensitivity hifi.
Excellent method!foam neoprene strips
How did you deal with the one strip joint?
@stv I spliced the butting joint at one of the screw holes. You can barely see it and so far the tape is staying put, so the adhesive is up to the task. I tried using speaker gasketing tape the first try and it peeled up on its own within an hour. This newer stuff is from Amazon and its not that expensive. About $10 for 16.5 ft of 1/2" wide x 1/8" thick.
Attachments

When marking the tape for locating the punched holes, I did a trial piece of gasket spanning between 2 holes, marking the hole locations while on the flange, then removing it to measure the linear distance (after letting it relax for a half hour). For this 10" Eminence frame the on-center linear distance between mounting holes is 3-13/16". Marking the tape in these intervals will locate the holes exactly dead on when applying it as in the picture.
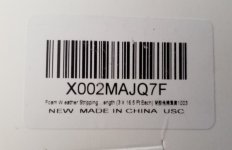
This is the label on the box -Do you mind providing an Amazon link?
Attachments
I use similar stuff from McMaster Carr
Door Weatherstripping, with Adhesive Back, 1/2" Wide, 1/16" Thick, 50 Feet Long
https://www.mcmaster.com/8694K11
I buy the 1.5" wide stuff and cut to suit.
Door Weatherstripping, with Adhesive Back, 1/2" Wide, 1/16" Thick, 50 Feet Long
https://www.mcmaster.com/8694K11
I buy the 1.5" wide stuff and cut to suit.
@A4eaudio
This is the hole punch tool link - https://www.amazon.com/dp/B0D7VRJCDN
and this is the neoprene foam strip 1/2" × 1/8" x 16.5 ft - https://www.amazon.com/dp/B07PZTQRHL
This is the hole punch tool link - https://www.amazon.com/dp/B0D7VRJCDN
and this is the neoprene foam strip 1/2" × 1/8" x 16.5 ft - https://www.amazon.com/dp/B07PZTQRHL
@6thplanet I purposely stay away from the basket side moving edge of the surround, as undesirable behavior may result throwing TSPs off or causing suspension noise / buzzing.
A positive side effect of the tape is it levels and smooths the transition from surround to basket and baffle surface. That may help reduce diffraction effects.
A positive side effect of the tape is it levels and smooths the transition from surround to basket and baffle surface. That may help reduce diffraction effects.
I fixed some older JBL 2213s using a wider version of 3/16" foam. It looked almost the same as the type of foam they use from the factory.
No prob!
I linked 1/16" thick, McMaster has all different thicknesses and widths, as well as other materials. Great selection of that type of stuff.
It's an option if someone doesn't want to do the Amazon thing.
How did you go about removing the original gasket?
I linked 1/16" thick, McMaster has all different thicknesses and widths, as well as other materials. Great selection of that type of stuff.
It's an option if someone doesn't want to do the Amazon thing.
How did you go about removing the original gasket?
@6thplanet I used isopropyl in a cyano applicator bottle with a fine needle type nozzle, applying it to the perimeter edge where the paper base gasket meets the surround surface. I broke away most of the chip gasket by hand before that by tipping the gasket segments outwards, peeling it away. Saturating the paper with small amounts of isopropyl allows it to be pulled away cleanly with fingernails. Just be careful to not pull too hard on the surround when its saturated with isopropyl, as this dissolves the PVA coating, which is effectively the glue holding it to the frame.
question: did you remove the original gasket and if so, how? we once discussed this for the faital 12pr320 but I didn't dare, fearing to damage the bond of the surround with the basket.
@sheeple See post #17.
The trick to not harming the surround bond is to apply pressure tipping the gasket outwards, NEVER INWARDS.
When using isopropyl to dissolve the gasket remnants, care should be taken to not apply excessive isopropyl so that it can soak into the surround fabric and weaken the surround to frame adhesion. This takes more isopropyl than you'd think and once the isopropyl evaporates, the bond is no longer effected. It doesn't however hurt to be mindful of how much force and solvent you apply. On all of the newer style Eminence multi piece gaskets you can just apply outward tipping force on the side od the gasket to break it away. The surround bond is MUCH stronger than the front gasket adhesion, so there's little concern for pulling off or weakening the surround bond to frame.
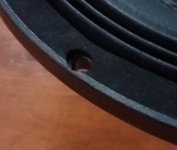
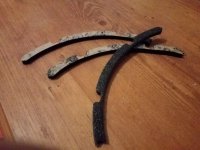
Below is what the Eminence gaskets look like removed via the above described method. You can actually reattach the gaskets if you change your mind because the break away point is the paper backing, which is the weakest link (likey on purpose to avoid damage to the surround).
All that said aside - I'm not responsible if anyone ruins their drivers attempting any of this, as other drivers may employ other types of adhesives requiring different solvents and procedures. All of the fabric surround drivers I've ever seen use a PVA based adhesive to attach the surround to the frame. There are some rare cases where Siloxan or epoxy based adhesives are chosen to adhere the surround to the frame. Most any common PA driver with a cloth surround will be just fine.
The trick to not harming the surround bond is to apply pressure tipping the gasket outwards, NEVER INWARDS.
When using isopropyl to dissolve the gasket remnants, care should be taken to not apply excessive isopropyl so that it can soak into the surround fabric and weaken the surround to frame adhesion. This takes more isopropyl than you'd think and once the isopropyl evaporates, the bond is no longer effected. It doesn't however hurt to be mindful of how much force and solvent you apply. On all of the newer style Eminence multi piece gaskets you can just apply outward tipping force on the side od the gasket to break it away. The surround bond is MUCH stronger than the front gasket adhesion, so there's little concern for pulling off or weakening the surround bond to frame.
Below is what the Eminence gaskets look like removed via the above described method. You can actually reattach the gaskets if you change your mind because the break away point is the paper backing, which is the weakest link (likey on purpose to avoid damage to the surround).
All that said aside - I'm not responsible if anyone ruins their drivers attempting any of this, as other drivers may employ other types of adhesives requiring different solvents and procedures. All of the fabric surround drivers I've ever seen use a PVA based adhesive to attach the surround to the frame. There are some rare cases where Siloxan or epoxy based adhesives are chosen to adhere the surround to the frame. Most any common PA driver with a cloth surround will be just fine.
Attachments
Last edited:
So far the foam strips are holding on really well. I generally advise people to experiment with a small piece of foam before committing to a full drivers worth of coverage. Its good idea to buy enough material to cover an extra driver if needed. Sometimes the quality and consistency of these self adhesive items varies.
- Home
- Loudspeakers
- Multi-Way
- Eminence 10" front flange gasket mod