Finally on my long overdue leave from work, I had some spare time to work on my living room. And being really fed up with those cheapish looking IKEA tables and bookcases, I decided to finally make something that I won't be ashamed to have below my beloved sound system. Please bear with my rant. Hopefully it would be a nice read and might help someone else going through the same stuff.
So got my car, went to the local IKEA and started looking and measuring the available options thinking to create something with Lack tables (just google it and you will see many racks made using them). But after about an hour of playing around trying to think possible options, I was really less than satisfied with the quality and the rigidity of the materials. I really doubt it would have been an upgrade from my current tables.
So after an hour or so I got out and went into the nearby Leroy Merlin. Now that was a nice change... a true DIYer's playground 🙂
I browsed a bit on the available wood available, and decided to go with 30mm sea grade plywood. An annoying miscalculation was that I requested to get the pieces cut before I decided on the column design. So I got 5 shelves measuring 50x50cm thinking that the supporting columns would be outside that.
After a couple more hours looking at options to use for the columns, I finally decided to go with the popular flexy design. All others were simply not that sturdy or way too demanding in woodworking skill.
So finally I got 3 20mm threaded rods and the rest of the supporting hardware.
Now something I never liked on flexy, is how the threaded rods look. Unfortunately I could not find something like PVC tubing there, so I will have to keep looking for something. In the meantime, I got some foamy tube insulation material that wraps nicely and tightly around the rods to keep them from ringing.
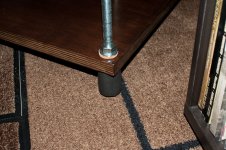
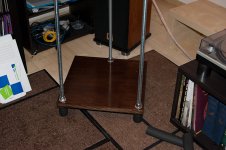
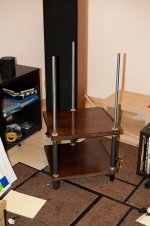
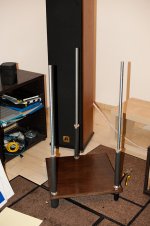
It s really late here and I am exhausting from all the walking in the two shops, but I managed to set the base of it to have a first draft look.

Only the external part of the foamy tubes is shown, so it seems a bit weird and wavey. With the internal tube in place it is rigid and nice. I might even keep it as a final finish of the rods.
As I said above, I miscalculated the useful area, so my equipment will be a bit tight in there. But there should be no problem. When I finish my F5 monoblocks I intent to make some separate platforms for them anyway.
My initial intention was to give the plywood a mahagony finish but seeing the natural color making a nice contrast with my carpet, I might leave it like this and just give it a nice semi glossy finish.
One thing I forgot was to get damping washers. The design really needs them. It rings like crazy as it is.
Some final thoughts on it. The top shelf (which will host my turntable) will be a sandwich of two 30mm shelves squeezing a layer of cork. The top half will also not be drilled, so no weird looking nuts and rods sticking out at the top. I might also not drill the bottom part all the way and put some spikes on the holes (sitting on the top of the rods) so that the sandwich is further mechanically separated from the rest of the rack.
Of course I will be happy to hear comments or suggestions
Dimmy
So got my car, went to the local IKEA and started looking and measuring the available options thinking to create something with Lack tables (just google it and you will see many racks made using them). But after about an hour of playing around trying to think possible options, I was really less than satisfied with the quality and the rigidity of the materials. I really doubt it would have been an upgrade from my current tables.
So after an hour or so I got out and went into the nearby Leroy Merlin. Now that was a nice change... a true DIYer's playground 🙂
I browsed a bit on the available wood available, and decided to go with 30mm sea grade plywood. An annoying miscalculation was that I requested to get the pieces cut before I decided on the column design. So I got 5 shelves measuring 50x50cm thinking that the supporting columns would be outside that.
After a couple more hours looking at options to use for the columns, I finally decided to go with the popular flexy design. All others were simply not that sturdy or way too demanding in woodworking skill.
So finally I got 3 20mm threaded rods and the rest of the supporting hardware.
Now something I never liked on flexy, is how the threaded rods look. Unfortunately I could not find something like PVC tubing there, so I will have to keep looking for something. In the meantime, I got some foamy tube insulation material that wraps nicely and tightly around the rods to keep them from ringing.
It s really late here and I am exhausting from all the walking in the two shops, but I managed to set the base of it to have a first draft look.
Only the external part of the foamy tubes is shown, so it seems a bit weird and wavey. With the internal tube in place it is rigid and nice. I might even keep it as a final finish of the rods.
As I said above, I miscalculated the useful area, so my equipment will be a bit tight in there. But there should be no problem. When I finish my F5 monoblocks I intent to make some separate platforms for them anyway.
My initial intention was to give the plywood a mahagony finish but seeing the natural color making a nice contrast with my carpet, I might leave it like this and just give it a nice semi glossy finish.
One thing I forgot was to get damping washers. The design really needs them. It rings like crazy as it is.
Some final thoughts on it. The top shelf (which will host my turntable) will be a sandwich of two 30mm shelves squeezing a layer of cork. The top half will also not be drilled, so no weird looking nuts and rods sticking out at the top. I might also not drill the bottom part all the way and put some spikes on the holes (sitting on the top of the rods) so that the sandwich is further mechanically separated from the rest of the rack.
Of course I will be happy to hear comments or suggestions
Dimmy
Attachments

After having made several of these kinds of things, I guess age crept up on me. I use a "rack" cut from lumber painted black. Really ugly, but here is the thing. It is inside a closet. I no longer want my living room dominated by electronics, just by music. Putting the turn table inside a closet has a big advantage, less feedback. I guess F5's would not like to be in a closet without a fan on them.
Pay attention to the type of finish on the shelves. Many "clear" finished will yellow the wood. Water based clear poly won't.
Pay attention to the type of finish on the shelves. Many "clear" finished will yellow the wood. Water based clear poly won't.
Well there s no closet in my living room, and I do not intent to get one there 🙂 The good side of being semi-single 😛
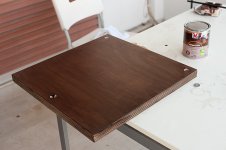
Anyway, back from vacations so started working on the shelves a bit. I have selected the most rough of the shelves to use as a test. I intent to use it on the bottom of the lower shelf anyway, so some trial and error is allowed until I found a technic and a finish that I like before I apply it to the rest of them.
I have scratched the large imperfections and my pen markings with a 100 sand paper following the wood direction. It was a bit too harsh but I intent to apply many layers of paint to achieve a very dark finish anyway, so the 250 and 600 ones will have their chance to give a nice finish.
The problem for now is that plywood seems to chip-off a bit on the sides where its layers are visible. A first thought is to use some wood putty. I will get some tomorrow and fill in the gaps before resanding and continuing with the second layer.
For now I have to say that I really like the color I chose. Perhaps I would like it a bit more warm, so I will get another more orangish paint tommorow too to apply a thin layer or two to get the tone I like.

Don t worry about the running on the side, I have already whiped it before it stained the sides permanently
Anyway, back from vacations so started working on the shelves a bit. I have selected the most rough of the shelves to use as a test. I intent to use it on the bottom of the lower shelf anyway, so some trial and error is allowed until I found a technic and a finish that I like before I apply it to the rest of them.
I have scratched the large imperfections and my pen markings with a 100 sand paper following the wood direction. It was a bit too harsh but I intent to apply many layers of paint to achieve a very dark finish anyway, so the 250 and 600 ones will have their chance to give a nice finish.
The problem for now is that plywood seems to chip-off a bit on the sides where its layers are visible. A first thought is to use some wood putty. I will get some tomorrow and fill in the gaps before resanding and continuing with the second layer.
For now I have to say that I really like the color I chose. Perhaps I would like it a bit more warm, so I will get another more orangish paint tommorow too to apply a thin layer or two to get the tone I like.
Don t worry about the running on the side, I have already whiped it before it stained the sides permanently
Attachments
Small update. The first layer has dried (too much wind outside) and the 180 sandpaper seems to be perfect for sanding between layers. I will use the 600 one only for the last one and the 100 one only for removing big problems, and only following the wood lines, otherwise the scratches are too harsh.
I finally found some time to work on the rack
I got some more supplies today, but still no rubber disks. I am thinking of using some silicon rings I had bought a while back for my tube preamp. If anythign else fails... but I don t think I have 30 of them... Another alternative could be cork.... We ll see...
I have fixed all of the shelves with wood putty and they are ready for sanding. The tone of the putty is a bit off but hopefully the dark stain will hide it well.
I also bought a small B&D orbital sander and worked a bit on a clear shelf. The 220 paper was really amazing and the initial sanding was far nicer than I would ever manage to do by hand without jumping from my balcony from boredom.
I also got a handheld/manual sander, but I really do not like working with. meh... it was only 5 euros anyway... 😛
A mistake I did was to try to resand the already painted shelf as well. And the bigger mistake was to use a disk without holes (dust did not get sucked into the bag). The friction temperature melted the stain/wood dust and created a disgusting trail of hard paint on the wood. I managed to remove it but this meant resanding the entire surface with 100 and then with 200 paper. And it still does not feel as nice as the clear one. Lesson learned...
The opposite side was sanded with a 600 paper and really felt nice and smooth. I had to resand some areas with a 200 and 400 ones again to remove some rough patches, but it ended up nice.
The second layer of stain was applied then. The paint was spreading very nicely on the smooth surface. Some rough patches were revealed by the brush. The paint did not spread as nicely there and I had to "refill" my brush.
Unfortunately the day is getting shorter and now that I am finished there is not enough light to judge the color and get a nice photo to show you.
Tomorrow 🙂
Ok ok sorry for the boring walls of text 🙂

Here is a photo showing my shelves so far. I corrected the flash white balance to get the color as close to what I really see as possible.
The right one is my test one. You can actually still see some of the scratches I made sanding vertically to the grain. This is the side that was not sanded (or melted) with the rotary sander. I do not want you to see that side 🙂 I want to forget it somewhere at the bottom of the rack... or perhaps somewhere at a garbage bin if I manage to go to the store again to get a fresh piece of plywood.
The test piece is also layed with two layers of stain. You can see the difference with the one on the left which has only one layer on it.
On the left one you can also see some vertical shading. This was probably because of the water based stain drying too fast without me noticing it and working additional layers on it to fix the side drips.
I really should switch from brush to cotton cloth technic.
On the top of the plywood you can also see some putty spots. These have not been sanded yet. The color actually came out pretty decent looking and very close to the natural color of the plywood side bands. I will post a closer photo at some point.
I still think that I need some more red in there, so I will try to get some redish mahagony stain and throw a layer or two.
For finish I am considering laquer or polyutherane. Or perhaps some plain oil since a fellow woodworker has promised me some miracle oil of his own mixing 🙂
Attachments

A bit lazy and tired today so I did not do any sanding...
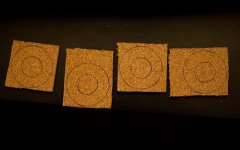
But I got some nice 6mm cork. It came in 60x90cm layers so I had to cut it. The exacto knife had a rather easy job, although I had some rough edges at some points.
The top shelf will look something like that.

In this photo you can also see the putty. It gets much lighter in color when you sand it.
I also cut some nice ring washers out of cork to use below the steel ones and squeeze the plywood nicely.

Unfortunately the cork crumbles if cut with scissors and I am too bored to cut all 30 with the exacto knife... I need to find some easier way to cut these.
Anyway, the result seems nice

In this photo you can also see some shading on the stripes of the plywood created by the water based putty. I hope it will dissappear after a few more stain layers. Otherwise I already arranged to have them on the back side 🙂
Next on the shopping list is some wood glue and some oils/finishes to try
But I got some nice 6mm cork. It came in 60x90cm layers so I had to cut it. The exacto knife had a rather easy job, although I had some rough edges at some points.
The top shelf will look something like that.
In this photo you can also see the putty. It gets much lighter in color when you sand it.
I also cut some nice ring washers out of cork to use below the steel ones and squeeze the plywood nicely.
Unfortunately the cork crumbles if cut with scissors and I am too bored to cut all 30 with the exacto knife... I need to find some easier way to cut these.
Anyway, the result seems nice
In this photo you can also see some shading on the stripes of the plywood created by the water based putty. I hope it will dissappear after a few more stain layers. Otherwise I already arranged to have them on the back side 🙂
Next on the shopping list is some wood glue and some oils/finishes to try
Attachments
I resanded lightly the two shelves today and added an additional layer of stain.
On the test sheet I did one side using cloth and the other using a brush.
I really like the shinny finish that the cloth gives. It would be very nice for the final layer before I start applying the finish. I took a new photo today, but I am too tired to get the exposure right for direct comparison with yesterday's photos.

The only reason I am attaching it is to show you how nice and silky shinny the finish appears on the cloth-wiped side (right one). You can see the reflections of the flash on the wipes. I know this is not very nice since it does not appear uniform. But with a light pass with a 600 sandpaper and the oil finish it should be really nice. Plus, because it is wiped, there are actually no dust bumps at all.
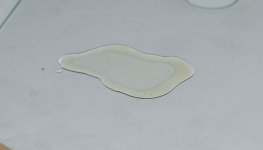
On the shopping side, I tried to find some oil. The only thing I could find on the local market was Teak oil with wax. I left a few drops on a piece of glass to dry, so that I can see if it really is some kind of oil or just thinned varnish.
I also got some pva glue for the sandwich. But I want to get the sheets ready for stain before I glue them together.
On the test sheet I did one side using cloth and the other using a brush.
I really like the shinny finish that the cloth gives. It would be very nice for the final layer before I start applying the finish. I took a new photo today, but I am too tired to get the exposure right for direct comparison with yesterday's photos.
The only reason I am attaching it is to show you how nice and silky shinny the finish appears on the cloth-wiped side (right one). You can see the reflections of the flash on the wipes. I know this is not very nice since it does not appear uniform. But with a light pass with a 600 sandpaper and the oil finish it should be really nice. Plus, because it is wiped, there are actually no dust bumps at all.
On the shopping side, I tried to find some oil. The only thing I could find on the local market was Teak oil with wax. I left a few drops on a piece of glass to dry, so that I can see if it really is some kind of oil or just thinned varnish.
I also got some pva glue for the sandwich. But I want to get the sheets ready for stain before I glue them together.
Attachments
I did an additional stain layer on the two shelves today. The test one is ready for oil.
I would love some input on what you think about the oils I got. You can see photos of the dried oils on glass below.
This one looks like plain thinned varnish. After 24 hours on the glass, it feels sticky. No oily or waxy feel.

This one on the other hand was thicker from the beginning. It has dried and left a thicker layer behind. It is not sticky at all after 24 hours, but rather feels like wax on the touch. Again no oilly sensation.

I would love some input on what you think about the oils I got. You can see photos of the dried oils on glass below.
This one looks like plain thinned varnish. After 24 hours on the glass, it feels sticky. No oily or waxy feel.
This one on the other hand was thicker from the beginning. It has dried and left a thicker layer behind. It is not sticky at all after 24 hours, but rather feels like wax on the touch. Again no oilly sensation.
Attachments

The glass experiment further proved that the second one was indeed oil. The sample is now all wrinkly as oil should be when it s dry.
I applied a second and third oil layer today on the test shelf. I really love how it feels and smells 🙂
I have also started working on the feet. I have found some nice wooden semi-spheres. I intent to make a hole and screw them on the columns.
An alternative thought is to have some spikes made from steel.
An additional layer of oil has been added today. I have to admit that it does not feel as nice as it did with two layers... I will apply a few more on the test to check how the wood will behave with more before continuing with the rest of the shelves.
Here is a photo of how the non-test shelf looks today (5 layers of stain and 2 layers of oil)

I m pretty satisfied with the results so far. I could have done some better work on the sides though... The flash reveals some problems. Thankfully, they are not as visible in normal room light.
Here is a photo of the dried oil today. The wrinkles further prove the oily composition.

I have also glued together the top sandwich. Tomorrow I will start working on it.

I have also ordered the spikes.
The rods will be drilled on their bottom and a super hard steel rod (don t know the english name for it. Something like oil-steel) will be inserted in it. The rod will then be machined to have a nice spiky shape, but not too steep in order to endure the large weight of the entire rack-equipment.
I will post some photos as soon as I get them.
Here is a photo of how the non-test shelf looks today (5 layers of stain and 2 layers of oil)
I m pretty satisfied with the results so far. I could have done some better work on the sides though... The flash reveals some problems. Thankfully, they are not as visible in normal room light.
Here is a photo of the dried oil today. The wrinkles further prove the oily composition.
I have also glued together the top sandwich. Tomorrow I will start working on it.
I have also ordered the spikes.
The rods will be drilled on their bottom and a super hard steel rod (don t know the english name for it. Something like oil-steel) will be inserted in it. The rod will then be machined to have a nice spiky shape, but not too steep in order to endure the large weight of the entire rack-equipment.
I will post some photos as soon as I get them.
Attachments

OK glueing inexperience alert....
I did not squeeze the two plywood sheets together around the cork. This resulted in a wavy cork sheet and big gaps between the 3 sheets...damn...
I did not squeeze the two plywood sheets together around the cork. This resulted in a wavy cork sheet and big gaps between the 3 sheets...damn...
Separating the plywood sheets was hard.... And scraping the cork was nightmare.... omg my hands hurt...
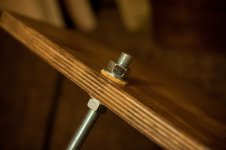
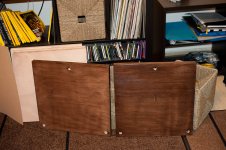
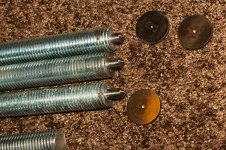
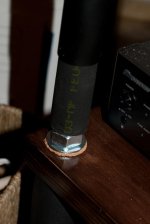
I have received the spikes today.

The rods were drilled and a bit of carbid was inserted in the hole. The carbid was then machined to a nice spikey shape. I expect the rack to be a bit heavy, so we decided to make the spike angle not very steep.
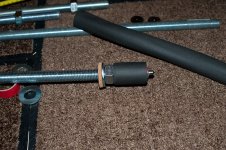
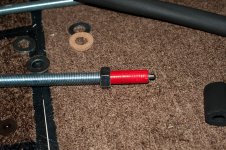
Now how I decided to handle the rods...
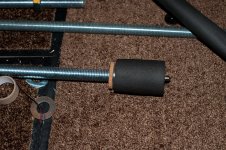
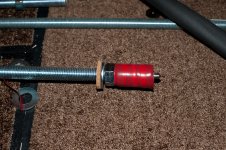
I measured 7cm from the spike tip and insterted the nut at that spot. The rest of the rod was covered with tape (black one, the red was just an experiment).

I then cut a piece of insulation tube and got it over the rod. The tape was necessary for the tube to slide on the rod without getting ruined.

I then tightened the tube with some more tape. This was to further increase the damping effect of the tubing.

Up to here I feel confident that the build is perfect for my needs.
Below I will try to give you a first hint of one of the alternatives I am considering for the final finish of the rods.
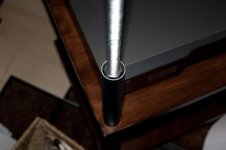
An additional piece of insulation tubbing was cut and inserted on top of the previous and the locking nut.

And below, you can see how it will actually look.

From far it looks nice.

But if you get close, you start seeing problems with the foamy tubbing.
To be honest, I like it both with the mat black and with the silvery metal of the rods...
Damn... decisions....
The rods were drilled and a bit of carbid was inserted in the hole. The carbid was then machined to a nice spikey shape. I expect the rack to be a bit heavy, so we decided to make the spike angle not very steep.
Now how I decided to handle the rods...
I measured 7cm from the spike tip and insterted the nut at that spot. The rest of the rod was covered with tape (black one, the red was just an experiment).
I then cut a piece of insulation tube and got it over the rod. The tape was necessary for the tube to slide on the rod without getting ruined.
I then tightened the tube with some more tape. This was to further increase the damping effect of the tubing.
Up to here I feel confident that the build is perfect for my needs.
Below I will try to give you a first hint of one of the alternatives I am considering for the final finish of the rods.
An additional piece of insulation tubbing was cut and inserted on top of the previous and the locking nut.
And below, you can see how it will actually look.
From far it looks nice.
But if you get close, you start seeing problems with the foamy tubbing.
To be honest, I like it both with the mat black and with the silvery metal of the rods...
Damn... decisions....
Attachments
OK I did some tests with the second shelf
The first two photos are with only the inner tubbing.


And the following ones are with the outer tubbing installed.


My feeling is that the thicker tubes seem a bit fatty. It would be perfect if the shelves were 60cm... damn....
What I liek with this tubing is that it is flexible, so you can get the length where you want it, just paying attention to not ballon it somewhere.
The first two photos are with only the inner tubbing.
And the following ones are with the outer tubbing installed.
My feeling is that the thicker tubes seem a bit fatty. It would be perfect if the shelves were 60cm... damn....
What I liek with this tubing is that it is flexible, so you can get the length where you want it, just paying attention to not ballon it somewhere.
Attachments

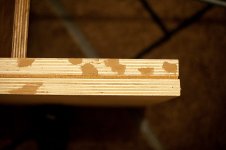
I ve been busy for the last few days working on other staff, so the rack had to be set aside for a while.
Today I managed to find some time and sand the last two shelves and get the first stain layer done.
I am pretty happy with the result. The top shelf was drilled only half way (one of the plywood sheets) and it is balancing nicely on its weight. The small height difference in one of the rod spikes did not create any problems with it. My turntable should be pretty happy up there.
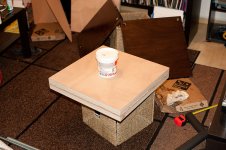
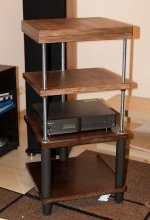
Here is a photo of how the shelves will look on the final assembly.

Again the flash is pretty unforgiving with imperfections, but on plain living room light the rack appears pretty nice.
I have put my CD player in there to give you a hint of how equipment fits. You can see that the 50cm width is just about adequate if you do not mind sliding equipment from the side. I would do my next one 60cm.
I would also go for 40mm thick shelves and I would try some hardwood instead to get a nicer look.
But for the money I spent on it, it comes up pretty nice.
Today I managed to find some time and sand the last two shelves and get the first stain layer done.
I am pretty happy with the result. The top shelf was drilled only half way (one of the plywood sheets) and it is balancing nicely on its weight. The small height difference in one of the rod spikes did not create any problems with it. My turntable should be pretty happy up there.
Here is a photo of how the shelves will look on the final assembly.
Again the flash is pretty unforgiving with imperfections, but on plain living room light the rack appears pretty nice.
I have put my CD player in there to give you a hint of how equipment fits. You can see that the 50cm width is just about adequate if you do not mind sliding equipment from the side. I would do my next one 60cm.
I would also go for 40mm thick shelves and I would try some hardwood instead to get a nicer look.
But for the money I spent on it, it comes up pretty nice.
Attachments
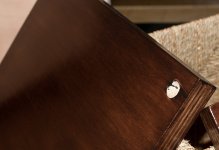
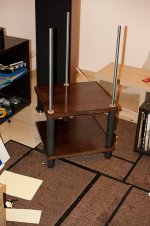
I finally managed to finish the rack.
I used pvc tubing to hide the rods.


And here is the final result

The problem for now is that I leveld the shelves while it was on the carpent. And now I need to do it again.
Also, the final result is not very sturdy. Probably because of the cork, or because I did not tighten the bolts enough.
I used pvc tubing to hide the rods.
And here is the final result
The problem for now is that I leveld the shelves while it was on the carpent. And now I need to do it again.
Also, the final result is not very sturdy. Probably because of the cork, or because I did not tighten the bolts enough.
Attachments

- Status
- Not open for further replies.
- Home
- General Interest
- Everything Else
- Dimmy's itteration of flexy rack