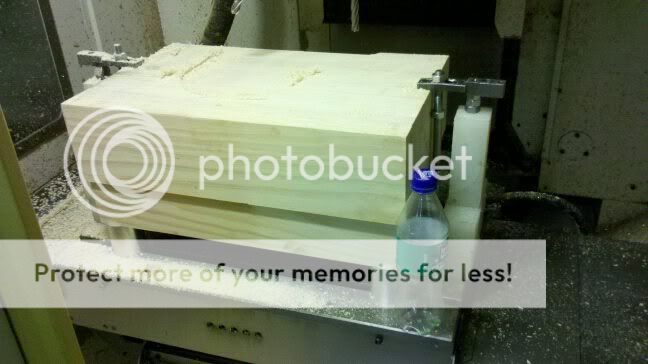
Just thought I'd post some pictures of my development since the forum is a little quiet. I still have to do a bit of work of course but so far it's working out okay.
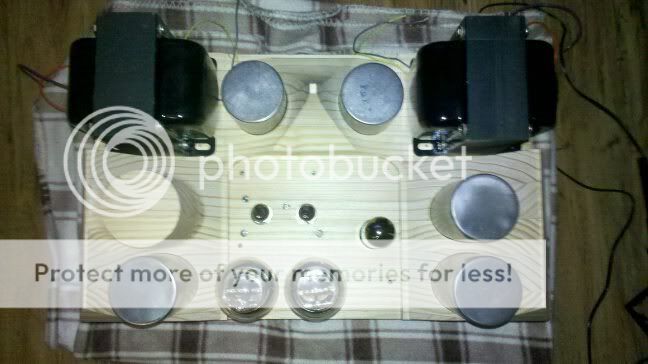
With the almost all motor-run cap setup the amp has to be reasonably huge, it's okay though it is balanced well with huge OPT's.


Now for some help please 🙂
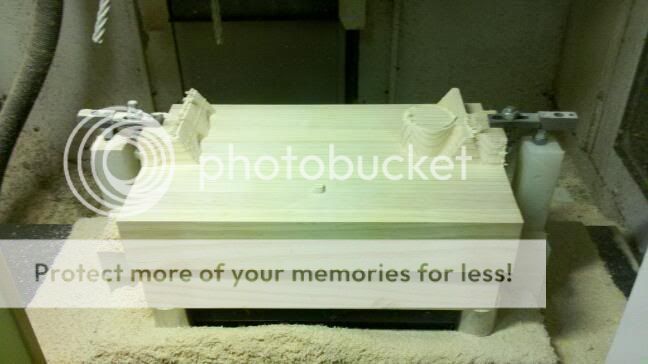
I got a little bit of "water" on it accidentally which is not just water it has a cutting oil emulsifier mixed in, since I usually machine metal the default on the code output is to switch the water on, once of twice it got away from me (usually happens when you get tired at the end of the day), I'm curious if anyone has any ideas how to draw the oiliness out of the wood, it's not very deep, I stopped it quick and wiped it off, but there are some marks as you can see at the front. I would like to dye it instead of painting it but I would need to then draw the oil out first?
Regards,
Jonathan.
With the almost all motor-run cap setup the amp has to be reasonably huge, it's okay though it is balanced well with huge OPT's.
Now for some help please 🙂
I got a little bit of "water" on it accidentally which is not just water it has a cutting oil emulsifier mixed in, since I usually machine metal the default on the code output is to switch the water on, once of twice it got away from me (usually happens when you get tired at the end of the day), I'm curious if anyone has any ideas how to draw the oiliness out of the wood, it's not very deep, I stopped it quick and wiped it off, but there are some marks as you can see at the front. I would like to dye it instead of painting it but I would need to then draw the oil out first?
Regards,
Jonathan.
Amazing work! I don't think I've seen a milled wood amp chassis before. As for the oil marks on the wood, I'd start by getting a scrap block of the same material. Splash a little of your oil/water mix on the scrap, and practice first on the scrap piece.
I might be inclined to try an oil based stain on the whole thing, in the hopes the stain somewhat blends the blemish. I don't know how you would otherwise draw it out completely.
I might be inclined to try an oil based stain on the whole thing, in the hopes the stain somewhat blends the blemish. I don't know how you would otherwise draw it out completely.
You can see it on the front, it isn't bad actually, and I want to stain it black anyway, I just don't want the oil to cause problems. I did some reading on the problem and a lot of people recommend thinners with an absorbing agent, I'll give that a go and see how much I can get out, I might just be able to sand it out though, I haven't tried yet so not sure how deep it is.
It is stupid big to be honest but it worked "ok" in the end, luckily I had the super long tool bits, I think the reason you don't see something like this is most likely cost, paying someone to machine something similar would probably set you back $1500-$2000.
It is stupid big to be honest but it worked "ok" in the end, luckily I had the super long tool bits, I think the reason you don't see something like this is most likely cost, paying someone to machine something similar would probably set you back $1500-$2000.
That is too cool......
Try Naptha to get out the oil. What are you going to use for dye? If it's alcohol based dye I don't think a little oil would be a problem. Water based might not be the best choice in this case.
Try Naptha to get out the oil. What are you going to use for dye? If it's alcohol based dye I don't think a little oil would be a problem. Water based might not be the best choice in this case.
The shellac sounds like a good approach. It'll cover just about anything and has at least a mild tolerance to heat. And you can control the color, too.
I've made my own shellac from crystals and denatured alcohol with great success.
Super cool work on the chassis !
I've made my own shellac from crystals and denatured alcohol with great success.
Super cool work on the chassis !
Last edited:
Thanks, I bought it ready mixed, just received it today I was not going to use Shellac anymore thought of having it painted until your post, I was worried that it would be too difficult to apply, but thanks to your post I'll give it a shot for sure, will get working on it hopefully done in two weeks 🙂
Just a wee bit of warning about the pre-mixed shellac:
I've not used it, I have always mixed my own, but I have heard from others that it can take a very long time to dry and in some cases always remains a tiny bit tacky.
I use shellac on the guitars I build and the info on the pre-mixed stuff comes from other guitar makers.
When I mentioned controling the color I meant that you can choose shellac crystals of different colors. It's really neat stuff.
Good luck, whichever route you choose.
Yeah figured you meant that with the flakes, I'll just mix in some black oxide, I'll have to give it a shot and see, hopefully it's okay.

Very kind Sir, thank you very much.
I hope to start it up this weekend, the power transformer just arrived 🙂
I hope to start it up this weekend, the power transformer just arrived 🙂
Been a bit delayed with problems on the htpc, but now I'm done with almost all the wiring, took longer than I thought 🙁
Anyway is there a good guide on how to wire in a pot or attenuator? I assume grnd to R1/L1 and POT out to R2/L2...
And to make sure T2-1/T3-1 = B+ and T2-2/T3-2 = Plate?
Anyway is there a good guide on how to wire in a pot or attenuator? I assume grnd to R1/L1 and POT out to R2/L2...
And to make sure T2-1/T3-1 = B+ and T2-2/T3-2 = Plate?
Last edited:
First go I get B-340 B+285 but the filament on C11 starts at 7.x then drops down all the way....
With the GZ43 in I get +495 and -365...
Sorry for another stupid question but where do I get the negative grid voltage from for the output tubes?
Sorry for another stupid question but where do I get the negative grid voltage from for the output tubes?
Last edited:
I think I am measuring correctly, Pin 1&4 gives -127 both sockets, I'm worried about the +495, it's climbing started initially at +492 but the more I switch the amp on and off the higher it goes, it's up at +497 although seems to have stabalized...
Okay well I think I'll stop for now, not really sure if there is a problem or not, when measuring output socket pin 1 to ground I get +314v on both sockets... when measuring pin 1 to 4 I get -127...
R14/R25 also gives +314...
I'm not sure what I did wrong 🙁 any help much appreciated.
R14/R25 also gives +314...
I'm not sure what I did wrong 🙁 any help much appreciated.
Okay think I found the problem...
R7 is no longer -340v when checked completely tubeless it's now +340v... it's possible that R25 was "bypassed" its larger than the locating holes so they bend backwards and both touched the body, I'm not sure if this could cause something to blow?
R7 is no longer -340v when checked completely tubeless it's now +340v... it's possible that R25 was "bypassed" its larger than the locating holes so they bend backwards and both touched the body, I'm not sure if this could cause something to blow?
- Status
- Not open for further replies.
- Home
- More Vendors...
- Tubelab
- Build coming together nicely