Now this was a very interesting find dumped on the side of the road and it sounds great circa 1978 very cool with a wooden sleeve unlike the modern crap sheeple buy. Download the service manual it's in German but if you are Afrikans it's easy.
Download the service manual. No Lin differential input stage simply a PNP a NPN driver and very interesting indeed a thermistor for bias control. Hmm class AB initially to class B?
And good old 2N3055s and pnp equivalent. It actually reminds me of one of ESP designs with a boot strap driver are we been brain washed to accept power op amp sound?
Open to comments but old school designs are interesting to get ideas from.
I am in the process of replacing the DIN inputs with RCA input and hard wiring the speakers.
I used to run such a receiver in my workshop.
Sounds surprisingly good and non fatiguing.....enjoy.
Dan.
Sounds surprisingly good and non fatiguing.....enjoy.
Dan.
Killer find. Please post some pics and also the din pin layout so if and when someone else finds o e they can converted it to RCA’s
Or I can make some din to rca cables
Or I can make some din to rca cables
...And good old 2N3055s and pnp equivalent.....
Is there more than one Beomaster 1400?
I see 2N5034, NPN only for the finals. (If you truly have '3055 they may have been an easy repair; the '5034 appears to fit TO3 holes and be about 3/4 of a '3055.)
There is *nothing* wrong with quasi-comp bootstrap non-diff designs at the 0.1% THD level. Arguably they are "safer" than amps without output caps and with current sources that won't quit into a short.
Diff-in full-comp comes when racing for sub-0.01% and angst-ing about how many big caps to use. Not about sonics.
Attachments
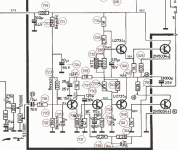
Sorry my typo, only two 2N3055s as output but it can can put out 20 watts into 4 Ohms.I
In the 70s, if your parents owned one of these then they were wealthy
In the 70s, if your parents owned one of these then they were wealthy
Yes there were two Beomaster 1400 models, and while the OP refers to the later one, PRR refers to the 1968 model, which I own. This is also a quasi design with single supply, and most remarkable is the stabilized supply at 30 V for the output stage: it really makes a difference for low-power amps !
Its styling is also remarkable, not the usual flat B&O style, but it seems it was from the TV department designer. Reminds me of the best decade for Scandinavian furniture design (1963-73).
Pity for the slider pots: if they break (and they do break) your only chance is taking them apart and fixing them with conductive paint.
The most common fault with these amplifiers is the bias pot. It corrodes over time and when open circuit can kill the output pair if it is left for a long time. Apart from that, they are reliable and well engineered.
- Status
- Not open for further replies.
- Home
- Amplifiers
- Solid State
- Beomaster 1400