
You're building a lot of holes. In 13.25" and 16" diameters. Are you planning to replicate the Grateful Dead's Wall Of Sound?
Actually, the holes are more like 14.25 and 17" and are not in my possession....
jacob has a start on the game but kind of a softball, wasn't it jake? 😛
Let's have some specificity!
jacob has a start on the game but kind of a softball, wasn't it jake? 😛
Let's have some specificity!
Balls? Thumbs? Definitely you are going to cut holes in that rounds, glue them together, and make some form of them.
Balls? Thumbs? Definitely you are going to cut holes in that rounds, glue them together, and make some form of them.
There we go- and that's as specific as we're going to be able to get because I'm still deciding what format to shape them in-
I was hoping someone would drop the "translam" bomb but you got it.

This is the concept I'm working with- wavy cutouts (I know the waves aren't significant at bass wavelengths but this enclosure might find itself used for a midwoofer later on) for full open sections, with alternating shelf-style bracing throughout, not only to brace the enclosure ( which will be absurdly strong anyway) but also to break up any potential resonances in the tube structure.
The Dumbell shape is the best I've come up with but I'm not thrilled with it. Drivers planned are creative sound Trio12 with a 15" passive, and I'll be building a pair. I haven't begun laminating but am cutting out the cores with my scrollsaw, both for the bracing style ones and the more open cross sections. I got the cutouts for free, they're baltic birch. Never would I dream of such a wasteful project otherwise!
Anyone have suggestions about alternate designs, given the type of material I'm limited to?
Are you making a circular mess?
or
Making me laugh by reading this thread and all the ridiculous replies?
Edit: Making me blush for not reading the whole thread!
Perhaps a slow taper through the whole thing, a sub tower for a FAST setup you could put the mid/hi array on top.
The staggered bracing is good tho.
or
Making me laugh by reading this thread and all the ridiculous replies?
Edit: Making me blush for not reading the whole thread!
Perhaps a slow taper through the whole thing, a sub tower for a FAST setup you could put the mid/hi array on top.
The staggered bracing is good tho.
Last edited:
Slow taper would be cool if I had a lot more of the 16"s to trim down, but it would be a lot more work- I'm trying to use the cutouts with sizing as-is, thanks for the suggestion though- I know the 2 sizes is limiting, which is why the dumbell (I'll bevel the edges of the 16" sections) is the frontrunner, though I've thought that a middle section of 16"s might be cool too, break up the long tube look of the middle.
You could get a lot more surface area using a kind of "Olympic ring" lamination, or cut the rounds to squares and do a checkerboard lamination using the cut offs for interior bracing.
You would then have enough material to do a large tapped horn and get more bang for your buck.
You would then have enough material to do a large tapped horn and get more bang for your buck.
Attachments

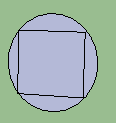
Just got a new computer and don't have any of my old familiar drawing programs, maybe you can get what I'm trying to convey with the picture below.I'm not sure I understand either of your concepts- can you elaborate?
Cut squares out of your circles.
Lay the squares out as a sheet, like a checkerboard, gluing the edges.
Glue and screw the round cut off portions over the lines of the checkerboard for bracing, use caulk as sealant if any glue joints look suspect to air leakage.
The round cut off portions go on the cabinet interior, the checkerboard is the exterior. You could alternate grain direction of each piece if you want the checkerboard pattern to stand out.
A lot of work still, but can be done on a table saw, faster than a scroll saw or a router cutting circles.
You end up wasting a lot less material, the "dumbbell tube" eliminates about 90%, while the checkerboard only looses about 35% of the material.
Attachments
Last edited:
Just got a new computer and don't have any of my old familiar drawing programs, maybe you can get what I'm trying to convey with the picture below.
Cut squares out of your circles.
Lay the squares out as a sheet, like a checkerboard, gluing the edges.
Glue and screw the round cut off portions over the lines of the checkerboard for bracing, use caulk as sealant if any glue joints look suspect to air leakage.
The round cut off portions go on the cabinet interior, the checkerboard is the exterior. You could alternate grain direction of each piece if you want the checkerboard pattern to stand out.
A lot of work still, but can be done on a table saw, faster than a scroll saw or a router cutting circles.
You end up wasting a lot less material, the "dumbbell tube" eliminates about 90%, while the checkerboard only looses about 35% of the material.
Thanks- that clarifies. I suspected that was your meaning but wasn't sure.
One would have to cut the first two pieces off with some sort of jig, to ensure a pure 90 degree angle and the right cutoff size, but then you could trim to size on the table saw using the fence once you had 2 straight edges to cut parallel to, which would be faster.
You would have to have one heck of a good blade alignment to avoid a warped checkerboard "sheet", or one that was enormously difficult to glue up. Also, glue lines tend to dull and dirty blades pretty quick.
All that said, I'm okay with the material loss (got these free from a pro speaker company, these are their cabinet cutouts), and part of what I'm hoping for here is to have the exposed layer "translam" look, and to use the circular character visually.
Can you explain a little more what you mean by the olympic rings setup?
In retrospect, the "Olympic Rings" would require cutting the plates in to hexagons, then doubling the layers, probably end up with about 40% of the original circle area.Can you explain a little more what you mean by the olympic rings setup?
It would be pretty easy to laminate on any flat surface, and would be double thickness everywhere, very solid.
That said, I use about 95% of my speaker cutouts for backing up wood for drilling, and the other 5% for small parts, too much work for the reclamation effort/blade wear/glue & screw cost vs. new plywood cost.
If I was tempted to make a cylindrical sub cabinet I'd just use two Sonotubes, sand fill between the two, and speaker cut-outs on each end.
Have fun cutting!
Art
Certainly the sand-filled sonotube is a good method for tubular- I didn't cut these circles, so that's the reason I'm willing to waste the material and time, the outside form is already done so I can do "Quick and rough" internal cutouts. The scrollsaw makes pretty quick work of them.
I do appreciate the input, it just seems your priorities are more about preserving maximum material. My motivation is more in getting something with the visually interesting (and very strong) translam assembly, which is naturally rather limiting in a number of ways.
I am retaining the cutouts, which are single-piece for the non-brace pieces, and will rework them into smaller translam bookshelf enclosures down the road, so there is not as much concern about waste as if I were simply tossing them.
Thanks again for the feedback art!
- Status
- Not open for further replies.
- Home
- Loudspeakers
- Subwoofers
- Anyone wanna guess what I'm building?