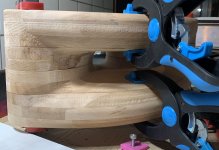
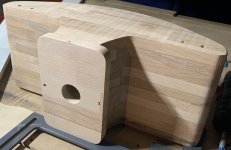
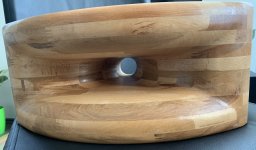
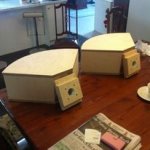
Time for the next step. I am working on a smaller ES horn made of beech. It is not solid wood, it is Leimholz (in German) which translates to "glued wood" - I am not sure how it is called in English. It is regular rectangular pieces of wood glued together. The thickness of this is really regular and the samples I bought were really flat. 18 mm thickness, the slices are now machined. They need to be glued into layers and machined in 3D. I need to pay more attention to the details and I think this will be a perfect horn for my CP755Nd drivers.


It is a way to make more efficient use of resources. I would still call it solid wood for most purposes. It's a little like butcher block.
From the machining point of view, these seem to be more precise and consistent (esp. thickness) than MDF or plywood. The various colors of the pieces should give it a very nicely looking surface.
We call it glulam where I’m from.
https://www.archdaily.com/928387/what-is-glued-laminated-wood-glulam
https://www.archdaily.com/928387/what-is-glued-laminated-wood-glulam
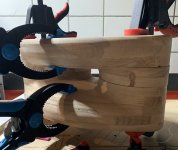
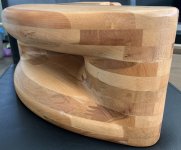
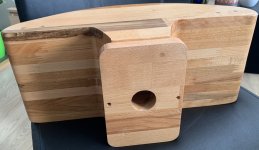
Beech is more difficult than MDF, plywood or OSB. And my 3D CNC skills are not good enough to get perfect results. It will require some sanding and lots of corrections with putty. The intention was to use oil finish, but I am not sure if that will look good. I also tried to use CA glue and wood dust for filling in some machining disasters. It did work really well.
Attachments
Any tips from the experienced guys on how to fill the imperfections, so that it will look more natural than coloured acrylic putty? I am afraid that the oil finish will not soak into the putty. Wood dust mixed with super glue seems to have a more natural color (similar to oil). How about wood dust and white PVA wood glue?
You could try the sanding dust mixed with a lacquer sealer. Mix to a creamy paste consistency and trowel it in. Sets up pretty quick for sanding.
Old filler trick used with parquet flooring installs.
Old filler trick used with parquet flooring installs.
Last edited:
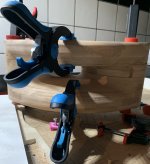
A short sanding session with random orbit sander with 80 grit paper made me more optimistic. Some things will be possible to sand off, the rest will be filled. The flat back side will be done with a belt sander. Unfortunately, it started raining, so I will have to continue tomorrow.
My target is to improve the CNC machining process so that there is much less sanding. I messed up the dowel holes a bit and used wrong tools, but still I am not sure if that is all I have done wrong. Next time, I will cut the slices oversized slightly so that the outline is machined together with the 3D part. I will also calibrate the thickness better. It seems not to be necessary to mirror the upper and lower parts, my CNC is almost perfectly squared.
The OSB is much more forgiving and so much easier to sand. One of the next horns will be OSB, but filled, sanded and finished properly. But first, I need to build second to this (and the big) pair.
Attachments
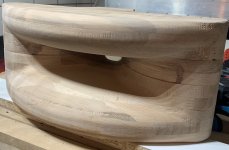
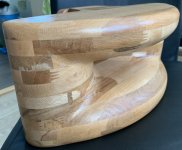
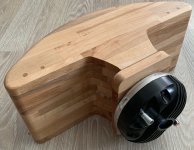
So this is the end result. Not great, not terrible🙂 With a bit more patience with CNC programming, the result will be better next time.
Attachments
-
 1D0C3531-2125-43EE-A0D6-C3A6963A64F4.jpeg413.3 KB · Views: 166
 -
 92B6B944-7CE1-4492-AD99-62F8F77B0FCA.jpeg461.4 KB · Views: 168
 -
 93E2C207-199D-48A0-8451-9BE47C0804C5.jpeg328 KB · Views: 162
 -
 77950A2C-C134-4DBB-BB8F-1DBDA44749D0.jpeg329.1 KB · Views: 155
 -
 86D777C6-7B68-447F-9E58-FB0A6B38F625.jpeg319.4 KB · Views: 165
Great project and nice job! We are waiting for your first measurements and listening impressions 👍🙂 What driver will be used?
This one is meant for Beyma CP755Ti but DCX464 will be tested as well when get a passive crossover for it.
High standards! I would be delighted with that result.So this is the end result. Not great, not terrible
If you look closely, there are quite a few imperfections. It is perfect for what it is, but if this was a product I bought, I would be slightly annoyed. The good thing is I know which mistakes I made, where to improve and the next beech horn will be better. Now I am cutting another horn of similar size from MDF and that is so much easier - but will be harder to finish nicely though. I also want to try the Durelis board - it is like a high grade OSB and ordinary chipboard as well. For horns which need a color finish anyway it does not matter. The laminated hardwood boards are pretty handy and not that expensive, I yet need to find some source for nice hardwood planks in one piece and around 30 - 40 mm thickness.
Well done on your DIY project. I've built a few horn systems, including CNC'd Yuichi 290S horn. With the 600Hz horn, what will aim for xover point....maybe 900-1,000Hz? Also, check out Joseph (Troy) Crowe's work...stunning. For $30, you can buy a CAD/CNC file. https://josephcrowe.com/
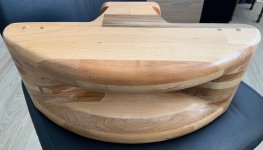
Thanks! I was inspired by your projects some time ago, still learning how to use a CNC router properly. This horn is Troy's ES800 scaled up 1.4 times and slightly modified, I also have had a custom horn designed by him and I already bought most of the models of his ES line. The ES800 was the first and I 3D printed it - and it turned out really well.
Good one. I love watching his videos. It makes my "2D" CAD/CNC projects look lame in comparison. I particularly how you (and he) use the large rounded curves at the horn mouth. My Yuichi 290S had straight sides. All the best with the project.Thanks! I was inspired by your projects some time ago, still learning how to use a CNC router properly. This horn is Troy's ES800 scaled up 1.4 times and slightly modified, I also have had a custom horn designed by him and I already bought most of the models of his ES line. The ES800 was the first and I 3D printed it - and it turned out really well.
Attachments
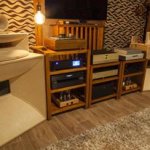
Finally I was able to make some quick outdoor measurement. This is on axis at 1 m, gated before the first reflection. Almost perfect LR4 at 800 Hz (the brown curve) without any EQ or crossover. This looks like it would be worth the effort to make a second one.

- Home
- Loudspeakers
- Multi-Way
- Another ES horn (600 Hz size, beech, CNC)