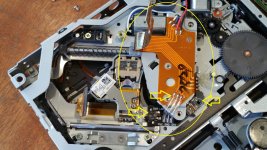
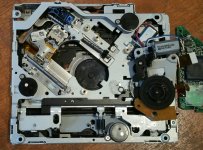
I was given an old Alpine CDA-7878 car reciever recently which has a 3-way DSP crossover, time alighnment and 45W x 4 amps so quite well specced. When I insert a CD it says "ERROR". I tried a cleaner CD but it didn't help so I've opened it up to try to get to the laser to clean it.
I've removed the CD rom ok but still no access to the laser lens. So I removed a circuit board and laser retaining screws thinking the laser would come out and its loose but its caught somewhere near the lens itself or the little black circuit board (arrowed and screws removed from it). I don't want to force anything so wondering if anyone has any idea how to remove it.
I've removed the CD rom ok but still no access to the laser lens. So I removed a circuit board and laser retaining screws thinking the laser would come out and its loose but its caught somewhere near the lens itself or the little black circuit board (arrowed and screws removed from it). I don't want to force anything so wondering if anyone has any idea how to remove it.
Attachments

If you are just trying to clean the lens then try turning the worm drive to a position where the lens is visible.
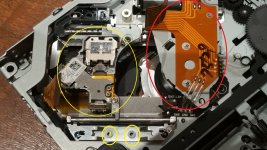
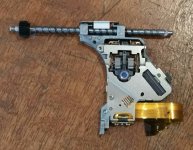
If you want to remove the laser completely then you might find that releasing the plastic bracket (top left) that retains the spiral rod will allow the pickup to be manually removed. There is also a screw on the pickup body (under your lower left yellow arrow) that looks like it may release the slide for that rail.
If you want to remove the laser completely then you might find that releasing the plastic bracket (top left) that retains the spiral rod will allow the pickup to be manually removed. There is also a screw on the pickup body (under your lower left yellow arrow) that looks like it may release the slide for that rail.
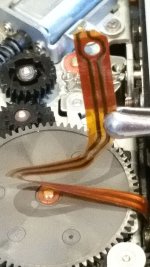
Thanks for the reply Mooly. I've removed the rail screws and the rail's loose-ish but being held on at 2 points which I've circled in yellow down below. I've got no idea what these are - they seem to be holes in the rail with a plastic looking material coming up through the holes and over the top like a plastic rivet. I tried gently to pry the rail up at these points but I don't want to break anything. Any ideas?
Also I wound the rail with some needle nose pliers as its quite stilff and managed to move the laser along but still can't get to it. The underside of the ROM is a maize of interlocking plates and allows no access. Just to confirm, the laser is what I have marked with the larger yellow circle rather than the red circle? What is it within the red circle?
Also I wound the rail with some needle nose pliers as its quite stilff and managed to move the laser along but still can't get to it. The underside of the ROM is a maize of interlocking plates and allows no access. Just to confirm, the laser is what I have marked with the larger yellow circle rather than the red circle? What is it within the red circle?
Attachments
The easiest way to move the sled is probably with a 1.5v battery on the sled motor.
Its always difficult just working off pictures but the screw I meant you to try was this one. It looks like it might remove the part that locates the pickup on the rail.
Its always difficult just working off pictures but the screw I meant you to try was this one. It looks like it might remove the part that locates the pickup on the rail.
Attachments

I couldn't budge that screw with the tools I had but I was able to remove the CD clamping mechanism with a bit more cajoling - it was catching on the gear which mates with the spocket on the end of the slider. I was then able to remove the slider/lens assembly.
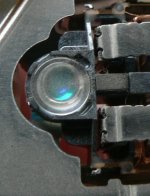
The laser lens looks pretty cloudy - I don't know if they are meant to look like this. Before I clean it, most people just seem to use a dry cotton/ear bud but is there any liquid I can use which is safe? Iso alchohol for example?
The other question is any idea where the pots would be which adjust the power to the laser? If the cleaning doesn't fix it then I'd like to go back in and try increasing the volts a very small amout to the laser.
Attachments
I've just found your post from 2012 re cleaning lenses but the identity of the "magic fluid" does not load up. Can you tell me what it is? Thanks.
How to clean the CD-laser lenses? With alcohol or without alcohol?
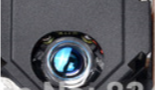
And a closeup of how dirty my lens is!!!
How to clean the CD-laser lenses? With alcohol or without alcohol?
And a closeup of how dirty my lens is!!!
Attachments
Last edited:
That is dirty.
The magic fluid isn't one of my posts 🙂 but I can tell you how to make some. You mustn't use pure ISO but what you need is around 30% ISO and 70% water together with ONE single drop of dishwashing liquid.
The magic fluid isn't one of my posts 🙂 but I can tell you how to make some. You mustn't use pure ISO but what you need is around 30% ISO and 70% water together with ONE single drop of dishwashing liquid.
Yes the CD player was in a 4WD for a time which made several trips to the Australian desert. Thanks alot for the cleaner recipe.
It wouldn't harm to put a hose from a vacuum on that. Hold your finger on the lens to stop it getting sucked to violently. It looks pretty grim tbh 😀
A clean lens should look super clean and twinkly sparkly when viewed with a torch. Don't be afraid to get the top of the lens wet, and just gently clean with a damp cotton bud. Repeat if needed.
If there has been a lot of fine dust in there then its possible the internal optics are dirty as well... unfortunately no easy fix for that... but getting the top of that lens clean should make a massive improvement.
Attachments
I gave the lens a good clean and the results are below. Looks pretty good to me now. Reassembled the rails and the clamping assembly after much trial and error. Now that I know where the lens sits I think it would be possible and a lot easier to clean the lens without taking it out, using a long bent swab like that used to clean cassette player heads.
If any other beginner is trying this on this model the best way I found (if you have disassembled everything) is to install the clamping assembly but leave the screws loose. Then fit the laser/slide assembly in the correct position onto the fixed slide, then push the lens/slider assembly into the clamping assembly, as the "worm drive" shaft end fits into a hole in the clamping assembly.
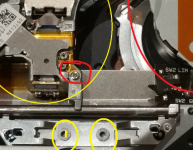
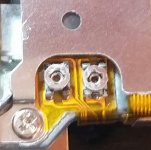
Unfortunately I managed to break a ribbon wire between the circuit board and the CD rom so I'll have to figure out how to repair this. I didn't realise it was just being held on by the solder. I also found what I believe to be the laser power adjustment pots - one says "5-2" and the other "E-r". I don't know which is which but one must be power and one offset? I won't touch them unless the lens cleaning doesn't work.
If any other beginner is trying this on this model the best way I found (if you have disassembled everything) is to install the clamping assembly but leave the screws loose. Then fit the laser/slide assembly in the correct position onto the fixed slide, then push the lens/slider assembly into the clamping assembly, as the "worm drive" shaft end fits into a hole in the clamping assembly.
Unfortunately I managed to break a ribbon wire between the circuit board and the CD rom so I'll have to figure out how to repair this. I didn't realise it was just being held on by the solder. I also found what I believe to be the laser power adjustment pots - one says "5-2" and the other "E-r". I don't know which is which but one must be power and one offset? I won't touch them unless the lens cleaning doesn't work.
Attachments
-
 Alpine CDA-7878 laser lens CLEANED 3 detail.jpg44 KB · Views: 136
 -
 Alpine CDA-7878 laser slider in clamp mechanism b.jpg854.3 KB · Views: 134
 -
 Alpine CDA-7878 broken wires.jpg303.5 KB · Views: 117
 -
 Alpine CDA-7878 laser pots 6.jpg281.2 KB · Views: 124
 -
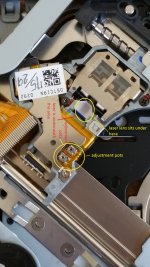 Alpine CDA-7878 laser location 2c.jpg777.2 KB · Views: 108
The 5-2 on the preset itself may be the value, five and two zeros (500 ohm). No idea on E-R although I can't see that on the other preset. E-F could be E-F balance, an electrical adjustment performed during initial setting up where E and F refer to the side detectors in the photo diode array within the pickup.
The 5-2 is on the top of the first pot whereas the E-r is at the bottom of the second pot. Could also be E-M or possibly F-M. Thanks again for all your help Mooly.
Will do. Today I sanded the ends of the broken ribbon cable to get them ready for resolding - no easy task : (
Next I have to look for my temperature controlled soldering iron. Have not seen it since we moved to the new house...
Next I have to look for my temperature controlled soldering iron. Have not seen it since we moved to the new house...
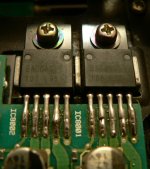
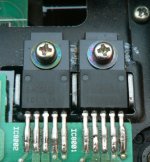
I've been doing some googling about this unit and there seem to be quite a few reports about CD error and overheating problems. I came across this thread which identified the problem as poorly soldered regulators IC8001 and IC8002 and the solution as simply resoldering the connections:
HI TEMP?!? - Page 6 - HighwayMP3
I have found these BA00AS regulators on my board and post a couple of pics below. Do they look like they need resoldering?
HI TEMP?!? - Page 6 - HighwayMP3
I have found these BA00AS regulators on my board and post a couple of pics below. Do they look like they need resoldering?
Attachments
Well I've fixed the ribbon cable and resoldered the regulators and ready to reassemble the unit but the black "heat shield" (I assume) which sticks to the top of the laser has lost it's stickiness. Is double-sided 3M tape enough to secure the heatshield? Not sure how well it will stand up to the heat. Is there a better product I can use which is heat resistant?
Attachments

- Status
- Not open for further replies.
- Home
- General Interest
- Car Audio
- Alpine CDA-7878 laser fix help