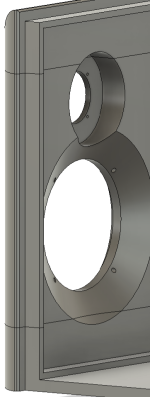
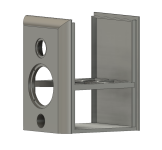
The drawing in the attachment shows the baffle with the rabbet joint. The wood side panels will be adhered to the baffle on the end grain and to 20mm of the inside face. The wood I'm using for the first pair is 1/2 inch prefinished BB.
Construction adhesive should be strong enough but I would prefer something thinner. Epoxy glue? Maybe there's something I'm not aware of?
Construction adhesive should be strong enough but I would prefer something thinner. Epoxy glue? Maybe there's something I'm not aware of?
Attachments
Since it’s the end grain, you either want an expanding glue like PU (gorilla) or slow setting epoxy that has time to penetrate. With epoxy you would normally pursue a two stage gluing process: first coat both sides with straight epoxy, wait, then mix in some filler and coat again before assembling. Whether PU glue will adhere to your 3d printed part is best determined through testing on some expendable part made from the same filament. PU glue is cheaper and easier to handle than epoxy, but it cannot fill gaps. Also, PU streaks can only be removed mechanically because nothing that you would want to handle dissolves this stuff. Epoxy can be wiped off with alcohol or white spirit while still wet. PU glue needs clamping, for epoxy you only need to secure the pieces until cured.

Can you 3D print some sort of keyed surface into the contact point/area like some dovetail shaped dado's, that would allow the epoxy a good mechanical bond
There are available on the net lists of plastic materials and the ease of use of adhesives with those.
Cross match with acoustic proprties, then make the part.
Some common plastics are notorious for poor sticking of anything.
I would recomend ABS, suitable for adhesion, and contains synthetic rubber, so decent acoustic properties.
Cross match with acoustic proprties, then make the part.
Some common plastics are notorious for poor sticking of anything.
I would recomend ABS, suitable for adhesion, and contains synthetic rubber, so decent acoustic properties.
The plastic along the gluing area needs to be roughed up with sandpaper, but this should be sufficient.keyed surface into the contact point/area
Thanks. I'm quickly losing interest in printing speakers after 24hrs to print one baffle for a trial run - I split up the body to fit in my printer. The speaker is about 250x290x420mm and the Elegoo Neptune max has enough print volume to print the entire piece but the print time is over 7days. Also finish work would needed to make the front baffle look nicer..
Thanks for suggestions. I'll probably build one pair with the 3d printed baffles but then I'll be done with it, then stick with all wood only..
Thanks for suggestions. I'll probably build one pair with the 3d printed baffles but then I'll be done with it, then stick with all wood only..
Attachments
I have been building the boxes of wood, but I've been printing the port. You can get better geometry than just a tube. I have used this reference and found the results to be good - https://www.diyaudio.com/community/attachments/harman-port-study-pdf.893225/
Why not use acrylic for the baffle? cast acrylic is denser and better suited for a baffle than filament. Use the printer for the dispersion profile and to achieve the flush mount look. Same look with similar sonics but much less print time since the bulk is already there.Thanks. I'm quickly losing interest in printing speakers after 24hrs to print one baffle for a trial run - I split up the body to fit in my printer. The speaker is about 250x290x420mm and the Elegoo Neptune max has enough print volume to print the entire piece but the print time is over 7days. Also finish work would needed to make the front baffle look nicer..
Thanks for suggestions. I'll probably build one pair with the 3d printed baffles but then I'll be done with it, then stick with all wood only..
For the adhesive, I'd use melamine PVA. Stuff is designed to stick to glossy, non-porous materials, and of course, wood. Dries flexible, like a stiff silicone. Like all PVAs, it shrinks as it dries so you'll want to add a 2nd coat (especially to the end grain) before mating the 2 pieces. I guarantee you won't be able to separate them after bonding and curing.
Picture below is different from what you're doing but similar enough to post here. It's an omni in a folded Voigt pipe. Baffle is 10mm acrylic covered with a 6mm diffuser 3d printed with 10% infill, no top or bottom. Driver is adhered with the PVA mentioned above to ensure total damping of the pressed steel rim. Baffle itself is isolated from the wood enclosure using foam weather stripping and is held down with screws, metal and rubber washers to minimise mechanical coupling.

Agree, I think exploring router jigs/tools/bits is more fun.I'll probably build one pair with the 3d printed baffles but then I'll be done with it, then stick with all wood only.
Far as 3D printing, the possibility to make your own router templates is pretty amazing.
Seems like you already had it figured out though to complete the project.
Prepped surfaces and plain old 2 part epoxy.
Yes, I'm working on drawing ports based on that research. thanks!I have been building the boxes of wood, but I've been printing the port. You can get better geometry than just a tube. I have used this reference and found the results to be good - https://www.diyaudio.com/community/attachments/harman-port-study-pdf.893225/
Have you seen augerpro's experiments based on that study! https://www.somasonus.net/box-construction-methods
Yes, I'm working on drawing ports based on that research. thanks!
Have you seen augerpro's experiments based on that study!
I think I saw that at one point, but he's added more interesting stuff since. Good CLD results, I'll have to go over it to see what I can nab for my own construction...
For 3D printing the ports here are a couple of things I realized:
- break it in half, front and back, so you can print with relatively few supports
- make your model parameterized. Every time I go back and make a new port I'm so glad I did this.
- On the parameters sheet for the model (I'm using FreeCAD) I included the port tuning EQ (uh, I think it's EQ 11 on Pg 32?) so when I'm twiddling parameters I can see what port tuning I get. Typically still have to iterate once to hit it exactly.
I haven't done a scientific A/B with normal vs Harman ports, but I do feel like the Harmon port is very clean for its diameter / length / output. But I had been making slot ports and those aren't very good. The trade off has been that the end becomes large, and in some cases can make for tight spacing.
- Home
- Design & Build
- Construction Tips
- Adhesive for joining 3D printed baffles to wood