Over the coming days I will post more versions of various chassis feet here for anyone who has access to a 3D printer to download and try out.
Here are some posts I've made previously for 3D printed chassis feet.
Bare Board Feet (ACA Mini slide on over Hex)
Bare Board Feet (ACA Mini, or others using M3 bolt/nut)
Bare Board Feet (Zenductor II)
Modushop Feet Risers (fits inside standard Modushop plastic feet)
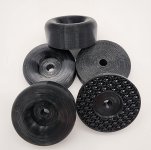
Here's the latest version I made based on dimensions of a commercial chassis foot for sale. You want to print using soft TPU (Thermal Polyurethane) to get close to the squishiness of rubber. Additionally, TPU has some grip (not as grippy as rubber, but works fine), whereas harder plastics like PLA and PETG are slippery and could scratch more delicate wood surfaces if used on heavy amps.
Suggested TPU Print Settings for Large Chassis Feet:

Here's the dimensions of these large chassis feet mimics from off the shelf rubber options.


Here are some posts I've made previously for 3D printed chassis feet.
Bare Board Feet (ACA Mini slide on over Hex)
Bare Board Feet (ACA Mini, or others using M3 bolt/nut)
Bare Board Feet (Zenductor II)
Modushop Feet Risers (fits inside standard Modushop plastic feet)
Here's the latest version I made based on dimensions of a commercial chassis foot for sale. You want to print using soft TPU (Thermal Polyurethane) to get close to the squishiness of rubber. Additionally, TPU has some grip (not as grippy as rubber, but works fine), whereas harder plastics like PLA and PETG are slippery and could scratch more delicate wood surfaces if used on heavy amps.
Suggested TPU Print Settings for Large Chassis Feet:
- Temperature - Depends on your brand of TPU (I use around 220°C for mine)
- Walls - 2, or 3
- Infill - Gyroid, 15-20%
- Top/Bottom - Increase top to 8 layers at 0.2mm/layer. Feel free to do the same with the bottom layer if you don't mind a few extra minutes of print time, but not critical since it's in compression.
- I suggest using a glue stick for the plate adhesion, but if you know what you're doing, it's not critical to use, just a safety blanket for me since I print on flat glass.
Here's the dimensions of these large chassis feet mimics from off the shelf rubber options.
Attachments
Last edited:

I've been using this design for a lot of my enclosures:

The hole is covered by a stick-on felt pad to avoid scratching whatever the enclosure is sitting on. This one was designed to accommodate 6-32 screws.
But the 3D printer applications don't stop there -- here's a control knob I designed:

The hex hole in the center accommodates a length of hex stock that is used to fix the knob to the potentiometer shaft. I'm using blue PLA+ which makes a nice contrast to the brass color. I also printed one in black, that will be fun to evaluate.
I also have printed board mount blocks for situations where the original holes in the PCB didn't work out. These all were designed using openSCAD.
3D printers are great for this kind of thing. I'm a recent convert and loving it!
The hole is covered by a stick-on felt pad to avoid scratching whatever the enclosure is sitting on. This one was designed to accommodate 6-32 screws.
But the 3D printer applications don't stop there -- here's a control knob I designed:
The hex hole in the center accommodates a length of hex stock that is used to fix the knob to the potentiometer shaft. I'm using blue PLA+ which makes a nice contrast to the brass color. I also printed one in black, that will be fun to evaluate.
I also have printed board mount blocks for situations where the original holes in the PCB didn't work out. These all were designed using openSCAD.
3D printers are great for this kind of thing. I'm a recent convert and loving it!
I'd be happy to share these scripts if there's any interest.
BTW the control knob upper perimeter has been rounded-over using a torus form. That makes it look a bit more organic.
BTW the control knob upper perimeter has been rounded-over using a torus form. That makes it look a bit more organic.
@Mark'51
You're welcome to post the STL/3MF files here, or the CAD files if you'd like. Another option, is start your own thread in the "Parts" section. I always use "[3D Print]" in the title of a post to help make it easy to search for 3D print files. I'm happy to add a link in the first posts above to your thread sharing your designs.
You need to zip up the files in order for them to be uploaded to the site since the file names (".STL", ".3MF", ."STEP", ".IGS", etc..) are not allowed for upload here.
Last edited: