I'm making my first active 3-way sealed enclosure. With much kind help from the forum I'd done a lot of planning and bought components for a very different design, but then circumstances changed and the intention now is for a (relatively) compact design, using what I already bought (and with minimal additional cost). So not ideal and any compromises needed but there we go.
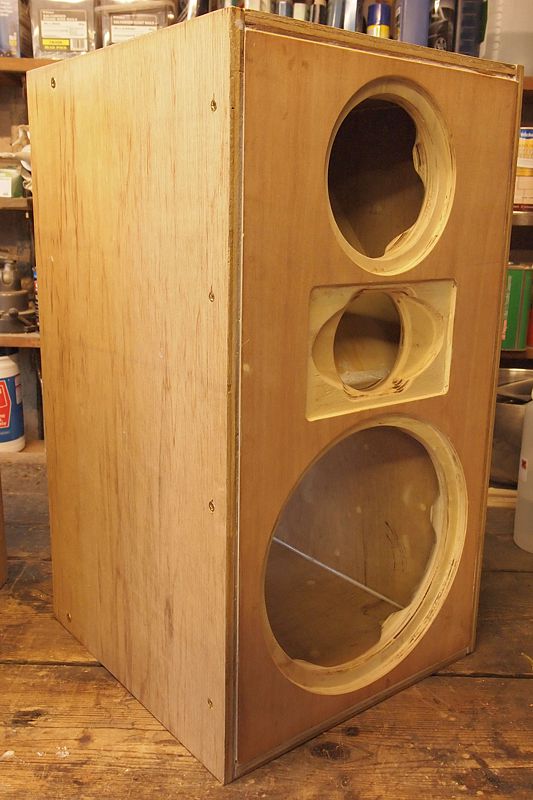
However, at long last, I've finally started making something! The cabinets - which are technically test cabinets but in reality likely to be used for some time. The bass section is for a scanspeak 26W-8861-T01, and for compactness about half the volume it should be - I'm going to take advantage of it being an active setup to use a linkwitz transform rather than volume to get the desired Qtc. The mid (& tweeter) enclosure is for a scanspeak 15W-8530K01 mid/bass driver, and again is about half the volume needed for a normal Qtc, however I'm only using it above about 270Hz and the Qtc barely has an effect up there so no correction needed. The tweeter will be the scanspeak d2608 (peerless HDS) in a pellegrene waveguide.
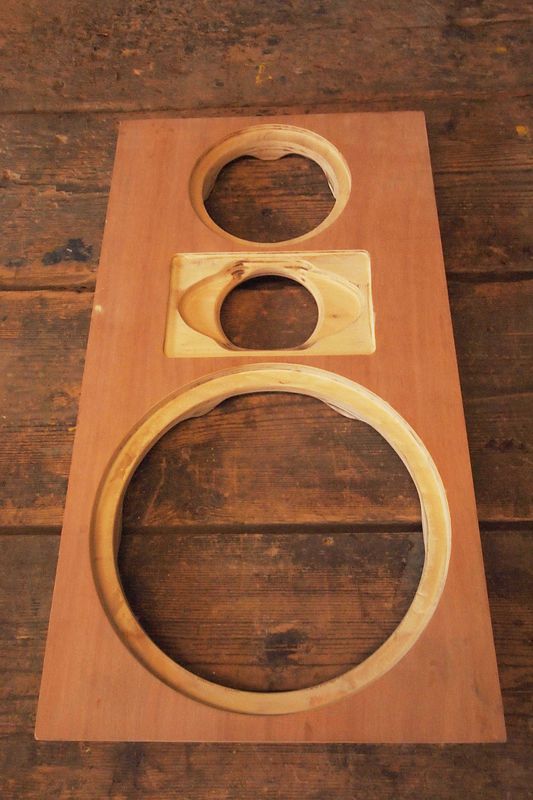
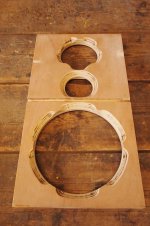
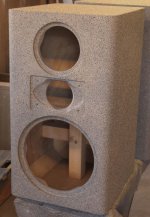
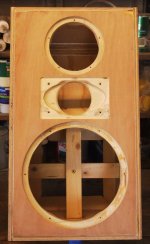
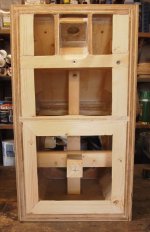
The baffle front. In line with the aim of compactness, its only a little bigger than the drivers. Its 36mm thick (two sheets of 18mm ply).
After listening to the mid and tweeter (which is in a rectangular waveguide) I decided to have the tweeter below the mid - I don't have a proper crossover for it yet though so the listening I did may not be valid; time will tell.
The baffle rear, chamfered around the rear of the driver holes except where the screws are to go. The tweeter chamfer probably wasn't necessary, but I guessed it may help with heat.
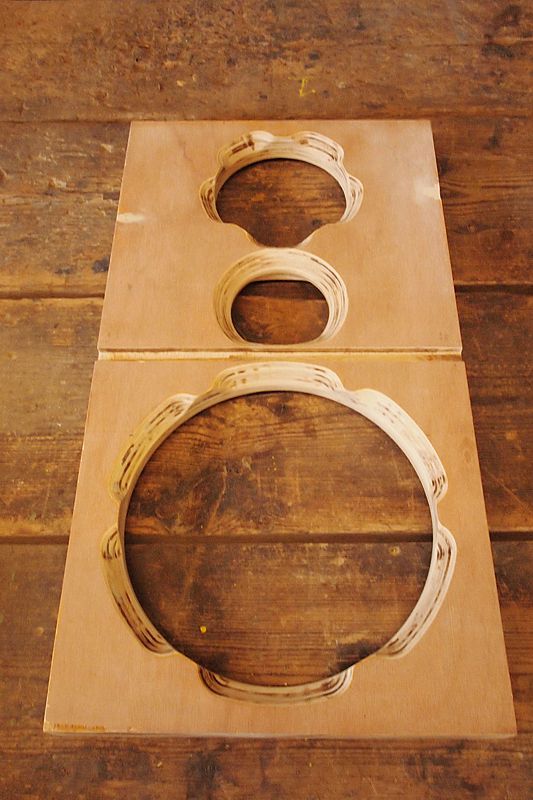
The horizontal recess is to take a brace.
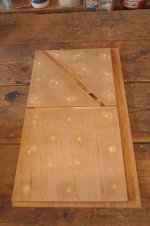
A side. Made by laminating two 1/2" sheets of ply (as I had a couple of full sheets doing nothing). The horizontal recess is for the same brace as in the baffle, the angled one will be for the rear wall of the mid/tweeter section.

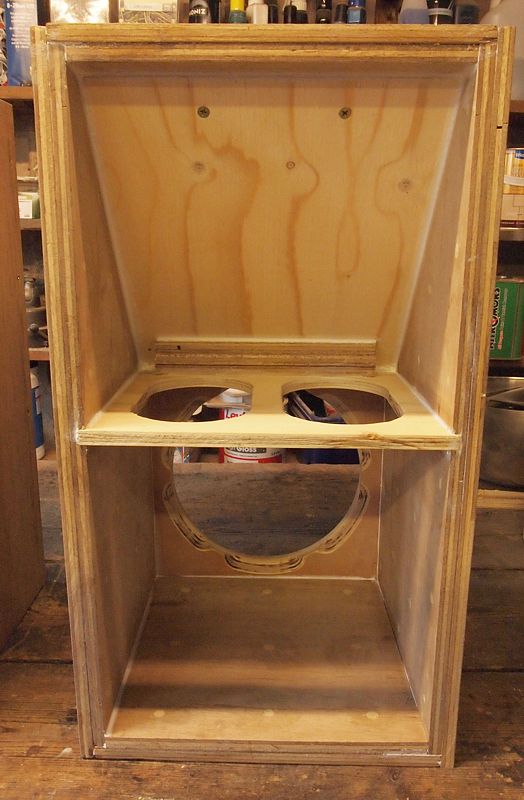
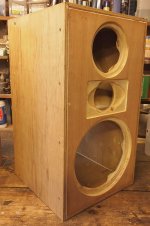
The cabinet glued up, except for the rear panel. As you can see (due to the volumes needed) the depth of the cabinet is almost the same as the width so I'm hoping plentiful stuffing will help offset that. Its also about twice as high as the width/depth, but having the angled bit stops it being like that internally, except at the very tip.
I may add some extra braces, possibly.
Hmm, compact is only relative; at about 1' square by just under 2' high they're still fairly large (and weighty) cabinets by 'compact' standards. At least I decided to situate the amps externally so they won't make the size/weight worse.
Front view; at some point I will round over the corners either side of the front baffle.
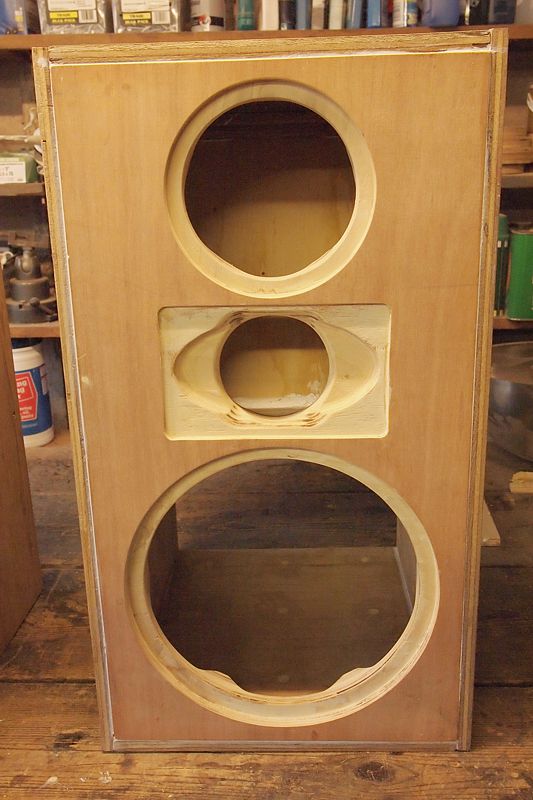
Looking rather old school - far from the tall, narrow elegant tower and/or curved organic shapes I'd had in mind. But its economical in terms of size/shape and reminds me of speakers I had when younger, so suits my immediate requirements and is at least pleasantly nostalgic.
So a bundle of compromises, and as I'm a noob probably full of errors, but very satisfying to have started doing something.
Cheers
Kev
However, at long last, I've finally started making something! The cabinets - which are technically test cabinets but in reality likely to be used for some time. The bass section is for a scanspeak 26W-8861-T01, and for compactness about half the volume it should be - I'm going to take advantage of it being an active setup to use a linkwitz transform rather than volume to get the desired Qtc. The mid (& tweeter) enclosure is for a scanspeak 15W-8530K01 mid/bass driver, and again is about half the volume needed for a normal Qtc, however I'm only using it above about 270Hz and the Qtc barely has an effect up there so no correction needed. The tweeter will be the scanspeak d2608 (peerless HDS) in a pellegrene waveguide.
The baffle front. In line with the aim of compactness, its only a little bigger than the drivers. Its 36mm thick (two sheets of 18mm ply).
After listening to the mid and tweeter (which is in a rectangular waveguide) I decided to have the tweeter below the mid - I don't have a proper crossover for it yet though so the listening I did may not be valid; time will tell.
The baffle rear, chamfered around the rear of the driver holes except where the screws are to go. The tweeter chamfer probably wasn't necessary, but I guessed it may help with heat.
The horizontal recess is to take a brace.
A side. Made by laminating two 1/2" sheets of ply (as I had a couple of full sheets doing nothing). The horizontal recess is for the same brace as in the baffle, the angled one will be for the rear wall of the mid/tweeter section.
The cabinet glued up, except for the rear panel. As you can see (due to the volumes needed) the depth of the cabinet is almost the same as the width so I'm hoping plentiful stuffing will help offset that. Its also about twice as high as the width/depth, but having the angled bit stops it being like that internally, except at the very tip.
I may add some extra braces, possibly.
Hmm, compact is only relative; at about 1' square by just under 2' high they're still fairly large (and weighty) cabinets by 'compact' standards. At least I decided to situate the amps externally so they won't make the size/weight worse.
Front view; at some point I will round over the corners either side of the front baffle.
Looking rather old school - far from the tall, narrow elegant tower and/or curved organic shapes I'd had in mind. But its economical in terms of size/shape and reminds me of speakers I had when younger, so suits my immediate requirements and is at least pleasantly nostalgic.
So a bundle of compromises, and as I'm a noob probably full of errors, but very satisfying to have started doing something.
Cheers
Kev
Attachments


Last edited:

Thanks.
Odd, I can't see the images inline, I wonder why - they were visible in the preview. Not, that I can do anything to edit the post now anyway. Oh well, hopefully it won't be too annoying for people to click the links.
Kev
Odd, I can't see the images inline, I wonder why - they were visible in the preview. Not, that I can do anything to edit the post now anyway. Oh well, hopefully it won't be too annoying for people to click the links.
Kev
I am a big fan of active loudspeakers and have built a few, including one using a Linkwitz transform.
The Linkwitz transform for the bass unit will work fine but just be aware of its limitations regarding possible amp clipping, driver excursion and limited SPL.
Frank.
The Linkwitz transform for the bass unit will work fine but just be aware of its limitations regarding possible amp clipping, driver excursion and limited SPL.
Frank.
Thanks Frank, seems encouraging! Yeah, the amp limits the minimum box volume in this case, I don't have enough headroom to fight against a smaller one. The excursion means I'll have to choose a slightly higher rumble filter than I'd like too, or else persuade myself to stick to lower SPLs, but its not far off what I was aiming for so thats good news.
Thanks again
Kev
Thanks again
Kev
Very nice selection of drivers you've chosen there. I feel a bit jealous.
I don't know much about active speakers but those bass drivers have a very generous xmax and with maximum excursion of +-14mm they should be able to go pretty loud even with eq, I'd have thought.
I don't know much about active speakers but those bass drivers have a very generous xmax and with maximum excursion of +-14mm they should be able to go pretty loud even with eq, I'd have thought.
I was quite lucky (I hope!) - the 26Ws are second-hand and the 15Ws old stock, but yes still not cheap and I wouldn't be able to afford them now. Just hope they are okay when they get put through their paces :-/
The X-mech of the 26Ws is very reassuring, although I have an OEM version so I'm assuming its the same. The linear X-max is only 9mm though, which I'm trying to design expected/normal peaks to be within; perhaps thats being too cautious though.
Cheers
Kev
The X-mech of the 26Ws is very reassuring, although I have an OEM version so I'm assuming its the same. The linear X-max is only 9mm though, which I'm trying to design expected/normal peaks to be within; perhaps thats being too cautious though.
Cheers
Kev
Only 9mm!!! - The 8" woofers in my sealed speakers only have 3mm Xmax and go more than loud enough for most people. I haven't modeled that woofer but I'd imagine they'd reach some pretty high SPLs before distortion becomes noticable. All this depends on the size of the room you are trying to fill, the low frequency content of the music you are playing and the amount of power you give them.
Seriously, I wouldn't worry too much about staying within linear xmax. With my speakers, If I go well past xmax it modulates vocals and makes them sound like robots but that's at very high volumes and the worst track for that is "Hey Now" by London Grammar (when the bass line kicks in).
Seriously, I wouldn't worry too much about staying within linear xmax. With my speakers, If I go well past xmax it modulates vocals and makes them sound like robots but that's at very high volumes and the worst track for that is "Hey Now" by London Grammar (when the bass line kicks in).
Yeah, you're right, the drivers aren't bad at all. Though it would be a lot to ask to have all my wishes at once below about 30Hz - so either the peaks will exceed X-max, or I need to roll it off faster than a Qtc of 0.5, or play quieter than the target SPL.
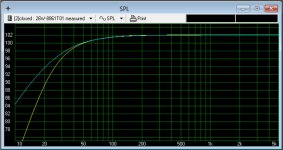
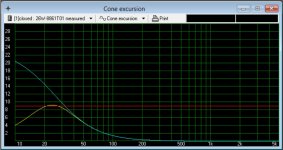
This is the target peak SPL; about 102dB. If I accept the peaks can typically be up to 20db above normal programme material (for less compressed music), that gives me 82dB@1m on average.

The upper line shows a Qtc of 0.5, the lower line is the affect of rolling it off faster to stay in Xmax:

So from what you're suggesting I could perhaps allow some use of Xmech for the highest peaks and make the roll off more shallow as a result. I don't want it sounding distorted (within the intended SPL) but perhaps the odd high peak now and again being non-linear wouldn't make a huge difference.
Cheers
Kev
EDIT: ah, the inline images worked this time 🙂
This is the target peak SPL; about 102dB. If I accept the peaks can typically be up to 20db above normal programme material (for less compressed music), that gives me 82dB@1m on average.
The upper line shows a Qtc of 0.5, the lower line is the affect of rolling it off faster to stay in Xmax:
So from what you're suggesting I could perhaps allow some use of Xmech for the highest peaks and make the roll off more shallow as a result. I don't want it sounding distorted (within the intended SPL) but perhaps the odd high peak now and again being non-linear wouldn't make a huge difference.
Cheers
Kev
EDIT: ah, the inline images worked this time 🙂
Attachments
Last edited:
A little more progress to report. Firstly some braces were added, seen here before the back is put on:

I built a recessed area between two braces at the top, this will take a multi-way speakon socket; the dedicated amps will be external and I want them detachable to help with portability. The corner braces look pretty big in the picture above, but they are all triangular section so only occupy half the volume they may appear.
View of the cross-brace through the woofer hole:

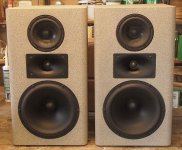
Once assembled and dried, the vertical corners were rounded to a 1" radius, and spent a lifetime or two filling, sanding and priming. I didn't round the horizontal corners in case I want to veneer in the future. But for now at least I decided just to paint, using rust-oleum stone-effect spray paint.

Obviously they still aren't the tall slender floor mounted cabinets I'd like, but I'm considerably happier with the aesthetics after the corner-rounding and painting.
Cheers
Kev
I built a recessed area between two braces at the top, this will take a multi-way speakon socket; the dedicated amps will be external and I want them detachable to help with portability. The corner braces look pretty big in the picture above, but they are all triangular section so only occupy half the volume they may appear.
View of the cross-brace through the woofer hole:
Once assembled and dried, the vertical corners were rounded to a 1" radius, and spent a lifetime or two filling, sanding and priming. I didn't round the horizontal corners in case I want to veneer in the future. But for now at least I decided just to paint, using rust-oleum stone-effect spray paint.
Obviously they still aren't the tall slender floor mounted cabinets I'd like, but I'm considerably happier with the aesthetics after the corner-rounding and painting.
Cheers
Kev
Attachments
Thanks! Yeah, hopefully. I should really wait the recommended 24hrs for the stone effect paint to get fully dry/hard before trying the drivers, which is going to test my patience. Must resist...
Cheers
Kev
Cheers
Kev
How warm is the room? Sometime Stone effects can take longer than 24 hours if in say, an unheated workshop.
Erm... its an unheated workshop.. Hmm, best handle carefully to begin with, then!
Although we're actually due some sun tomorrow, so hopefully it will get quite hot in there during the day.
Although we're actually due some sun tomorrow, so hopefully it will get quite hot in there during the day.
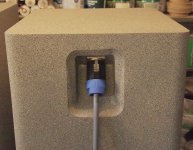
You were right, Cal - it took longer than 24hrs even in mid summer, it was getting on for this evening before the coating was finally starting to feel hard. So not much opportunity to do a lot, but the speakon socket has been fitted:


its an 8-way (they don't do a 6-way that I could find), aside from convenience compared to separate sockets, I'm imagining that (once wired up correctly) it should reduce the chances of me connecting (say) the bass amp to the tweeter by mistake.
The cable is 7-way, just what they use for connecting trailer/caravan lights up with, so reasonably chunky and flexible. I've tried it with my existing (full-range) speakers and theres no difference that I can hear to the super heavy gauge OFC I normally use (which is good now, but shows I was probably gullible back in the day when I bought that!).
Cheers
Kev
Attachments

Oh! It look pretty , so what about material of sanding coat. It take more some days, can enjoy with these speakers. Very good
Thanks, as I get more accustomed to them I'm getting happier with their look too - perhaps I was just too set on the original tall slimline ideas in my head.
As the sanding layer, I used several coats of normal/household undercoat for wood - more for reasons of cost than anything else. It comes in large pots and is cheap and (in my case) I had lots already. But I wouldn't really advise it, each coat takes a long time to dry and doesn't sand very easily; proper sanding sealer or thin/spray-on automotive filler would have been much easier. Beneath that I used some car body-type filler for any large holes or depressions, the sort that is mixed with a catalyst and sets in minutes.
So yes, the undercoat took a couple of days, the stone effect took a couple more, and the clear lacquer top coat yet a couple more to set. Of course I didn't stand there watching each stage dry so it wasn't a problem, but definitely there are quicker ways.
Cheers
Kev
More progress was made last night, its getting dangerously close to the stage where I have to work out my testing methods.
First the stuffing; following help on other threads I decided to use 70% wool insulation, which isn't quite as effective as fibreglass but was still reasonably cheap and available locally. I compromised on the performance as I can foresee myself tinkering with it quite a lot, and its much more pleasant to handle.

It does smell like a farmyard though! I started with 1/2lb per cubic foot and will increase that whilst measuring the bass driver's impedance to reach a rough optimum.
The drivers were put in, along with a 33uf protection capacitor for the tweeter. I used a thin bead of silicone to seal the mid and tweeter, and (as it will come in and out for stuffing tests etc) I used a dry gasket made from draft strip (self adhesive foam strip) for the woofer.

Hopefully I gauged the screw tightness correctly for the woofer, I understand you can distort the driver's basket if tightened too much against a gasket with give in it. It seems fairly firm and I can't see much deflection around the screws, so fingers crossed it should be ok.
Drivers are a pair of second hand YG acoustics (made by scanspeak) 26w-8861t01, a pair of new/old-stock scanspeak 15w-8530k01 mid/bass drivers and scanspeak d2608-913000 (I believe previously the peerless HDS) tweeters in pellegrene 165x100mm waveguides. All were originally chosen (when I was richer) for a different project with much kind help from this forum. Consequently the woofer volume required is greater than I would like for this project; ungainly as these cabinets are they're still too small without the gentle EQ that I propose to use - yet again after kind advice from the forum
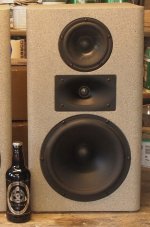
And here for scale with a 500ml bottle of beer, which didn't last long after the photograph was taken.

I've been doing some gentle (and very subjective) initial testing this morning, with crossover set in the media player's software. I only have a 2-channel amp at the moment and need to measure the bass driver's Qts before I can set the EQ for it, so can't hear them properly yet. But the mid/bass and tweeter combination at least is very pleasing. For their price, my existing JPW bookshelf speakers were fairly well regarded by the hi-fi community back in the day, but I've already noticed improved clarity of vocals so it all sounds promising so far.
Cheers
Kev
First the stuffing; following help on other threads I decided to use 70% wool insulation, which isn't quite as effective as fibreglass but was still reasonably cheap and available locally. I compromised on the performance as I can foresee myself tinkering with it quite a lot, and its much more pleasant to handle.
It does smell like a farmyard though! I started with 1/2lb per cubic foot and will increase that whilst measuring the bass driver's impedance to reach a rough optimum.
The drivers were put in, along with a 33uf protection capacitor for the tweeter. I used a thin bead of silicone to seal the mid and tweeter, and (as it will come in and out for stuffing tests etc) I used a dry gasket made from draft strip (self adhesive foam strip) for the woofer.
Hopefully I gauged the screw tightness correctly for the woofer, I understand you can distort the driver's basket if tightened too much against a gasket with give in it. It seems fairly firm and I can't see much deflection around the screws, so fingers crossed it should be ok.
Drivers are a pair of second hand YG acoustics (made by scanspeak) 26w-8861t01, a pair of new/old-stock scanspeak 15w-8530k01 mid/bass drivers and scanspeak d2608-913000 (I believe previously the peerless HDS) tweeters in pellegrene 165x100mm waveguides. All were originally chosen (when I was richer) for a different project with much kind help from this forum. Consequently the woofer volume required is greater than I would like for this project; ungainly as these cabinets are they're still too small without the gentle EQ that I propose to use - yet again after kind advice from the forum
And here for scale with a 500ml bottle of beer, which didn't last long after the photograph was taken.
I've been doing some gentle (and very subjective) initial testing this morning, with crossover set in the media player's software. I only have a 2-channel amp at the moment and need to measure the bass driver's Qts before I can set the EQ for it, so can't hear them properly yet. But the mid/bass and tweeter combination at least is very pleasing. For their price, my existing JPW bookshelf speakers were fairly well regarded by the hi-fi community back in the day, but I've already noticed improved clarity of vocals so it all sounds promising so far.
Cheers
Kev
Attachments

Last edited:
- Status
- Not open for further replies.
- Home
- Loudspeakers
- Multi-Way
- 3-way (finally) started! The cabinet