I have a habit of never making things easy for myself, so I used mdf pieces that I had left over from other projects to avoid buying new ones.
And i had no plan at all except that it would be a very potent 3 way, but built as small as possible with drivers i had home.
The most important thing for me when I build speakers, is to always start from drivers that I really believe in (and have at home) because money is in short supply.
So used in this diy was:
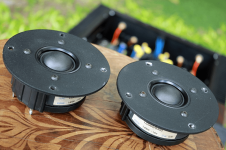
a old 28 mm Scan Speak 9300 for tweeter.
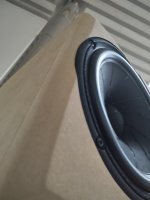
A 6½ inch Scan Speak 18M/4631T00 for midrange
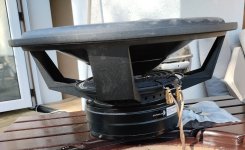
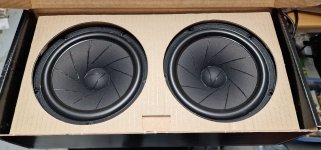
And 15 inch Dayton rss390ho-4 for woffer
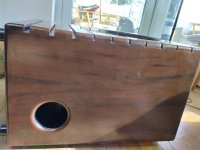
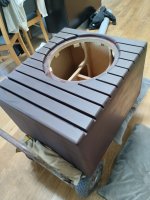
Because i had alot of smaller mdf pieces but not many large ones, i had to make separate cabinettes for all drivers.
And the tweeter dosent need "air" behind it, so you can create whatever box you like as small as you like...it just needs to be nice enough to look at.
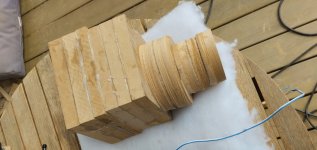
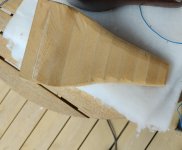
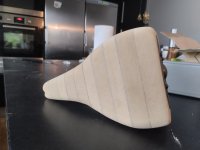
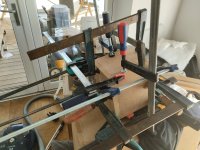
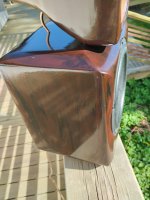
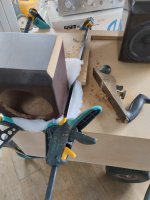
So i just begain to glue together small pieses of leftover mdf, and it end up looking like this "wooden block-garbage"
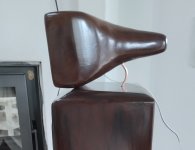
After a while it look like this
And end up like this.
to be continued
/John
And i had no plan at all except that it would be a very potent 3 way, but built as small as possible with drivers i had home.
The most important thing for me when I build speakers, is to always start from drivers that I really believe in (and have at home) because money is in short supply.
So used in this diy was:
a old 28 mm Scan Speak 9300 for tweeter.
A 6½ inch Scan Speak 18M/4631T00 for midrange
And 15 inch Dayton rss390ho-4 for woffer
Because i had alot of smaller mdf pieces but not many large ones, i had to make separate cabinettes for all drivers.
And the tweeter dosent need "air" behind it, so you can create whatever box you like as small as you like...it just needs to be nice enough to look at.
So i just begain to glue together small pieses of leftover mdf, and it end up looking like this "wooden block-garbage"
After a while it look like this
And end up like this.
to be continued
/John
Attachments


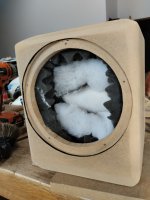
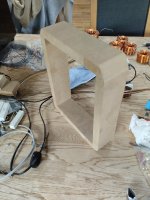
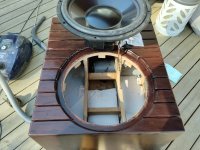
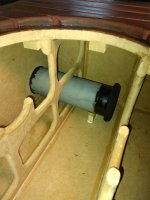
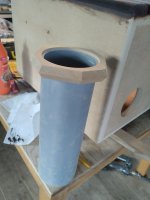
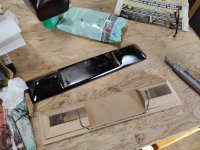
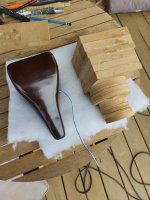
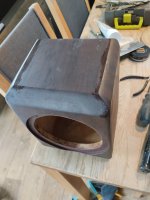
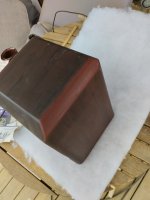
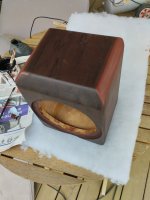
Then i begain with the midrange-box, and i wanted to use the driver from 150-180 hz
My only goal was to make it small at ca 7-8 liter, and tryout with measurements from there.
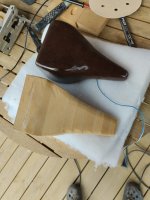
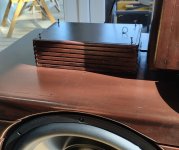
Even had to glue 2 pieses to one because i dident find a big enough for the top.
After some planing and sanding the edges so it turned out like this, and i was lucky so the ending of the SS drivers rounding continue with the rounding of the box.
After a little mesaurement and advice from "Loysec" and "Raymondj", i cut down the 7-8 liter to 4 liter and used much filling, so had to push to get the driver in place.
to be continued
/John
My only goal was to make it small at ca 7-8 liter, and tryout with measurements from there.
Even had to glue 2 pieses to one because i dident find a big enough for the top.
After some planing and sanding the edges so it turned out like this, and i was lucky so the ending of the SS drivers rounding continue with the rounding of the box.
After a little mesaurement and advice from "Loysec" and "Raymondj", i cut down the 7-8 liter to 4 liter and used much filling, so had to push to get the driver in place.
to be continued
/John
Attachments
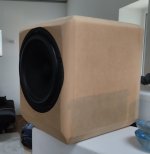
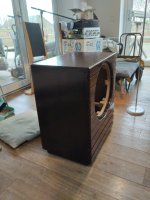
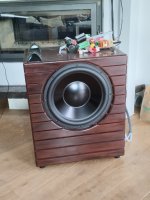
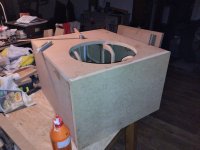
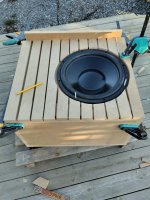
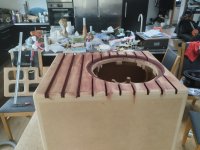
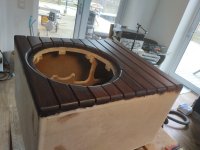
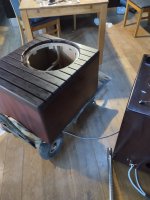
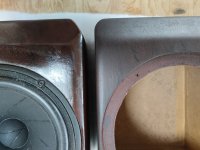
It was time for the woofercabinett, and i had simulated a little and decided that the Dayton 390ho need about 92 liter netto.
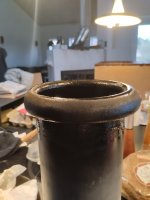
And tuned to 23 hz with 35 cm port (102 mm inside) looks good in simulation.
And because i wanted it slim, I chose to use a side-mounted woofer.
Build the box in 22 mm mdf and with 2 extra reinforcements inside.
Dont know why, but i always gets stressed when it's time to glue all the pieces together, & when you've got all 8 pieces together, they all slide around in the slippery wood glue.......and time is of the essence if you want a real solid box.
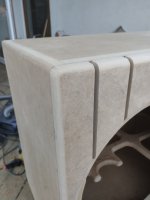
Also had many narrow small pieces of mdf "leftovers", so I decided to build the baffle stronger with slats, and also at the same time get a design-thing. And also made the port-endings in mdf.
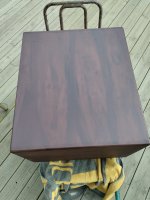
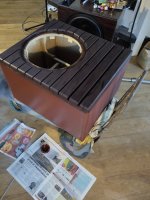
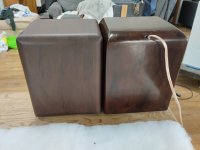
I would then try to make all these diy speakerboxes in mdf look like walnut with 2 different staincolurs.
I had oilbased stain in "Rosenwood" colur by Zar at home, and wanted to find also black oilbased stain in my nearby shop.
But diden´t find any, so had to buy waterbased black stain ( mdf hates water )
And i try some different approach with the stain, and to work "wet in wet" gave the most natural results.
First let the Rosewood oilbased stain saturate/impregnate the mdf, go over with more stain on a cloth until you se it dosent soaks in anymore.
Then 5 min later go over the surface with black stain and a cloth, and "darker" the surface to your taste.
Now take a narrow brush and draw some "unregular" lines with black stain.
And work out the black "lines" with "small piece of cloth" and with small movements only from top to bottom or vise vorse.
Make your black lines of stain looks like the irregular natural veins as Walnut have.
Let dry 24 hours and varnish it with 3 layers of polyurethane varnish or similar semi-gloss varnish.
If you want you can also polish it afterwards with car-products like rubbing and wax.
Don´t want to spoil the project, but better pic´s are coming later.
to be continued
/John
And tuned to 23 hz with 35 cm port (102 mm inside) looks good in simulation.
And because i wanted it slim, I chose to use a side-mounted woofer.
Build the box in 22 mm mdf and with 2 extra reinforcements inside.
Dont know why, but i always gets stressed when it's time to glue all the pieces together, & when you've got all 8 pieces together, they all slide around in the slippery wood glue.......and time is of the essence if you want a real solid box.
Also had many narrow small pieces of mdf "leftovers", so I decided to build the baffle stronger with slats, and also at the same time get a design-thing. And also made the port-endings in mdf.
I would then try to make all these diy speakerboxes in mdf look like walnut with 2 different staincolurs.
I had oilbased stain in "Rosenwood" colur by Zar at home, and wanted to find also black oilbased stain in my nearby shop.
But diden´t find any, so had to buy waterbased black stain ( mdf hates water )
And i try some different approach with the stain, and to work "wet in wet" gave the most natural results.
First let the Rosewood oilbased stain saturate/impregnate the mdf, go over with more stain on a cloth until you se it dosent soaks in anymore.
Then 5 min later go over the surface with black stain and a cloth, and "darker" the surface to your taste.
Now take a narrow brush and draw some "unregular" lines with black stain.
And work out the black "lines" with "small piece of cloth" and with small movements only from top to bottom or vise vorse.
Make your black lines of stain looks like the irregular natural veins as Walnut have.
Let dry 24 hours and varnish it with 3 layers of polyurethane varnish or similar semi-gloss varnish.
If you want you can also polish it afterwards with car-products like rubbing and wax.
Don´t want to spoil the project, but better pic´s are coming later.
to be continued
/John
Attachments
-
 IMG_20240516_163020.jpg563.1 KB · Views: 83
 -
 IMG_20240514_171505.jpg207.6 KB · Views: 80
 -
 IMG_20240420_185014.jpg394.1 KB · Views: 74
 -
 IMG_20240420_185026.jpg460.7 KB · Views: 90
 -
 IMG_20240426_164923.jpg446.1 KB · Views: 86
 -
 IMG_20240428_164922.jpg441.9 KB · Views: 92
 -
 IMG_20240428_164938.jpg337.9 KB · Views: 82
 -
 IMG_20240507_191404.jpg322 KB · Views: 79
 -
 IMG_20240419_195242.jpg378.1 KB · Views: 78
 -
 IMG_20240419_194149.jpg260.5 KB · Views: 74
 -
 IMG_20240419_185528.jpg206.6 KB · Views: 70
 -
 IMG_20240416_214358.jpg454.6 KB · Views: 78
 -
 IMG_20240417_191801.jpg512.8 KB · Views: 79
 -
 IMG_20240418_182831.jpg331.1 KB · Views: 68
 -
 IMG_20240418_192415.jpg212.8 KB · Views: 62
 -
 IMG_20240419_081224.jpg315.6 KB · Views: 64
 -
 IMG_20240419_155513.jpg530.2 KB · Views: 68
 -
 IMG_20240509_191353.jpg331.9 KB · Views: 65
 -
 IMG_20240509_191342.jpg420.4 KB · Views: 70
 -
 IMG_20240510_125440.jpg333.7 KB · Views: 75
Instead of the finish and look, I'd worry about sound(proofness)
Why don't you cover the box with a sheet of lead? I know it would add weight, as the 2 mm quality is thin... maybe a double layer with gum inside.
Yeah, conflicts...then you are obliged to lay it on the floor cos it is heavy... but you don't want it
Why don't you cover the box with a sheet of lead? I know it would add weight, as the 2 mm quality is thin... maybe a double layer with gum inside.
Yeah, conflicts...then you are obliged to lay it on the floor cos it is heavy... but you don't want it
Thanks for sharing these details showing how much you put into a new speaker build. I think it highlights how many stages are actually needed to build a box.
I wanted to really enjoy the woodworking side of builds, but it has escaped me up to know and i have tried several times. once you get beyond a very small cabinet the amount of bracing to stop the things from vibrating is a very important aspect and it is difficult to fix once the cabinets are assembled.
How did you shape the tweeter Pod ? is that all hand work with chisels and files ?
When im doing someting, i always "all in" and never take shortcuts.Instead of the finish and look, I'd worry about sound(proofness)
Why don't you cover the box with a sheet of lead? I know it would add weight, as the 2 mm quality is thin... maybe a double layer with gum inside.
Yeah, conflicts...then you are obliged to lay it on the floor cos it is heavy... but you don't want it
And the cabinettes needs to be without putty knife (because the stain has problem to get attached) so pieces have to fit well.
And with 3 layers of polyurethane varnish, it help also to seal possible small air leaks (and to make the box 5% stronger)
Do you think it will benefit with gum inside?
Thanks Ray you have a big point in "it highlights how many stages are actually needed to build a box"How did you shape the tweeter Pod ? is that all hand work with chisels and files ?
Of course you can simplify things by taking some "design" away, and use a weak woofer 😉
And yes, bracing is important, and i tryed bracing in my small 4 liter midrange-box but took it away when i was filling the inside with much filling. (because it was so diffecult to place the filling because the small boxsize)
But the midrange-box has "a war" inside when im playing real high SPL, so maby in the future i have to build the box in 22 mm mdf all around insteed of 22 mm baffle and 16-19 mm mdf at other walls.
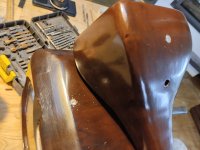
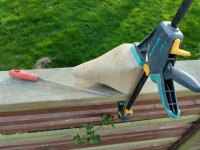
My tools are ordenary "hobby-tools", and i have jigsaw, small table saw, router ....& my best buy an oscillating sander 👍
Shapeing the tweeter pod was done with alot of beer and whiskey hahaha...a joke
used table saw, hand saw, files, sharp knife, chisels and my oscillating sander.
And if i make one today i will had shape the pieses more, before glueing them together.
But i had no design-plan when glueing pieces together, so it end up with more work of course.
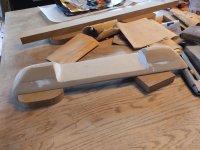
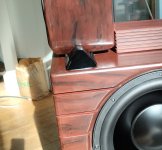
Okey, so now i had boxes for 1 tweeter, 1 midrange and 1 woofer...And all i have to do now is building 1 more of each.
But was thinking alot on "bafflestep-problem" in the 2-600 hz region because of the small box, and wanted to integrate the midrange-box more to the woofers baffle (to maby get some "less" bafflestep dipp)
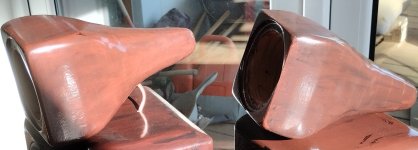
Had smaller pieces of leftover mdf, and just "brainstormed"...and ended up whit this.
Then i also had to solve how to put the tweeter over the midrange, and had a small round neo-magnet.
So i drilld a hole in the tweeter and forced the magnet in, and the opposite in the midrangebox with a piece of a bolt.
Here i had some bad luck because the bolt wasen´t reacting with the neomagnet aka non magnetic Grrrrr.
So had to take it out and replace it ( not easy when it was forced in!..but finaly i was succesful.
But neomagnet was not enough to keep the tweeter stable (the tweeter was heavy), so i had to come up with something more.
Had some meters of copper brake pipe in my garage, so cut of ca 80 mm and bend it.
Then drilled skewed inwards both in the tweeter & midrange and adjust the brake pipe to fit.(brake pipe make me be able also to aim the tweeter as i please)
So now 1 side is ready to go!
But when you build without plans/drawings and do it all by hand, it not easy .....especially with hobby tools.
to be continued
/John
But was thinking alot on "bafflestep-problem" in the 2-600 hz region because of the small box, and wanted to integrate the midrange-box more to the woofers baffle (to maby get some "less" bafflestep dipp)
Had smaller pieces of leftover mdf, and just "brainstormed"...and ended up whit this.
Then i also had to solve how to put the tweeter over the midrange, and had a small round neo-magnet.
So i drilld a hole in the tweeter and forced the magnet in, and the opposite in the midrangebox with a piece of a bolt.
Here i had some bad luck because the bolt wasen´t reacting with the neomagnet aka non magnetic Grrrrr.
So had to take it out and replace it ( not easy when it was forced in!..but finaly i was succesful.
But neomagnet was not enough to keep the tweeter stable (the tweeter was heavy), so i had to come up with something more.
Had some meters of copper brake pipe in my garage, so cut of ca 80 mm and bend it.
Then drilled skewed inwards both in the tweeter & midrange and adjust the brake pipe to fit.(brake pipe make me be able also to aim the tweeter as i please)
So now 1 side is ready to go!
But when you build without plans/drawings and do it all by hand, it not easy .....especially with hobby tools.
to be continued
/John
Attachments

I was talking about the benefits of a 2mm lead sheet first, then you can put dampingDo you think it will benefit with gum inside?
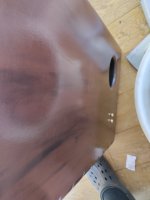
Some close-up photos, but hard for my cheep mobilecamera to get good pics, and the stain/colure shift very much depend on sunlight.
Camera has it hard to get focus.
to be continued
/John
Camera has it hard to get focus.
to be continued
/John
Attachments
Real lead or do you mean bitumen cheets?I was talking about the benefits of a 2mm lead sheet first, then you can put damping
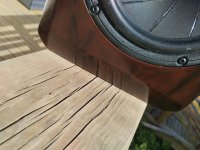
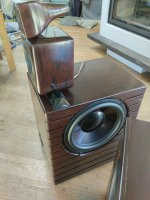
it was not easy to manufacture an "identical" tweeter and midrange cabinet 🙄
And i had to accept some "small" differences.
Before the varnish i put the midrange-boxes side to side, and notice i had to plane some more att two corners.(the box doesn't have much surface area that isn't rounded)
And it all end up okey (stain i quite easy to work with)
The tweeter cabinette was more work to get a "copy" of, but like to see that things are handmade, so didn't struggle to create an exact match.
Easyest was the woofer-box because i had made a drawing of the wide deep and hight.
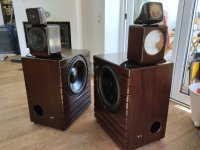
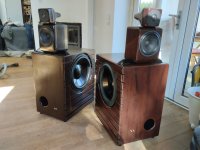
W 380 + the ribbs= 400 x H 600 x D 560
to be continued
/John
And i had to accept some "small" differences.
Before the varnish i put the midrange-boxes side to side, and notice i had to plane some more att two corners.(the box doesn't have much surface area that isn't rounded)
And it all end up okey (stain i quite easy to work with)
The tweeter cabinette was more work to get a "copy" of, but like to see that things are handmade, so didn't struggle to create an exact match.
Easyest was the woofer-box because i had made a drawing of the wide deep and hight.
W 380 + the ribbs= 400 x H 600 x D 560
to be continued
/John
Attachments
-
 IMG_20240522_143823.jpg426.6 KB · Views: 45
 -
 IMG_20240522_143936.jpg402.8 KB · Views: 37
 -
 IMG_20240522_143641.jpg362.5 KB · Views: 38
 -
 IMG_20240514_174619 (2).jpg207 KB · Views: 37
 -
 IMG_20240510_185140.jpg577.2 KB · Views: 37
 -
 IMG_20240506_145214.jpg426.7 KB · Views: 47
 -
 IMG_20240506_131805.jpg455 KB · Views: 39
 -
 IMG_20240506_130728.jpg309.5 KB · Views: 42
 -
 IMG_20240506_124359.jpg281.1 KB · Views: 39
 -
 IMG_20240506_124355.jpg354.5 KB · Views: 31
 -
 IMG_20240506_120254.jpg397.4 KB · Views: 40
 -
 IMG_20240506_115137.jpg245 KB · Views: 38
 -
 IMG_20240506_114503.jpg456.4 KB · Views: 39
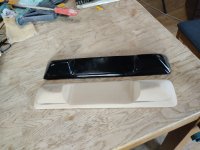
I had some 8 mm mdf left also, so i I decided to build a external xover-box.
Not totaly happy with the design, but will make a decision later.
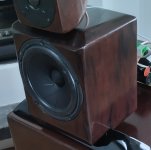
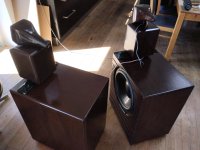
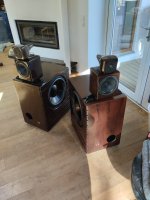
So here is my slim 3 way Walnut imitation.
Mesaurements will come.
to be continued
/John
Not totaly happy with the design, but will make a decision later.
So here is my slim 3 way Walnut imitation.
Mesaurements will come.
to be continued
/John
Attachments
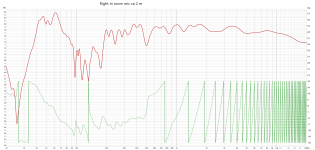
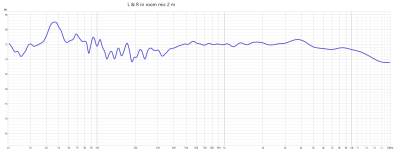
Driver used is these, and this is right speakers first in room mesaurement.
to be continued
/John
to be continued
/John
Attachments
-
 Right in room mic ca 2 m.png105.5 KB · Views: 55
 -
dayton-audio-rss390ho-4-specifications-46177.pdf242.2 KB · Views: 38
-
18m-4631t00.pdf286.9 KB · Views: 40
-
d2905-930000.pdf240.3 KB · Views: 49
-
 IMG_20240516_163048 (2).jpg404.7 KB · Views: 46
 -
 6c403a6a332d197c6e97f637d8b4d3fd.png226.2 KB · Views: 45
 -
 559546691_6dcf3eae-5227-46e1-898a-74861923014a.jpg364.2 KB · Views: 46
the midrange-box.....My only goal was to make it small at ca 7-8 liter, i cut down the 7-8 liter to 4 liter and used much filling
But the midrange-box has "a war" inside when im playing real high SPL
use a bigger box, much much bigger
Are you absolutely sure?use a bigger box, much much bigger
Big box = less micro cone-controll
Smaller box= more total controll of the cone movement.
The spring effect...no?

Smaller box= more total controll of the cone movement.
Big box = less micro cone-controll
no box/open baffe = ?????
Think open baffle need more selected drivers.no box/open baffe = ?????
or ?
- Home
- Loudspeakers
- Multi-Way
- 3 way build and some MDF inspiration with shapes & stains