I've been looking at getting a new set of speakers for my desktop for sometime now, I've been using a pair of KEF Q15s for years but they've always been pretty underwhelming. After looking around at a bunch of options I decided to pull the trigger on the NX Bravo kit from GR Research, I've always wanted to build a set of speakers but starting from scratch is currently out of my wheelhouse.
There doesn't seem to be a ton of information around the Internet on these so I figured I'd create a thread detailing my build of this set of speakers. I purchased the kit late last week and after some international shipping paperwork issues it arrived at my shop in Ontario Canada today in 2 well packed boxes.
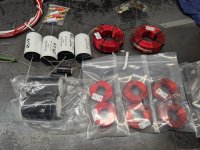
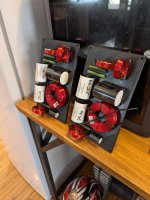
The kit includes pretty much everything you will need to assemble the speakers including solder, shrink tube, hook up wire and 3 giant sheets of no rez. I didn't buy the flat pack as I opted to design my own enclosures and because of cost, I already spent enough money.

The drivers look pretty nice, the woofers are small polymer basket drivers that look to have pretty low excursion l but since these are for small rooms and desks they should be fine. The planar magnetic tweeters are surprisingly heavy and seem to have fur coming out of them, must be some kind of damping. Maybe they could be wrapped in some very thin grill cloth to hide the fuz?


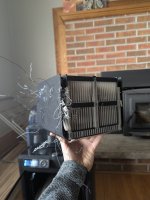
Included are a pair of 3D printed waveguides for the tweeters and rear cups to seal the back of the tweeters. While this is a cool idea the 3D print quality on the back side is not great. I have a 3D printer and can definitely do better, GR Research was kind enough to provide me with the waveguide file so I can make my own out of different materials other than PLA.

The ports provided are unfortunately not very nice at all and really look like plumbing parts. They have hard edges everywhere and the diameter actually tapers down towards the port entrance, since they have 3D printing capabilities in house why they don't print their own ports is beyond me. I won't be using these since I can do so much better.

They certainly didn't cheap out on the crossover components though, they provided air core inductors and huge poly caps for everything. Included are the tube connectors Danny goes on and on about on his YouTube channel but these are really just banana plugs 🍌, I don't care how you sugar coat it. One thing that I do find kind of annoying is that they do not provide any mounting board for the crossover components and simply give you a schematic and a photo. For a lot costing as much as this a simple layout board would have been appreciated.

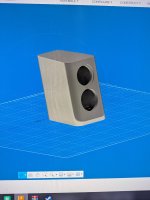
My enclosures will be 3D printed in sections and bonded together, the walls are hollow so they can be filled with epoxy. The only wood will be a 3/4" thick maple baffle.


There doesn't seem to be a ton of information around the Internet on these so I figured I'd create a thread detailing my build of this set of speakers. I purchased the kit late last week and after some international shipping paperwork issues it arrived at my shop in Ontario Canada today in 2 well packed boxes.
The kit includes pretty much everything you will need to assemble the speakers including solder, shrink tube, hook up wire and 3 giant sheets of no rez. I didn't buy the flat pack as I opted to design my own enclosures and because of cost, I already spent enough money.
The drivers look pretty nice, the woofers are small polymer basket drivers that look to have pretty low excursion l but since these are for small rooms and desks they should be fine. The planar magnetic tweeters are surprisingly heavy and seem to have fur coming out of them, must be some kind of damping. Maybe they could be wrapped in some very thin grill cloth to hide the fuz?
Included are a pair of 3D printed waveguides for the tweeters and rear cups to seal the back of the tweeters. While this is a cool idea the 3D print quality on the back side is not great. I have a 3D printer and can definitely do better, GR Research was kind enough to provide me with the waveguide file so I can make my own out of different materials other than PLA.
The ports provided are unfortunately not very nice at all and really look like plumbing parts. They have hard edges everywhere and the diameter actually tapers down towards the port entrance, since they have 3D printing capabilities in house why they don't print their own ports is beyond me. I won't be using these since I can do so much better.
They certainly didn't cheap out on the crossover components though, they provided air core inductors and huge poly caps for everything. Included are the tube connectors Danny goes on and on about on his YouTube channel but these are really just banana plugs 🍌, I don't care how you sugar coat it. One thing that I do find kind of annoying is that they do not provide any mounting board for the crossover components and simply give you a schematic and a photo. For a lot costing as much as this a simple layout board would have been appreciated.
My enclosures will be 3D printed in sections and bonded together, the walls are hollow so they can be filled with epoxy. The only wood will be a 3/4" thick maple baffle.
Attachments
Last edited:

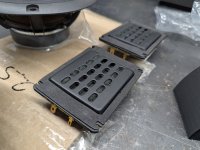
Since these do not include mounting boards for the crossover hardware I'll 3D print some of my own. I'll have a prototype completed before I wake up tomorrow morning.

Looks ambitious. I'll be watching to see what you come up with. Finished mine recently and still in the honeymoon phase, but these seem pretty nice. Went my own way with certain aspects of the build.. more effort in the port, cabinet and driver damping, external crossover, damped back cups, melamine foam rather than insulation for absorption, reinforced baffle. I also used a precision milligram scale to make sure I had the exact same amount of fiberglass insulation in each back cup, just to help me sleep better at night. They don't seem to advertise it but the tweeters do come as a matched pair. Thought it may be worth the small extra effort. I only use them above 80Hz to avoid any limited xmax concerns, and let a servo sub handle the bottom end.
Attachments

Website has no info about drivers. What brand and model are they? The woofer has quite little Xmax by the looks of the cone surround.
They are a pretty low xmax driver, but these are primarily for small rooms or desktops so they should do just fine.Website has no info about drivers. What brand and model are they? The woofer has quite little Xmax by the looks of the cone surround.
Both crossover boards built and populated, there's definitely some decent quality parts including with this kit. That's really to be expected given the price though.
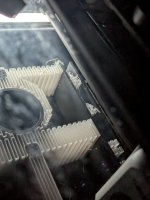
Unfortunately I ran into an issue with my 3D printer and that I can't find a good way to trick the filament changer into cooperating with 5KG spools so I need to find a workaround for this or buy smaller spools.
Unfortunately I ran into an issue with my 3D printer and that I can't find a good way to trick the filament changer into cooperating with 5KG spools so I need to find a workaround for this or buy smaller spools.
Attachments
Progress has started on the 3D printed enclosure but things have not started off so well. The extruder knocked over the purged tower of filament used to clear the nozzle so it's simply dumping the excess filament into midair. The waste chute backed up inside the printer and is likely what started this whole mess.
I thought about aborting the print but since it was already almost 2 days in I just decided to let it go. When I get home tonight it will have either printed enough new material to recover or I'll be faced with a plastic spaghetti disaster. High amounts of filament changes really suck and seem to be causing more problems than I expected.
I thought about aborting the print but since it was already almost 2 days in I just decided to let it go. When I get home tonight it will have either printed enough new material to recover or I'll be faced with a plastic spaghetti disaster. High amounts of filament changes really suck and seem to be causing more problems than I expected.
Attachments


I used the flat pack option from Denton Woodworkers. Rather than the included side-to-side stick brace, I decided to do a KEF / PS Audio style bracing arrangement between the two side panels @38.2% up (golden rectangle) with a Sorbothane boundary compressed ~10%. Then another hardwood brace between the driver backplate and rear panel, also with the slightly compressed Sorbothane for damping. These two bracing structures are in close proximity but not coupled together.
I'm in Canada and getting the flat pack here was going to cost me a small fortune. I also hate woodworking so this seemed like a viable alternative. We'll see how it turned out later tonight when I'm home.
Well after a whole bunch of issues I did have a successful print, only 7 more pieces to go 😂.
Its pretty nasty at first glance but in reality it will work just fine after a little sanding. I made some changes that should hopefully help the rest print a bit better.
Its pretty nasty at first glance but in reality it will work just fine after a little sanding. I made some changes that should hopefully help the rest print a bit better.
Attachments

Hi from Ottawa
I think the 3D printed cabinets will be the coolest part of the build. Are you planning to fill them with something, like sand? for mass loading. The woofers are designed to be crossover un-chalenging and easily implemented. Waiting for measurements and listening impression. Yeah, the tweeter looks like BG Neo3 plannar. Never heard kit from GR-Research.
I think the 3D printed cabinets will be the coolest part of the build. Are you planning to fill them with something, like sand? for mass loading. The woofers are designed to be crossover un-chalenging and easily implemented. Waiting for measurements and listening impression. Yeah, the tweeter looks like BG Neo3 plannar. Never heard kit from GR-Research.
I'm most likely going to fill them with epoxy or that plaster mix I see people using in 3D printed enclosures.
Unfortunately I have some delays because I need to re-do my model, printing the enclosure in these big blocks with massive amounts of support filament just isn't working. I've had multiple failures after the first piece barely got by. I'm going to remake the model with each wall as a separate piece and bond it together when finished.
Unfortunately I have some delays because I need to re-do my model, printing the enclosure in these big blocks with massive amounts of support filament just isn't working. I've had multiple failures after the first piece barely got by. I'm going to remake the model with each wall as a separate piece and bond it together when finished.
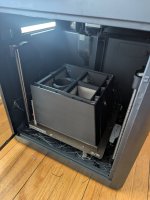
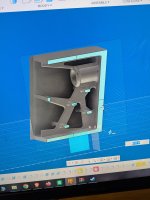
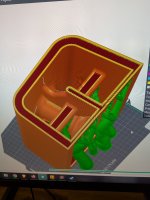
Ok, so I sat down this afternoon and started a new design from scratch that will be easier to print. Unfortunately I could not get fusion 360 to cooperate in making the walls hollow so I'll just make them very dense instead and add some damping to the inside of the cabinet. I'm still fairly new to this 3D software and getting this drawing to where it is really tested my patience. When everything goes right in fusion it's great but if you try and do something the wrong way it can really be frustrating.
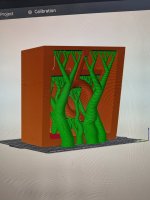
This will be split into 4 pieces and printed in PLA plastic, including the supports that will be printed in a tree design that's easier to remove. Not having to do filament changes this time around will save many hours. I'll have to start thinking about what I want to do for a crossover enclosure.
This will be split into 4 pieces and printed in PLA plastic, including the supports that will be printed in a tree design that's easier to remove. Not having to do filament changes this time around will save many hours. I'll have to start thinking about what I want to do for a crossover enclosure.
Attachments

- Home
- Loudspeakers
- Multi-Way
- GR Research NX Bravo kit build