Hi everyone
I'm Andrea from Italy and I have been passionate about restoration for many years (about 20).
Over the last years I have often worked on old B&W DM6 / DM16 / 802 MS2 / 801 MS2 , ProAC EBS and Studio20, ESB 7/06 7/07 7/08, JBL L300 and many more
and I would like to share my works with you
I'm Andrea from Italy and I have been passionate about restoration for many years (about 20).
Over the last years I have often worked on old B&W DM6 / DM16 / 802 MS2 / 801 MS2 , ProAC EBS and Studio20, ESB 7/06 7/07 7/08, JBL L300 and many more
and I would like to share my works with you
Last edited:

my interventions are all aimed at the conservative restoration of the spaker as follows:
1) no distortions on the original crossover scheme
2) improvement of components
3) creation of a crossover from scratch which is replaced by the standard one (thus guaranteeing the reversibility of the intervention)
4) NO cuts, NO modifications to the cabinets, at most switching from a single pair of binding posts to a double one if the owner is interested in the possibility of bi-amping.
5) all my interventions are followed by CLIO measurements, both electrical and acoustic, to confirm the effectiveness of the intervention
my approach aims to understand things and do work that is as state of the art as possible!!!
As soon as possible I will insert photos and descriptions... I hope they can help someone
Good music everyone A.
Interesting👍Looking forward to seeing more of your work.
That reminds me that I have a pair of DM1 in the basement. It was a pretty cheap deal on the local flea market. But unfortunately, despite the seller telling otherwise, the (mid) tweeter are broken. The rest of the loudspeaker is fine. Maybe you have an idea how to proceed with the DM1?
That reminds me that I have a pair of DM1 in the basement. It was a pretty cheap deal on the local flea market. But unfortunately, despite the seller telling otherwise, the (mid) tweeter are broken. The rest of the loudspeaker is fine. Maybe you have an idea how to proceed with the DM1?
Ciao Andrea
I am curious about the restoration of the ESB 7 series designed by Renato Giussani, it will be interesting.
Pic: https://audiocostruzioni.com/prodotto/esb-7-08-ii/

I am curious about the restoration of the ESB 7 series designed by Renato Giussani, it will be interesting.
Pic: https://audiocostruzioni.com/prodotto/esb-7-08-ii/
About the //06 I have to work on a couple in the next few days
at home I should have the PCBs of the crossovers for the 3 models 7/06 7/07 7/08 that I had designed and had made
at home I should have the PCBs of the crossovers for the 3 models 7/06 7/07 7/08 that I had designed and had made
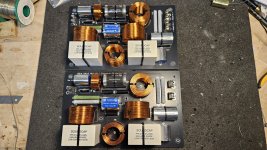
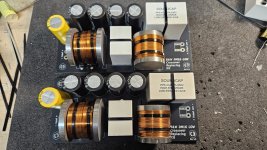
This is the kit I studied which includes various configurations
1) mono/biamp
2) fused bypass
3) Attenuators bypass
4) possibility of connecting faston and soldering the cable
1) mono/biamp
2) fused bypass
3) Attenuators bypass
4) possibility of connecting faston and soldering the cable
Attachments
Oh boy, they are way too much better than xo you find in commercial speaker...

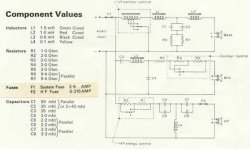
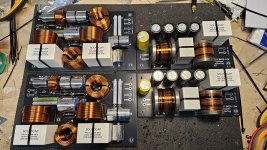
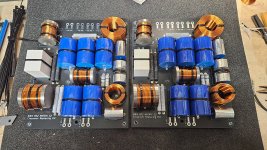
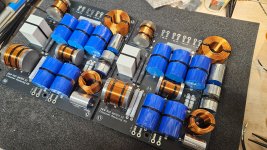
the specifications in this case were
1) eliminate the APOC (Audio Powered Overload Protection) system
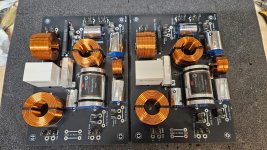
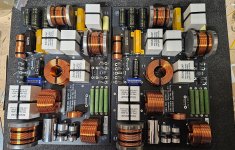
2) have 2 separate PCBs, one for the low path and one for the medium-high path
3) optimize everything we could in terms of components
1) eliminate the APOC (Audio Powered Overload Protection) system
2) have 2 separate PCBs, one for the low path and one for the medium-high path
3) optimize everything we could in terms of components
Attachments

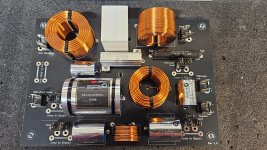
1) eliminate the APOC (Audio Powered Overload Protection) system
2) the PCB had to have the maximum dimensions to fit into the original position
3) optimize everything we could in terms of components
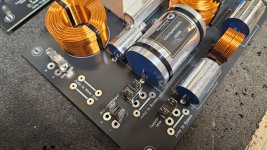
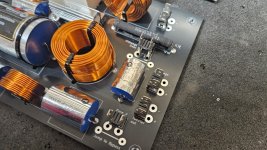
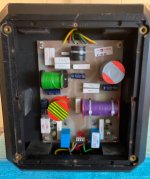
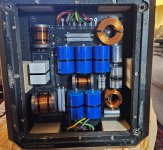
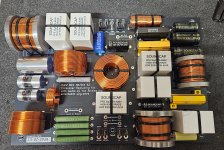
you can see a comparison photo between before and after
2) the PCB had to have the maximum dimensions to fit into the original position
3) optimize everything we could in terms of components
you can see a comparison photo between before and after
Attachments
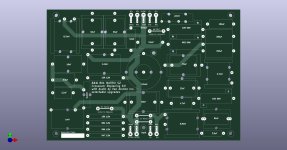
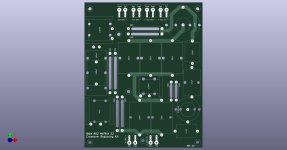
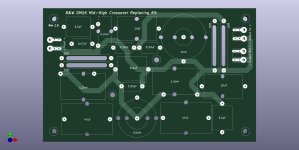
Qui ho messo alcune foto dei vari PCB che ho progettato per i vari B&W
they all exist in reality, but to better show the details I took them from the KiCad 3D viewer
they all exist in reality, but to better show the details I took them from the KiCad 3D viewer
Attachments
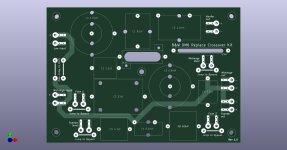

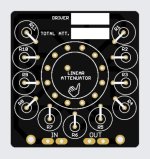
for the dm6, where the use of two attenuators external to the crossover is also envisaged, I created this small kit which allows you to have 12 adjustment steps instead of the standard 3. the first step is a bypass, the other 11 can be calculated and adjusted as desired simply based on the resistance value that will be soldered
this value is then reported on the small white pad at the top so as not to make mistakes given that on the DM6 the tweeter attenuator and the midrange attenuator have different maximum attenuation values (therefore the resistors to be used in the two cases are different)
this value is then reported on the small white pad at the top so as not to make mistakes given that on the DM6 the tweeter attenuator and the midrange attenuator have different maximum attenuation values (therefore the resistors to be used in the two cases are different)
Attachments
using higher quality components and replacing others that are now ruined by time (electrolytics, inductive resistors or poorly cemented coils) while maintaining the original scheme elevates the sound to a better level
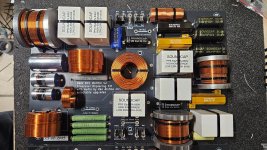
once the B&Ws are finished, I would move on to another fairly simple project but which I have made many crossover pairs in recent years.
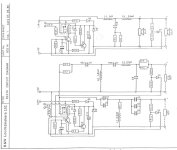
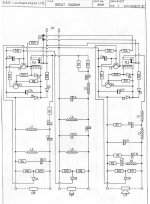
the JBL L300 from Nelson Pass
here we have the crossover diagram
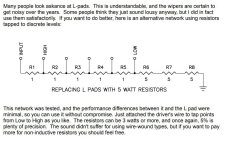
when I made some L300s for a friend I also dedicated some time to studying some Lpads that could replace the low quality commercial ones starting from the basis of the project reported in Pass's paper
the JBL L300 from Nelson Pass
here we have the crossover diagram
when I made some L300s for a friend I also dedicated some time to studying some Lpads that could replace the low quality commercial ones starting from the basis of the project reported in Pass's paper
Attachments

- Home
- Loudspeakers
- Multi-Way
- New life for old glorious B&W / ProAC / ESB / JBL and many more....